Documenting: My SDA-1c upgrades from start to finish
Options

plastic_avatar
Posts: 747
Part 1 - The Deal

Two days later, marked down to $149. I am able to buy them. Original owner and wife are VERY nice. He even used to haunt this forum! SO, I'll work just a little harder to make them awesome.
I drive an hour and a half North to Pittsburgh, and realize (as I carry the first one to my car) that 85 pounds feels heavier than it used to...
Part 2 - Evaluate

I believe his wife had candles on top of one of them. The other had something splatter on it.
Fluids were spilled and dripped on the veneer, the grill, the speakers, and the fascia.
I have a lot of cleaning to do...
Part 3 - Dissasembly

I know what I want to do, and I trust the owner about the condition of the speakers, so I don't even bother testing them before I get started on the tear-down.
It'll be easier to clean the cabinets and all the drivers once they're out.
I decide to find a way to put the 1c and my Monitor 12 Series 2 on wheels. That will have to make it easier to swap them out with each other for A/B listening. And, surely, wheels will act like spikes to a degree, yes?
Oh, and the empty boxes weigh a solid 50 pounds. Empty, the things weight almost as much as my Monitors. BEAST!
Part 4 - Evaluation

With the drivers and crossovers out, I can work to put everything in its place for cleaning, upgrading, and modding.
I can see the cabinets are in good shape underneath the grime, which is GREAT.
- The passive radiators need rotated. I did the same thing with all the speakers/radiators in my Monitors. You can see where 30 years of gravity pulled the cones towards the ground. No biggie. Just something everyone should consider.
- The dust caps are in sad shape. Only means I have incentive to try out the phase plug mod. I wonder if I could 3D print them, if I can't score some of the metal ones a guru here made...
- Tweeter domes are crinkled, like slightly crumpled paper. Planned to replace tweeters with RD0194 versions anyway. No one had any! Found an excellent thread on upgrading the SL2000! Decide to try the Wuhan mod to replace the domes on the SL2000 with some silk ones. Parts on order from China. Likely take 4 weeks to arrive.
Did you know there are 2 different kinds of faceplates on the SL2000? I didn't... So, after some schooling from forum gurus, I found out mine are the easier to mod versions! Woot!

And some came with a hard dome behind the tweeter dome, but others came with felt. Consensus is, take off the dome bits and replace with felt.


Next?
I'm make a master list of mods I want to work on, links to threads about those mods, and thoughts on all of it.
I will post updates over the next few months about my progress. I hope anyone with suggestions speaks up! I wouldn't be where I am in my project today if it wasn't for the help of a group of brainiacs this week.
I hope this thread helps at least one person find their way to some new info they didn't know about, introduces them to the work of some of the great people here, and (selfishly) helps me do the best job I can on what I hope will be a pair of amazing speakers")
Two days later, marked down to $149. I am able to buy them. Original owner and wife are VERY nice. He even used to haunt this forum! SO, I'll work just a little harder to make them awesome.
I drive an hour and a half North to Pittsburgh, and realize (as I carry the first one to my car) that 85 pounds feels heavier than it used to...
Part 2 - Evaluate
I believe his wife had candles on top of one of them. The other had something splatter on it.
Fluids were spilled and dripped on the veneer, the grill, the speakers, and the fascia.
I have a lot of cleaning to do...
Part 3 - Dissasembly
I know what I want to do, and I trust the owner about the condition of the speakers, so I don't even bother testing them before I get started on the tear-down.
It'll be easier to clean the cabinets and all the drivers once they're out.
I decide to find a way to put the 1c and my Monitor 12 Series 2 on wheels. That will have to make it easier to swap them out with each other for A/B listening. And, surely, wheels will act like spikes to a degree, yes?
Oh, and the empty boxes weigh a solid 50 pounds. Empty, the things weight almost as much as my Monitors. BEAST!
Part 4 - Evaluation
With the drivers and crossovers out, I can work to put everything in its place for cleaning, upgrading, and modding.
I can see the cabinets are in good shape underneath the grime, which is GREAT.
- The passive radiators need rotated. I did the same thing with all the speakers/radiators in my Monitors. You can see where 30 years of gravity pulled the cones towards the ground. No biggie. Just something everyone should consider.
- The dust caps are in sad shape. Only means I have incentive to try out the phase plug mod. I wonder if I could 3D print them, if I can't score some of the metal ones a guru here made...
- Tweeter domes are crinkled, like slightly crumpled paper. Planned to replace tweeters with RD0194 versions anyway. No one had any! Found an excellent thread on upgrading the SL2000! Decide to try the Wuhan mod to replace the domes on the SL2000 with some silk ones. Parts on order from China. Likely take 4 weeks to arrive.
Did you know there are 2 different kinds of faceplates on the SL2000? I didn't... So, after some schooling from forum gurus, I found out mine are the easier to mod versions! Woot!
And some came with a hard dome behind the tweeter dome, but others came with felt. Consensus is, take off the dome bits and replace with felt.
Next?
I'm make a master list of mods I want to work on, links to threads about those mods, and thoughts on all of it.
I will post updates over the next few months about my progress. I hope anyone with suggestions speaks up! I wouldn't be where I am in my project today if it wasn't for the help of a group of brainiacs this week.
I hope this thread helps at least one person find their way to some new info they didn't know about, introduces them to the work of some of the great people here, and (selfishly) helps me do the best job I can on what I hope will be a pair of amazing speakers
The Thrifty Setups in Mah House Big thrifty stereo in the basement w/ my custom SDA-1C (built with help from kind forum members) * Beautiful 1966 MCM GE console upgraded w/ Bluetooth, Dual turntable, and Paradigm speakers in family room * Swanky 1980 Realistic system and great TEAC eq with dancing colored lights in the living room * custom 5B on a system for my Dad * Ye Olde college stereo in the garage
Comments
-
Dust caps can be fixed with a vacuum, ask for instructions.
Wheels are not spikes and do not act like spikes. Easier yes, but not even close.
I found that with the metal button feet Polk provided allowed my 2.3tls to actually vibrate out of position ever so slightly. I'd sit down at night for a session and again the next day, something would be "off". I'd get up and measure distance from wall and each other and fund one or both had moved from my previous position. Sometimes they would angle in a bit sometimes they would angle out. Spikes stopped that. Mine were on carpet that was not thick at all and in a basement. Carpet over concrete, keep in mind they're well over 100# each and they moved from speaker movement during play.
Wheels will make it easier for them to move.
If I was you my first move would be to get epoxy on the magnets on all drivers. Those mw6511's are very very hard to buy. In the past year all Polk mw65xx drivers have started to dry up and cost is going sky high. In the past drivers could be bought for $40-$50, they are now approaching $70+ used. -
Typo! And working, so I missed my hour edit window! AUUUUGH! The writer in me died a little this morning. Yeah, I have issues...
"I'll make a master list of mods...' not 'I'm make a master list of mods...'
pdogg:
Holy crap. I didn't know prices went up so much.
Magnet creep = Looked over a lot of talk about this. Confused as to how I really determine if it's o.k. to glue, or whether I need to learn magnet surgery.
Spikes = [thinking...]. Maybe... spikes but get the wheeled truck/low-rider mini dolly platforms to slide under...The Thrifty Setups in Mah House Big thrifty stereo in the basement w/ my custom SDA-1C (built with help from kind forum members) * Beautiful 1966 MCM GE console upgraded w/ Bluetooth, Dual turntable, and Paradigm speakers in family room * Swanky 1980 Realistic system and great TEAC eq with dancing colored lights in the living room * custom 5B on a system for my Dad * Ye Olde college stereo in the garage -
If the drivers are free flowing no scratchiness when even pressure is applied pushing in around outside dust cap, THEN GLUE UP. This is a good reason you should have taken time to listen to them first.
-
Well, I did press on each one like that to see if they moved right and didn't make noises.
I had a speaker in some Advents I got rid of that just didn't feel right and made a tiny scraping noise when pressed like you suggest. So I started offhandedly doing that whenever I look at speakers.
Should I try that again, with them out of the boxes? Flat or held vertical? Or do you think what I did was good enough?The Thrifty Setups in Mah House Big thrifty stereo in the basement w/ my custom SDA-1C (built with help from kind forum members) * Beautiful 1966 MCM GE console upgraded w/ Bluetooth, Dual turntable, and Paradigm speakers in family room * Swanky 1980 Realistic system and great TEAC eq with dancing colored lights in the living room * custom 5B on a system for my Dad * Ye Olde college stereo in the garage -
Will not hurt to do it again flat on a table to double check, then glue.
@lawdogg stated his testing he came to the conclusion that Gorilla glue epoxy held stronger than JB weld and Power grab adhesive.
Maybe he'll see this and chime in. I've not used the GG epoxy but he (@lawdogg) in a thread stated a two part epoxy was stronger than both PG and JB and he used Gorilla Glue in the same sentence. -
I would just rebuild all of the tweets with doped Wuhans and save some duckets.Don't take experimental gene therapies from known eugenicists.
-
Wuhans = I went ahead and ordered 8 domes.
That way, I've got 2 spares, 2 for my 5b, and 4 for the 1c. If I mess up, I have a buffer
(I'll put in a whole section based on VSAT's thread and the side conversations.)
Epoxy = Gimme all the suggestions, everybody! I'll be putting up my known parts/supplies list soon.The Thrifty Setups in Mah House Big thrifty stereo in the basement w/ my custom SDA-1C (built with help from kind forum members) * Beautiful 1966 MCM GE console upgraded w/ Bluetooth, Dual turntable, and Paradigm speakers in family room * Swanky 1980 Realistic system and great TEAC eq with dancing colored lights in the living room * custom 5B on a system for my Dad * Ye Olde college stereo in the garage -
Will not hurt to do it again flat on a table to double check, then glue.
@lawdogg stated his testing he came to the conclusion that Gorilla glue epoxy held stronger than JB weld and Power grab adhesive.
Maybe he'll see this and chime in. I've not used the GG epoxy but he (@lawdogg) in a thread stated a two part epoxy was stronger than both PG and JB and he used Gorilla Glue in the same sentence.
I think the 2-part epoxy I used in the drop test was from Harbor Freight. I use whatever is on the shelf at the hardware store.
Analysis of adhesives is fun but at the end of the day - no need to overthink it. my 3.1TLs
I will fix your shifted magnets for free.")
-
-
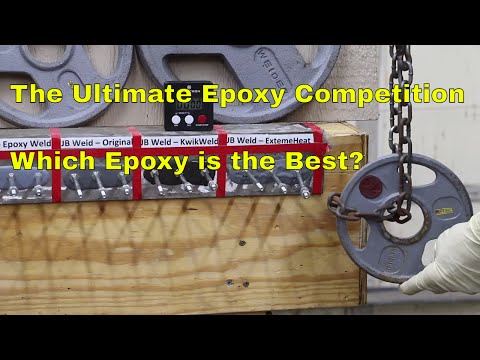
Epoxy vid = Interesting!
OG JB Weld or Devcon from that test.
I wonder if torsionally pliable is better for this application over torsional rigidity?
Engineers?The Thrifty Setups in Mah House Big thrifty stereo in the basement w/ my custom SDA-1C (built with help from kind forum members) * Beautiful 1966 MCM GE console upgraded w/ Bluetooth, Dual turntable, and Paradigm speakers in family room * Swanky 1980 Realistic system and great TEAC eq with dancing colored lights in the living room * custom 5B on a system for my Dad * Ye Olde college stereo in the garage -
Better epoxy? Yes, West Systems.
It's somewhat expensive and should be used with one of their fillers dependent on the application. Generally, 404 and 406 fillers are the best.Political Correctness'.........defined
"A doctrine fostered by a delusional, illogical minority and rabidly promoted by an unscrupulous mainstream media, which holds forth the proposition that it is entirely possible to pick up a t-u-r-d by the clean end."
President of Club Polk -
plastic_avatar wrote: »Epoxy vid = Interesting!
OG JB Weld or Devcon from that test.
I wonder if torsionally pliable is better for this application over torsional rigidity?
Engineers?
It would be interesting if he had tested something like West Systems G-flex with a filler like colloidal silica. I think that would have beaten all of them, at least with the Impact Test, because of its flexibility.
One important thing if you want to be *anal* about all this is that the pole pieces are steel but they are probably zinc chromate plated steel and also ferrite may not be the ideal bonding surface either unless it is ground roughly. Not really a good bonding surface at all. Peel strength over time is the key and especially if there will be repeated thermal cycles if it isn't stored in a climate controlled situation. If you wanted to take the time to grind it a little with a dremel wheel it would probably hold up over the coming decades a bit better. Especially important if you are going to live to 100 or so Slow cure is the way to go. Never 5 minute 😒 and you have plenty of time, especially if you are living to 100..... George / NJ
Polk 7B main speakers, std. mods+ (1979, orig owner)
Martin Logan Dynamo sub w/6ft 14awg Power Cord
Onkyo A-8017 integrated
Logitech Squeezebox Touch Streamer w/EDO applet
iFi nano iDSD DAC
iPurifier3
iDefender w/ iPower PS
Custom Steve Wilson 1m UPOCC Interconnect
iFi Mercury 0.5m OFHC continuous cast copper USB cable
Custom Ribbon Speaker Cables, 5ft long, 4N Copper, 14awg, ultra low inductance
Custom Vibration Isolation Speaker Stands and Sub Platform -
Gardenstater wrote: »If you wanted to take the time to grind it a little with a dremel wheel it would probably hold up over the coming decades a bit better. Especially important if you are going to live to 100 or so
Brain-in-a-box tech is my only hope.
But I have kids. So bring on the overkill builds!
The Thrifty Setups in Mah House Big thrifty stereo in the basement w/ my custom SDA-1C (built with help from kind forum members) * Beautiful 1966 MCM GE console upgraded w/ Bluetooth, Dual turntable, and Paradigm speakers in family room * Swanky 1980 Realistic system and great TEAC eq with dancing colored lights in the living room * custom 5B on a system for my Dad * Ye Olde college stereo in the garage -
Well then for overkill I also definitely like the idea of using a cyanoacrylate or one of the low viscosity Loctite anaerobic adhesives first and letting them wick into the cracks, before the epoxy. Probably makes it more like a 2 day job allowing for cure time.George / NJ
Polk 7B main speakers, std. mods+ (1979, orig owner)
Martin Logan Dynamo sub w/6ft 14awg Power Cord
Onkyo A-8017 integrated
Logitech Squeezebox Touch Streamer w/EDO applet
iFi nano iDSD DAC
iPurifier3
iDefender w/ iPower PS
Custom Steve Wilson 1m UPOCC Interconnect
iFi Mercury 0.5m OFHC continuous cast copper USB cable
Custom Ribbon Speaker Cables, 5ft long, 4N Copper, 14awg, ultra low inductance
Custom Vibration Isolation Speaker Stands and Sub Platform -
Jesse I was speaking to plastic avatar and if I'm not mistaken this is his thread . Misinformation is entirely your opinion here. pitdogg2 has related that he has seen epoxy lose its grip. I've seen it especially with the 5 min stuff. plated steel has a lot of lubricity to it and is not a good bonding surface. We need to lighten up this is a hobby. I was talking about lightly roughing the plated surface, not taking a bench grinder to the pole pieces (try small diamond point in dremel). But I'll try to not take offense 😉
PS: I clearly was stressing that it was overkill and he was asking about overkill. I think probably everyone got that when I mentioned if you're going to live till 100 etc..Post edited by Gardenstater onGeorge / NJ
Polk 7B main speakers, std. mods+ (1979, orig owner)
Martin Logan Dynamo sub w/6ft 14awg Power Cord
Onkyo A-8017 integrated
Logitech Squeezebox Touch Streamer w/EDO applet
iFi nano iDSD DAC
iPurifier3
iDefender w/ iPower PS
Custom Steve Wilson 1m UPOCC Interconnect
iFi Mercury 0.5m OFHC continuous cast copper USB cable
Custom Ribbon Speaker Cables, 5ft long, 4N Copper, 14awg, ultra low inductance
Custom Vibration Isolation Speaker Stands and Sub Platform -
I took a carbide lathe to a couple pole-pieces... Turned out better than factory.Don't take experimental gene therapies from known eugenicists.
-
If I know you I am sure it did! And I'm sure you got satisfaction in making something better.George / NJ
Polk 7B main speakers, std. mods+ (1979, orig owner)
Martin Logan Dynamo sub w/6ft 14awg Power Cord
Onkyo A-8017 integrated
Logitech Squeezebox Touch Streamer w/EDO applet
iFi nano iDSD DAC
iPurifier3
iDefender w/ iPower PS
Custom Steve Wilson 1m UPOCC Interconnect
iFi Mercury 0.5m OFHC continuous cast copper USB cable
Custom Ribbon Speaker Cables, 5ft long, 4N Copper, 14awg, ultra low inductance
Custom Vibration Isolation Speaker Stands and Sub Platform -
The only other option is the taboo SDA 1C-TL, that all the engineers here can't decipher.Don't take experimental gene therapies from known eugenicists.
-
Well like you said it seems a reasonable approach to attempt to do it to the top tweeter which is the dominant one, and then to do youz guy's Silk Dome mod to the lower SL2000, especially since the DCR of the voice coil is very similar, and you are retaining the magnet motor structure of the SL2000. Definitely worth pontificating over 😁George / NJ
Polk 7B main speakers, std. mods+ (1979, orig owner)
Martin Logan Dynamo sub w/6ft 14awg Power Cord
Onkyo A-8017 integrated
Logitech Squeezebox Touch Streamer w/EDO applet
iFi nano iDSD DAC
iPurifier3
iDefender w/ iPower PS
Custom Steve Wilson 1m UPOCC Interconnect
iFi Mercury 0.5m OFHC continuous cast copper USB cable
Custom Ribbon Speaker Cables, 5ft long, 4N Copper, 14awg, ultra low inductance
Custom Vibration Isolation Speaker Stands and Sub Platform -
Part 5 - Money spent to date
I absolutely want to do EVERYTHING I can manage and afford to this pair of speakers. Overkill, if I can.
If I sell $750 worth of other equipment, I'll put $750 into them. I'd like to see what I can accomplish with a $1000 investment.
So far:
- $150 for the 1c
- $85 for 2 Buffalo Chicken pizzas from Frank's Chicken and Pizza in Pittsburgh, + a meatball sub, + 3 bottles of their house Ranch dressing (a special meal for the family we get twice a year now, and reward for my oldest going with me)
- $10 for a local brand chocolate milk to bring home to my youngest daughter
- $18 for gas
- $42 for Wuhan silk domes on ebay
Total spent to date on project = $305
Yes, I'm counting all the food and gas in the total. It's all money spent to just get the damn speakers in mah hands. So, *really* purchasing and retrieving the speakers cost me time on a Sunday and $260.
I have, from my proposed $1000 budget, $695 remaining.
The Thrifty Setups in Mah House Big thrifty stereo in the basement w/ my custom SDA-1C (built with help from kind forum members) * Beautiful 1966 MCM GE console upgraded w/ Bluetooth, Dual turntable, and Paradigm speakers in family room * Swanky 1980 Realistic system and great TEAC eq with dancing colored lights in the living room * custom 5B on a system for my Dad * Ye Olde college stereo in the garage -
Part 6 - Proposed basic (ha!) upgrades and mods
After combing through a TON of thread and getting some info from some very helpful folk, this is the preliminary list of upgrades and mods for the 1c:
Tweeters
- The @xschop version of the Wuhan silk dome upgrade to the existing SL2000 motor structures
- Felt/lamb's wool mod/diffraction rings
- Epoxy magnets in place (leaning towards @Gardenstater glue choices)
- Dynamat to the backside of faceplate for rigidity
- Somebody did a little bevel mod for the opening around the dome (usual suspects?), that looked really neat
- Coat the domes with doping goop.
- Maybe attempt poking a very tiny hole in the middle of the domes, like Polk does
- Replacement seals for mounting tweeters to cabinets (I am still out on which route to take. I used Mortite when I did my Monitors, but it seems that is not the best solution- even if it is effective.)
If I'm forgetting something or there are more options, bring 'em on!
Mid-woofers
- Foam installed/glued to inside of baskets to reduce backside cone reflections
- Dynamat on outside of of baskets to reduce vibration
- Phase plugs! @xschop is at it again. In lieu of milled metal, to keep my cost down, maybe I can have my friend 3D print some for me?
- Coat the wires on the cones with a material I saw someone recommend... The silver is showing through.
- Rotate drivers 180 degrees when remounting
- - ... which could get tricky if any are off-kilter
- Replacement seals for mounting midwoofers to cabinets
Did I miss anything?
Passive Radiator
- Dynamat and foam baskets, just like midwoofers. They are REALLY light.
- Rotate 180 degrees when remounting
- Replace seels for mounting passive radiators to cabinets
I don't know of anything else to do...
Crossovers
O.k., this is tricky. I HATE THE SONICRAFT WEBSITE!!! G/god(s), it is an abomination. It's a crime against design and usability. We hates it, precious!
[cough, cough]
- Sonic caps seems to be the de facto choice for upgrading these crossovers (unless you're like this guy who upgrades SRS models like money is no object... and his work is AMAZING!!!). I won't use Daytons for this build. I did in my Monitors, and I think I hear where they're letting me down. Honestly, for the money, I think they're great. The imaging and soundstage is staggering on some mixes. But... there's a little something missing in the upper midrange/lower treble.
Are there other, cost-comparable and sound-equivalent options anyone likes better?
- How about the resistors? Where to order what brands for this build? What do people have experience with?
- That tweeter protection circuit. Some people insist it should be left in, but most seem to want it out. What do you think?
Cabinets
I don't think I'll have to do much in the way of veneer repair, but they need a cleaning and polish.
- Get some spikes
- I have my Monitors on stands, and it really helps them come alive. Does anyone use stands with their 1c?
- Get some little wheeled furniture moving platform thingies to move them around (even though I would LOVE to just mount some rollerblade-style wheels on the bottoms...
- What is the Blackhole foam thing people talk about. I looked up the product. Do you remove the polyfill rolls and install that instead? I'm all for it. I just don't know exactly how to do it...
- Wool on the front, like anti-diffraction methods of old
- Dynamat every inch of the interior. Why? Resonance. That cabinet isn't dead enough for me.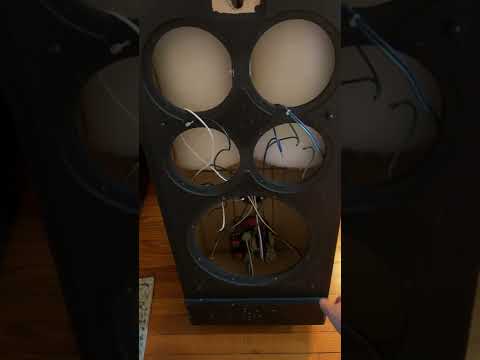 https://youtu.be/ysqfSHXD6R8
I coated the surfaces around the passive radiator, below the mids in my Monitors with Dynamat. I really like the results. No boomy bass. Very tight. Sounded subdued after I did it, because I was so used to the added boominess. So I'm convinced to do it in the whole damn cabinets on the 1c.
What else?
Outside of these suggestions, what's left?
I know I can:
- Replace the binding posts
- Replace the wires inside (how much and is it worth it?)
- Make a new interconnect cable (but I don't know how much that will cost...)
- Make my own Dreadnaught modification (but that's like $500, right? I might have to put that on a wishlist)
What else is there?
What did I miss?
What say you?The Thrifty Setups in Mah House Big thrifty stereo in the basement w/ my custom SDA-1C (built with help from kind forum members) * Beautiful 1966 MCM GE console upgraded w/ Bluetooth, Dual turntable, and Paradigm speakers in family room * Swanky 1980 Realistic system and great TEAC eq with dancing colored lights in the living room * custom 5B on a system for my Dad * Ye Olde college stereo in the garage -
Oh, I missed mention of the 198...
[laughs]
Look man, I learned my lesson on asking about that one") The Thrifty Setups in Mah House Big thrifty stereo in the basement w/ my custom SDA-1C (built with help from kind forum members) * Beautiful 1966 MCM GE console upgraded w/ Bluetooth, Dual turntable, and Paradigm speakers in family room * Swanky 1980 Realistic system and great TEAC eq with dancing colored lights in the living room * custom 5B on a system for my Dad * Ye Olde college stereo in the garage
The Thrifty Setups in Mah House Big thrifty stereo in the basement w/ my custom SDA-1C (built with help from kind forum members) * Beautiful 1966 MCM GE console upgraded w/ Bluetooth, Dual turntable, and Paradigm speakers in family room * Swanky 1980 Realistic system and great TEAC eq with dancing colored lights in the living room * custom 5B on a system for my Dad * Ye Olde college stereo in the garage -
You're going to royally screw up those speakers. For example, Dynamat on the inside of the cabinet wall is the wrong thing to do. But hey, if you don't want to listen to those of us with 10...20 years of experience inside and out with vintage Polk speakers knock yourself out. Just don't say you weren't told what not to do.
ListedPolitical Correctness'.........defined
"A doctrine fostered by a delusional, illogical minority and rabidly promoted by an unscrupulous mainstream media, which holds forth the proposition that it is entirely possible to pick up a t-u-r-d by the clean end."
President of Club Polk -
You have certainly compiled a list of everything that you could possibly do to these speakers. I would suggest you get them back together to determine what is needed. Replacing the gaskets and other tasks you list are generally considered "as necessary" rather than required.
Glue the magnets
dynamat the baskets
refresh the crossovers
do what you will with the tweeters
Then see where you are with the sound. You may have some cash left over that would be better spent elsewhere. If you are anything like me, there is 0% chance you will spend a grand on these 1C's and sit back thinking "well, that's done, no need to spend more on the stereo." I'm sure you already know this deep down.SDA SRS 2.3tl, SDA 1C, SDA 2B (TL mod), Reserve 200 -
F1 is right, don't waste your time and $ on Dyna/butyl matting the inside of enclosures.
Do Dyna/butyl mat the SL2000 tweeter bezel, making sure no alum foil backing touches the Wuhan leads when done.
Do add retinoic acid/retinol in a small sheen to the domes via q-tip after a long break-in.
Do perform Gardenstater's inner basket frame foam mod (you just need to do the uprights).
Do install MW backer rings, mine or make your own. Those baffles would definitely see the benefit.
Do Dyna/butyl mat the MW and passive frames.
Do use Blackhole 5 behind MWs on back wall. Many recommendations here.
Do have fun and experiment, then share your results, it's a hobby after all.
I can highly recommended saving some more inflationary dollars using this in lieu of Dyna mat...
Post edited by xschop onDon't take experimental gene therapies from known eugenicists. -
You have certainly compiled a list of everything that you could possibly do to these speakers. I would suggest you get them back together to determine what is needed. Replacing the gaskets and other tasks you list are generally considered "as necessary" rather than required.
Yeah. I tried to scour for every tweak someone made that had at least some others who also tried it and liked it. Some of them have REALLY in-depth work that was done testing. Some are anecdotal. Some are proven tech used in other speakers.You're going to royally screw up those speakers. For example, Dynamat on the inside of the cabinet wall is the wrong thing to do. But hey, if you don't want to listen to those of us with 10...20 years of experience inside and out with vintage Polk speakers knock yourself out. Just don't say you weren't told what not to do.
I'm not dismissing anyone's experience. I'm counting on it!
[smiles]
I certainly hope I don't mess them up!
I want a master list for anyone thinking about modding/repairing the 1c. And I want the pros and cons!
A lot of those proposed tweaks address quality and tech issues. And will absolutely change something about the character of the speakers.
I don't think these speakers were designed to have active enclosures like the Mission clamshells I fixed up a few years ago, Is it the excitation of the air that is key to the passive radiators, or reflected and off-timed waves bouncing around the plywood (grid in the back, flat elsewhere), crossovers, wires, and baskets, that's important?
I know exactly the audible, subjective effect on the Monitors. Mechanically, they are almost identical in concept. So, I'll go ahead and Dynamat the interiors and see how they sound. It's not hard to take it back out if I make a mistake on that one. Maybe the design of the SDA passive takes into account the flaws of a resonant bass chamber/cabinet more than the Monitor passive does? We'll find out!
Oh, in case anyone thought otherwise, I did not remove the polyfill from the Monitors. I also did not Dynamat in the upper chamber where the polyfill was.Glue the magnets
dynamat the baskets
refresh the crossovers
do what you will with the tweeters
Then see where you are with the sound. You may have some cash left over that would be better spent elsewhere. If you are anything like me, there is 0% chance you will spend a grand on these 1C's and sit back thinking "well, that's done, no need to spend more on the stereo." I'm sure you already know this deep down.
Your truncated list is absolutely fair and reasonable. Add Dynamatting the enclosures, and those tweaks/fixes what I think I should concentrate on.
Then it's phase plugs and maybe wool on the front (I have ideas about that on an SDA I'd like to experiment with), for fun.
And you are 100% correct. Even without much fun money in the bank, I have thrifty-audio'd upgrades every chance I had for a very long time
I had to scrape and scrounge to upgrade the Monitors over 10'ish years. Since I have some play room on the 1c, I'm going to dive into the deep end. AND! It's also a project my oldest is going to help with! She'll be a senior next year, so it's a very meaningful project for me.
Then I'll finish building my transformable omni/uni directional homebrews...
The Thrifty Setups in Mah House Big thrifty stereo in the basement w/ my custom SDA-1C (built with help from kind forum members) * Beautiful 1966 MCM GE console upgraded w/ Bluetooth, Dual turntable, and Paradigm speakers in family room * Swanky 1980 Realistic system and great TEAC eq with dancing colored lights in the living room * custom 5B on a system for my Dad * Ye Olde college stereo in the garage -
For the third time
DO NOT LINE THE WALLS OF THE ENCLOSURE WITH ANY TYPE OF DYNAMAT.
This is not something you do!
A few pieces of Blackhole 5 or sonibarrier behind the active woofers only. If you get carried away with BH5 or sonibarrier it will seriously be counter productive.
One of our members did line their cabinets with a LOT of BH5 and it sucked the life right of them. They had to remove it it was that bad.
-
Didn't see anything about installing hurricane nuts and machine screws in place of wood screws into the baffles. The more you are in and out of the cabinets, the more important this becomes.
I think you need to also make sure all the cabinet seams are well-sealed.
If you need to replace driver gaskets, Armacell is good stuff.
Regarding your question about a new SDA interconnect, think about building the cable yourself with whatever speaker wire you'd like (match your speaker cables, ideally), and terminate it with Neutrik SpeakOns. You'll need to install the female Neutriks in the cup housing the binding posts. Good time to think about replacing the posts, too, and someone here used to make beautiful plates pre-drilled for all of this. Knowing how to install the SpeakOns will come in handy if/when you get to assembling a Dreadnaught.
I think removing Dynamat from the inside of the cabinets will be much harder than you anticipate. If you insist on experimenting with more dampening than recommended above by xchop, consider SonicBarrier (sp?) - relatively inexpensive, easy to cut into pieces, install, and remove.
Just based on my limited experience with some CRS+ TLs. Good luck! -
For the third time
DO NOT LINE THE WALLS OF THE ENCLOSURE WITH ANY TYPE OF DYNAMAT.
Help me out, guys. Let's talk it out so I can get a better picture.
I'm taking what I know of recording booths and applying it to cabinet interiors, so I come at this from a different place.
I use Dynamat-like materials to reduce the resonance, the actual vibration of an enclosure due to less-than-optimal design. That resonance is not what is present in the original excitation of the air from a mouth to a mic.
I use sound-absorbing foam materials to actually absorb sound, or trap it, or diminish its reflections, so those off-timed echoes do not influence the excitation of the air from a mouth to the mic. The distance between the mic and mouth, and the size of the room and the amount of air excited to carry the vibration between the two, affects the tone. You can have an over damped volume of air. I think, based on what I'm hearing, is a different affect from a different process (foam vs. dynamat).
Dynamat-like materials have a minor damping effect, because rubber reflects sound less effectively than the dense internal ply or mdf of a speaker cabinet. But, that absorption of reflected sound is minor compared to a foam product. Dynamat helps prevent the absorption, excitation, and reflection of sound energy from the interior of the cabinet, to its structure, and back to the air inside the enclosure. And, it helps keep outside vibrations from penetrating as strongly through the cabinet to the inside (which is why it works so great at keeping road noise out of your car).
Absolutely, a foam-based sound-absorbing material will have a deadening effect on the air itself within an enclosure, but the Dynamat material has a different function.
O.k., help me translate this to speaker enclosure interiors from your perspectives! Everyone else's turn
OH!
I don't want to make this thread all about this one mod, so if anyone has other thoughts, chime in!
I want it to be a repository so it can be whittled down later to a guide.
The Thrifty Setups in Mah House Big thrifty stereo in the basement w/ my custom SDA-1C (built with help from kind forum members) * Beautiful 1966 MCM GE console upgraded w/ Bluetooth, Dual turntable, and Paradigm speakers in family room * Swanky 1980 Realistic system and great TEAC eq with dancing colored lights in the living room * custom 5B on a system for my Dad * Ye Olde college stereo in the garage


 https://youtu.be/XObmZIbHOzY