Best Of
Pile of tweeters and a few woofers
Hey everyone,
Not intending to make a for sale post, as I know these don't belong here and I don't think I have enough posts anyways for access, but I have a small pile of leftover tweeters salvaged from, well, salvaged enclosures that are just gathering dust and that I will never use, so I wanted to move them on to a home that could use them for free.
I have:
Tweeters-
3 SL2500
1 SL1000 (titanium/silver faceplate)
1 Peerless (bad coil)
6 SL2000 poly dome
Woofers-
1 MW509 (bad coil)
1 MW6600x(?) tested good
1 MW650 tested good
If anyone is interested in any of these please PM me. All I am asking is please cover shipping.
Thanks,
K.
 Karn
Karn
1 ·
Re: FS: 600+ CDs.. Pick n' Choose
I picked up the CDs yesterday. The condition of the CDs and high quality packing exceeded my expatiations again.
Thanks again @jephdood!
Thanks again @jephdood!
 HzTweaker
1 ·
 https://youtu.be/yBoxoHSRR64?si=zfqB3D7xH0-MLXt4

Re: Thinking about retirement.
I'm 2.5 years into the good life. Was a bit if a hard decision to pull the plug on this partly from being a bit apprehensive on being retired and starting a new life but mostly because I was still working from home and really only "working" about 50% of the time.
Still, I would rather spend my time doing what I want and not working on something that has no benefit to me other than satisfaction of a completed job.
BTW, I know where you can get all sorts of suggestions on how to spend you $$ on stereo equipment!
")
Still, I would rather spend my time doing what I want and not working on something that has no benefit to me other than satisfaction of a completed job.
BTW, I know where you can get all sorts of suggestions on how to spend you $$ on stereo equipment!
 muncybob
3 ·
Thinking about retirement.
Well hell. Thought I might never make it but after **** up my back(hopefully for the last time), I've decided to pull the plug on the ol' work thing. I've worked my a$$ off for the last 40+ years and made some good investments so before I decide to take on one more job and end up in a wheelchair I'm going to cash out.
A good gambler knows when to walk away. I'm a terrible gambler by the way. I'm disappointed in myself for not being able to put in a good hard days work. My punishment is to go fishing. I call it therapy. Some call it church. Whatever works.
My uncle could have retired but decided to work instead so his wife would have better health insurance. He worked until the cancer took him some years ago. His wife is remarried. I use this life experience as an example to remind me not to get married, and to always do what's best for your own happiness.
I think I need some new stereo equipment.
 audioluvr
6 ·
Re: Monitor 4 upgrades
You can't, honestly, look at this picture and tell me all those "bolts" are equidistant from the binding post plate hole edge
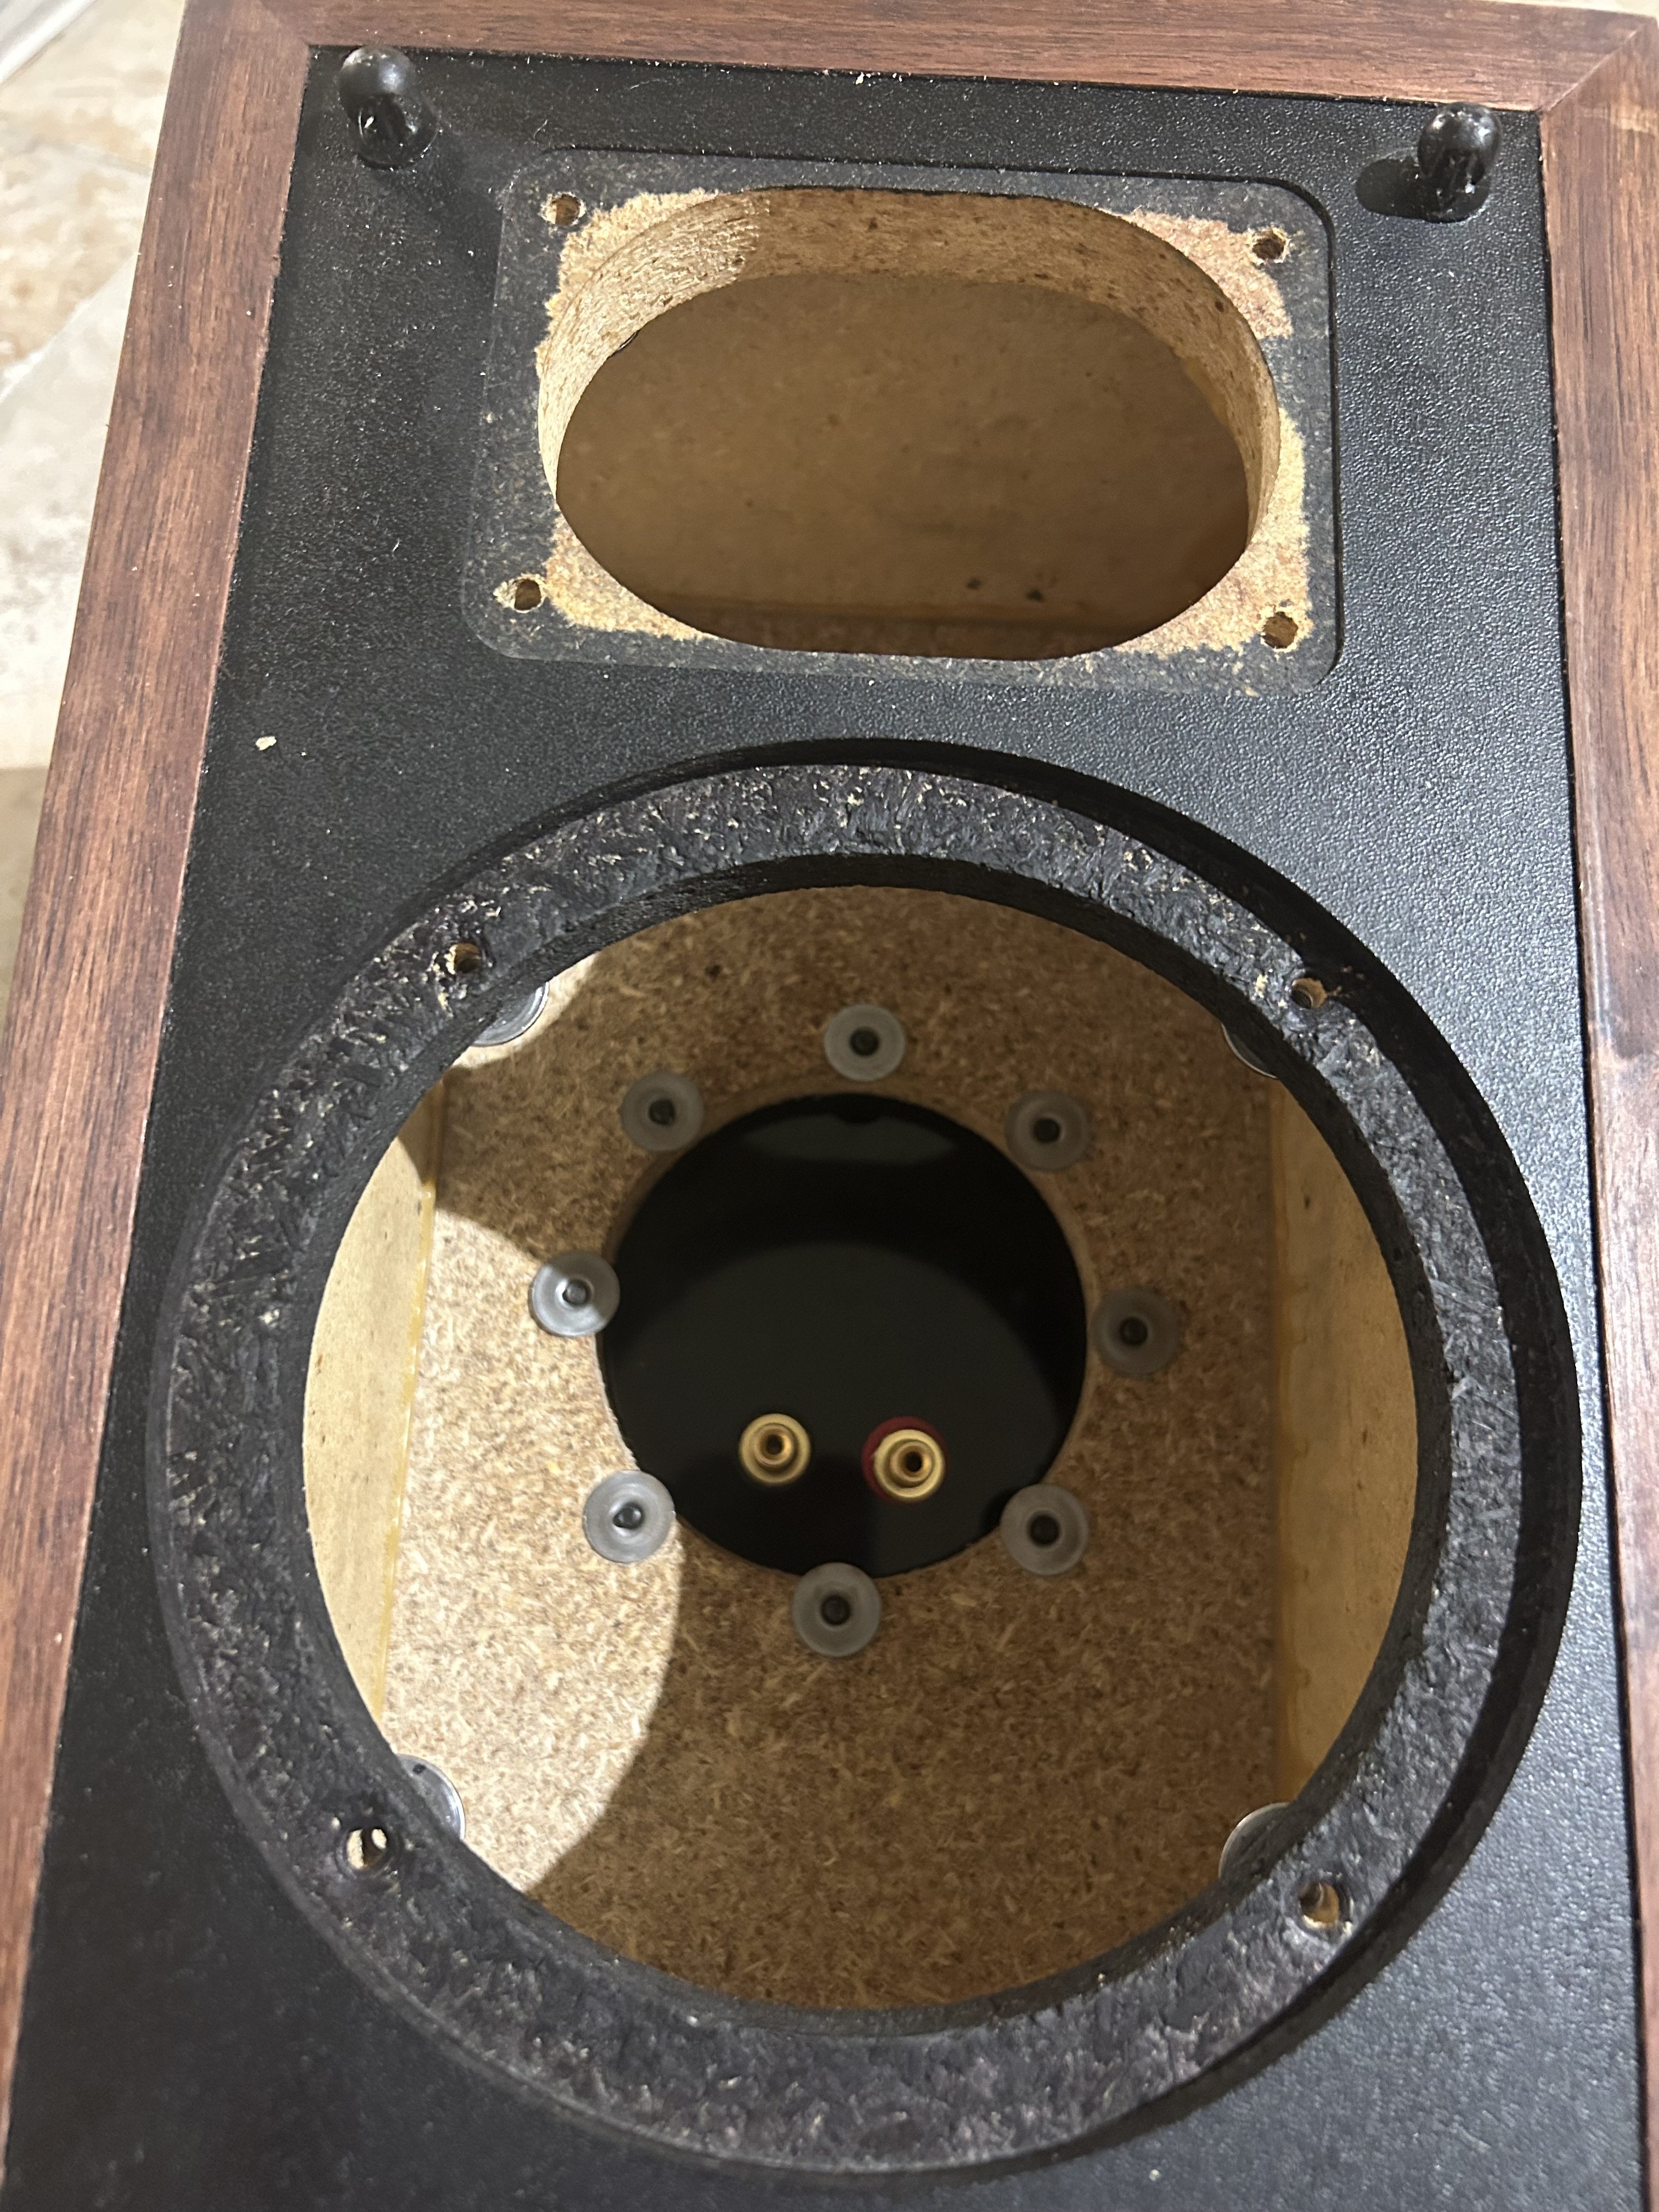
Your "bolts" are tee-nuts too and the day you cinch down on them, where ever the tee-nut flange doesn't have the same amount of material under it to snug down on, it's going to tend to crush the edge of the particle board leading to failure.
For those who don't know what tee-nuts are, they are these:
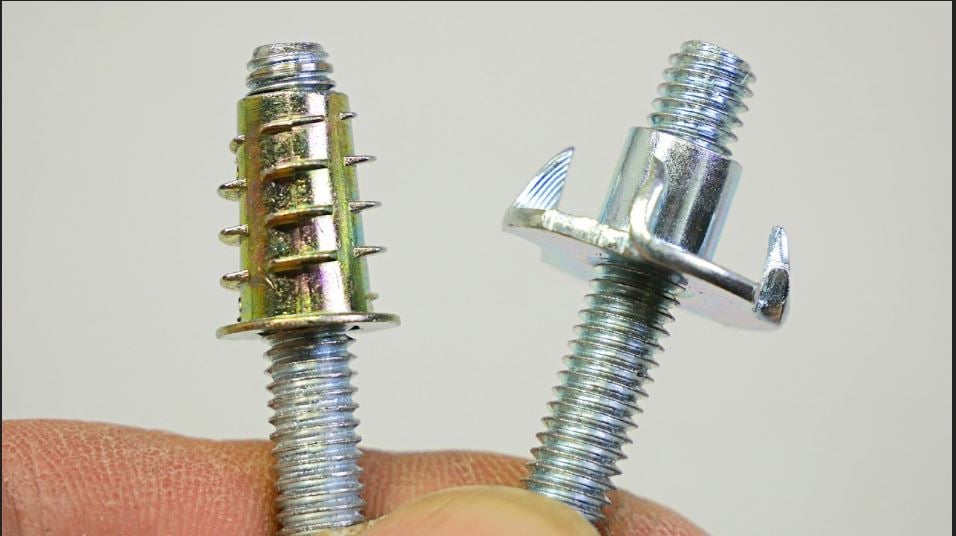
They require pre-drilling and are sometimes called sleeve nuts, threaded flanges or threaded sleeves. Whether you use the spiked flange kind, the non-spiked flange kind or you use the kind that gets threaded in to the hole, they rely on clamping force to remain in position and maintain fastening tension. If you do not have the entirety of the flange contacting the material you are using the tee-nut for you will not get even clamping force and, additionally, you will create forces on the rest of the flange and spikes that they were not designed to handle. That makes them weaker and more prone to crushing the material they are mounted in and failing or ripping out. Add to the fact that it's a particle board enclosure with not much capability to hold screw tensions and this is looking at failure.
Once it fails, the only repair is going to be cut a new, larger plate to hold the binding posts and then drill new holes for new screw holes and you'll have to make sure your new holes are far enough out from the old holes to make sure you don't compromise the new holes with the failed old holes. You'll also have to seal that whole thing up and the larger the plate, the more screws you will need to ensure equal clamping force around the perimeter gasket of the binding post plate. The more screw holes you punch in the particle board the more likely you are to be making a perforation pattern that creates a failure point.
Particle board is nothing more than coarse sawdust that is mixed with a resin and then "printed" into sheets which are then compressed and heated to create a contiguous product that is temperature stable and sonically dead (it doesn't resonate). It lacks the structural stability of other engineered products like plywood and is susceptible to damage from moisture or impact. It's not the greatest thing for building cabinets but it is inexpensive, strength/stability can be improved with lamination and it has very little waste in the manufacturing process. That makes it ideal for mass speaker manufacturing which is why so many brands use it. It is not real happy when it gets disassembled because once the tension on particles that are holding mounting screws in place is released, they tend to fall out of suspension in the resin which, in turn, leaves less material for the screw being returned to it's position to create tension on. In other words, it leaves a weaker hole. That can hamper re-assembly and reduce longevity of the product.
Something like a tee-nut can solve that problem but you have to use them correctly or they will just clamp down unevenly and rip out of an edge.
Another issue you have is that you used the same flange nuts on the speaker mounting holes and they extend into the circumference of the driver opening. I really hope that the driver baskets don't interfere with those flanges otherwise the day you cinch down on them is the day they will fail. If that flange impacts the driver basket, it will not only cause severely uneven clamping but it will also cause lateral forces that will pry that threaded sleeve right out of it's hole. If it does impact the best you can hope for is uneven seating of the driver causing air leakage and spoiling your enclosure tuning for your port tuning.
On top of that, the binding posts aren't level and canted with the negative terminal sitting higher than the positive terminal. The reason that is bad is because your pair of wires are going to have a stress point where they break over and drop straight down. That will cause them to eventually wear and loosen over time. Especially as they heat up and cool down. If you're going to use banana plugs or standoffs, then you should make sure that they aren't close enough to short, both outside the enclosure and inside. I mean, that's the reason binding posts are separated to begin with.
But, it's too late now so I'll pray for your sustained success with this methodology.
So flag me all you want, I'm not being a jerk here. I'm pointing out glaring issues with this "build" while being insulted for it at every turn. Contrary to popular belief, I do know what I am talking about here.
I have built competition winning subwoofer enclosures of all kinds. They have far higher stresses on them than a mere Monitor 4 enclosure. I have yet to have one fail or not perform to or exceed what minimum specification they were designed to. So I'm good on the "learning" part as there's nothing ground-breaking here. There's some stuff being tried that I know doesn't work. Some from experience some from knowledge based on learning, myself. But hey, what do I know? I'm just supposed to keep my mouth shut and watch people fail emphatically because of "feelings" or some BS like that when I could have easily helped them out if they were willing to listen instead of fight with me and insult me.
Your "bolts" are tee-nuts too and the day you cinch down on them, where ever the tee-nut flange doesn't have the same amount of material under it to snug down on, it's going to tend to crush the edge of the particle board leading to failure.
For those who don't know what tee-nuts are, they are these:
They require pre-drilling and are sometimes called sleeve nuts, threaded flanges or threaded sleeves. Whether you use the spiked flange kind, the non-spiked flange kind or you use the kind that gets threaded in to the hole, they rely on clamping force to remain in position and maintain fastening tension. If you do not have the entirety of the flange contacting the material you are using the tee-nut for you will not get even clamping force and, additionally, you will create forces on the rest of the flange and spikes that they were not designed to handle. That makes them weaker and more prone to crushing the material they are mounted in and failing or ripping out. Add to the fact that it's a particle board enclosure with not much capability to hold screw tensions and this is looking at failure.
Once it fails, the only repair is going to be cut a new, larger plate to hold the binding posts and then drill new holes for new screw holes and you'll have to make sure your new holes are far enough out from the old holes to make sure you don't compromise the new holes with the failed old holes. You'll also have to seal that whole thing up and the larger the plate, the more screws you will need to ensure equal clamping force around the perimeter gasket of the binding post plate. The more screw holes you punch in the particle board the more likely you are to be making a perforation pattern that creates a failure point.
Particle board is nothing more than coarse sawdust that is mixed with a resin and then "printed" into sheets which are then compressed and heated to create a contiguous product that is temperature stable and sonically dead (it doesn't resonate). It lacks the structural stability of other engineered products like plywood and is susceptible to damage from moisture or impact. It's not the greatest thing for building cabinets but it is inexpensive, strength/stability can be improved with lamination and it has very little waste in the manufacturing process. That makes it ideal for mass speaker manufacturing which is why so many brands use it. It is not real happy when it gets disassembled because once the tension on particles that are holding mounting screws in place is released, they tend to fall out of suspension in the resin which, in turn, leaves less material for the screw being returned to it's position to create tension on. In other words, it leaves a weaker hole. That can hamper re-assembly and reduce longevity of the product.
Something like a tee-nut can solve that problem but you have to use them correctly or they will just clamp down unevenly and rip out of an edge.
Another issue you have is that you used the same flange nuts on the speaker mounting holes and they extend into the circumference of the driver opening. I really hope that the driver baskets don't interfere with those flanges otherwise the day you cinch down on them is the day they will fail. If that flange impacts the driver basket, it will not only cause severely uneven clamping but it will also cause lateral forces that will pry that threaded sleeve right out of it's hole. If it does impact the best you can hope for is uneven seating of the driver causing air leakage and spoiling your enclosure tuning for your port tuning.
On top of that, the binding posts aren't level and canted with the negative terminal sitting higher than the positive terminal. The reason that is bad is because your pair of wires are going to have a stress point where they break over and drop straight down. That will cause them to eventually wear and loosen over time. Especially as they heat up and cool down. If you're going to use banana plugs or standoffs, then you should make sure that they aren't close enough to short, both outside the enclosure and inside. I mean, that's the reason binding posts are separated to begin with.
But, it's too late now so I'll pray for your sustained success with this methodology.
So flag me all you want, I'm not being a jerk here. I'm pointing out glaring issues with this "build" while being insulted for it at every turn. Contrary to popular belief, I do know what I am talking about here.
I have built competition winning subwoofer enclosures of all kinds. They have far higher stresses on them than a mere Monitor 4 enclosure. I have yet to have one fail or not perform to or exceed what minimum specification they were designed to. So I'm good on the "learning" part as there's nothing ground-breaking here. There's some stuff being tried that I know doesn't work. Some from experience some from knowledge based on learning, myself. But hey, what do I know? I'm just supposed to keep my mouth shut and watch people fail emphatically because of "feelings" or some BS like that when I could have easily helped them out if they were willing to listen instead of fight with me and insult me.
 Jstas
Jstas
2 ·
Re: One can dream, can't they? - Audio Exotics
The speakers are the Harold Beverage model III speakers which are electrostatic speakers with a wave guide to create an extremely wide dispersion pattern. The designer, Harold Beverage, was an audiophile who was an expert on radar and used his knowledge of radio frequency antennas to model the guide. The original speaker used an output transfomerless tube amplifier connected directly from the output tube's plate to the electrostatic stator, no transformers at all. When a tube amplifier is connected to an electrostatic speaker the output tube's high impedance is stepped down by the output transformer. Then inside the speaker the incoming signal is stepped up to provide the stators high polarizing voltage (2,000 Volts in this case). Kind of like first making tea, then using the tea to make coffee; lots of changes happen. The Beverage amplifier was designed by Roger Modjeski, a true tube expert and was located in the bottom of the speaker. The speakers were intended to be placed on the two side walls facing each other. The stereo image would be suspended in the middle, eerily suspended actually. I remember hearing a Laurindo Alemeida direct-to-disc recording on Crystal Clear records with these speakers and the guitar was right in front of me. No kidding it was there, "know what I mean, Vern?"
The version in the photo is the model III, I believe which doesn't have the internal amplifier and can be powered externally. If anyone is interested there's a pair for sale in Baltimore:
https://www.facebook.com/marketplace/item/938120197677000?ref=search&referral_code=null&referral_story_type=post&tracking=browse_serp:6784a4f4-8baf-4214-8800-1fbc33cd80a6
 SeleniumFalcon
3 ·

Re: Budget ultrasonic vinyl cleaning
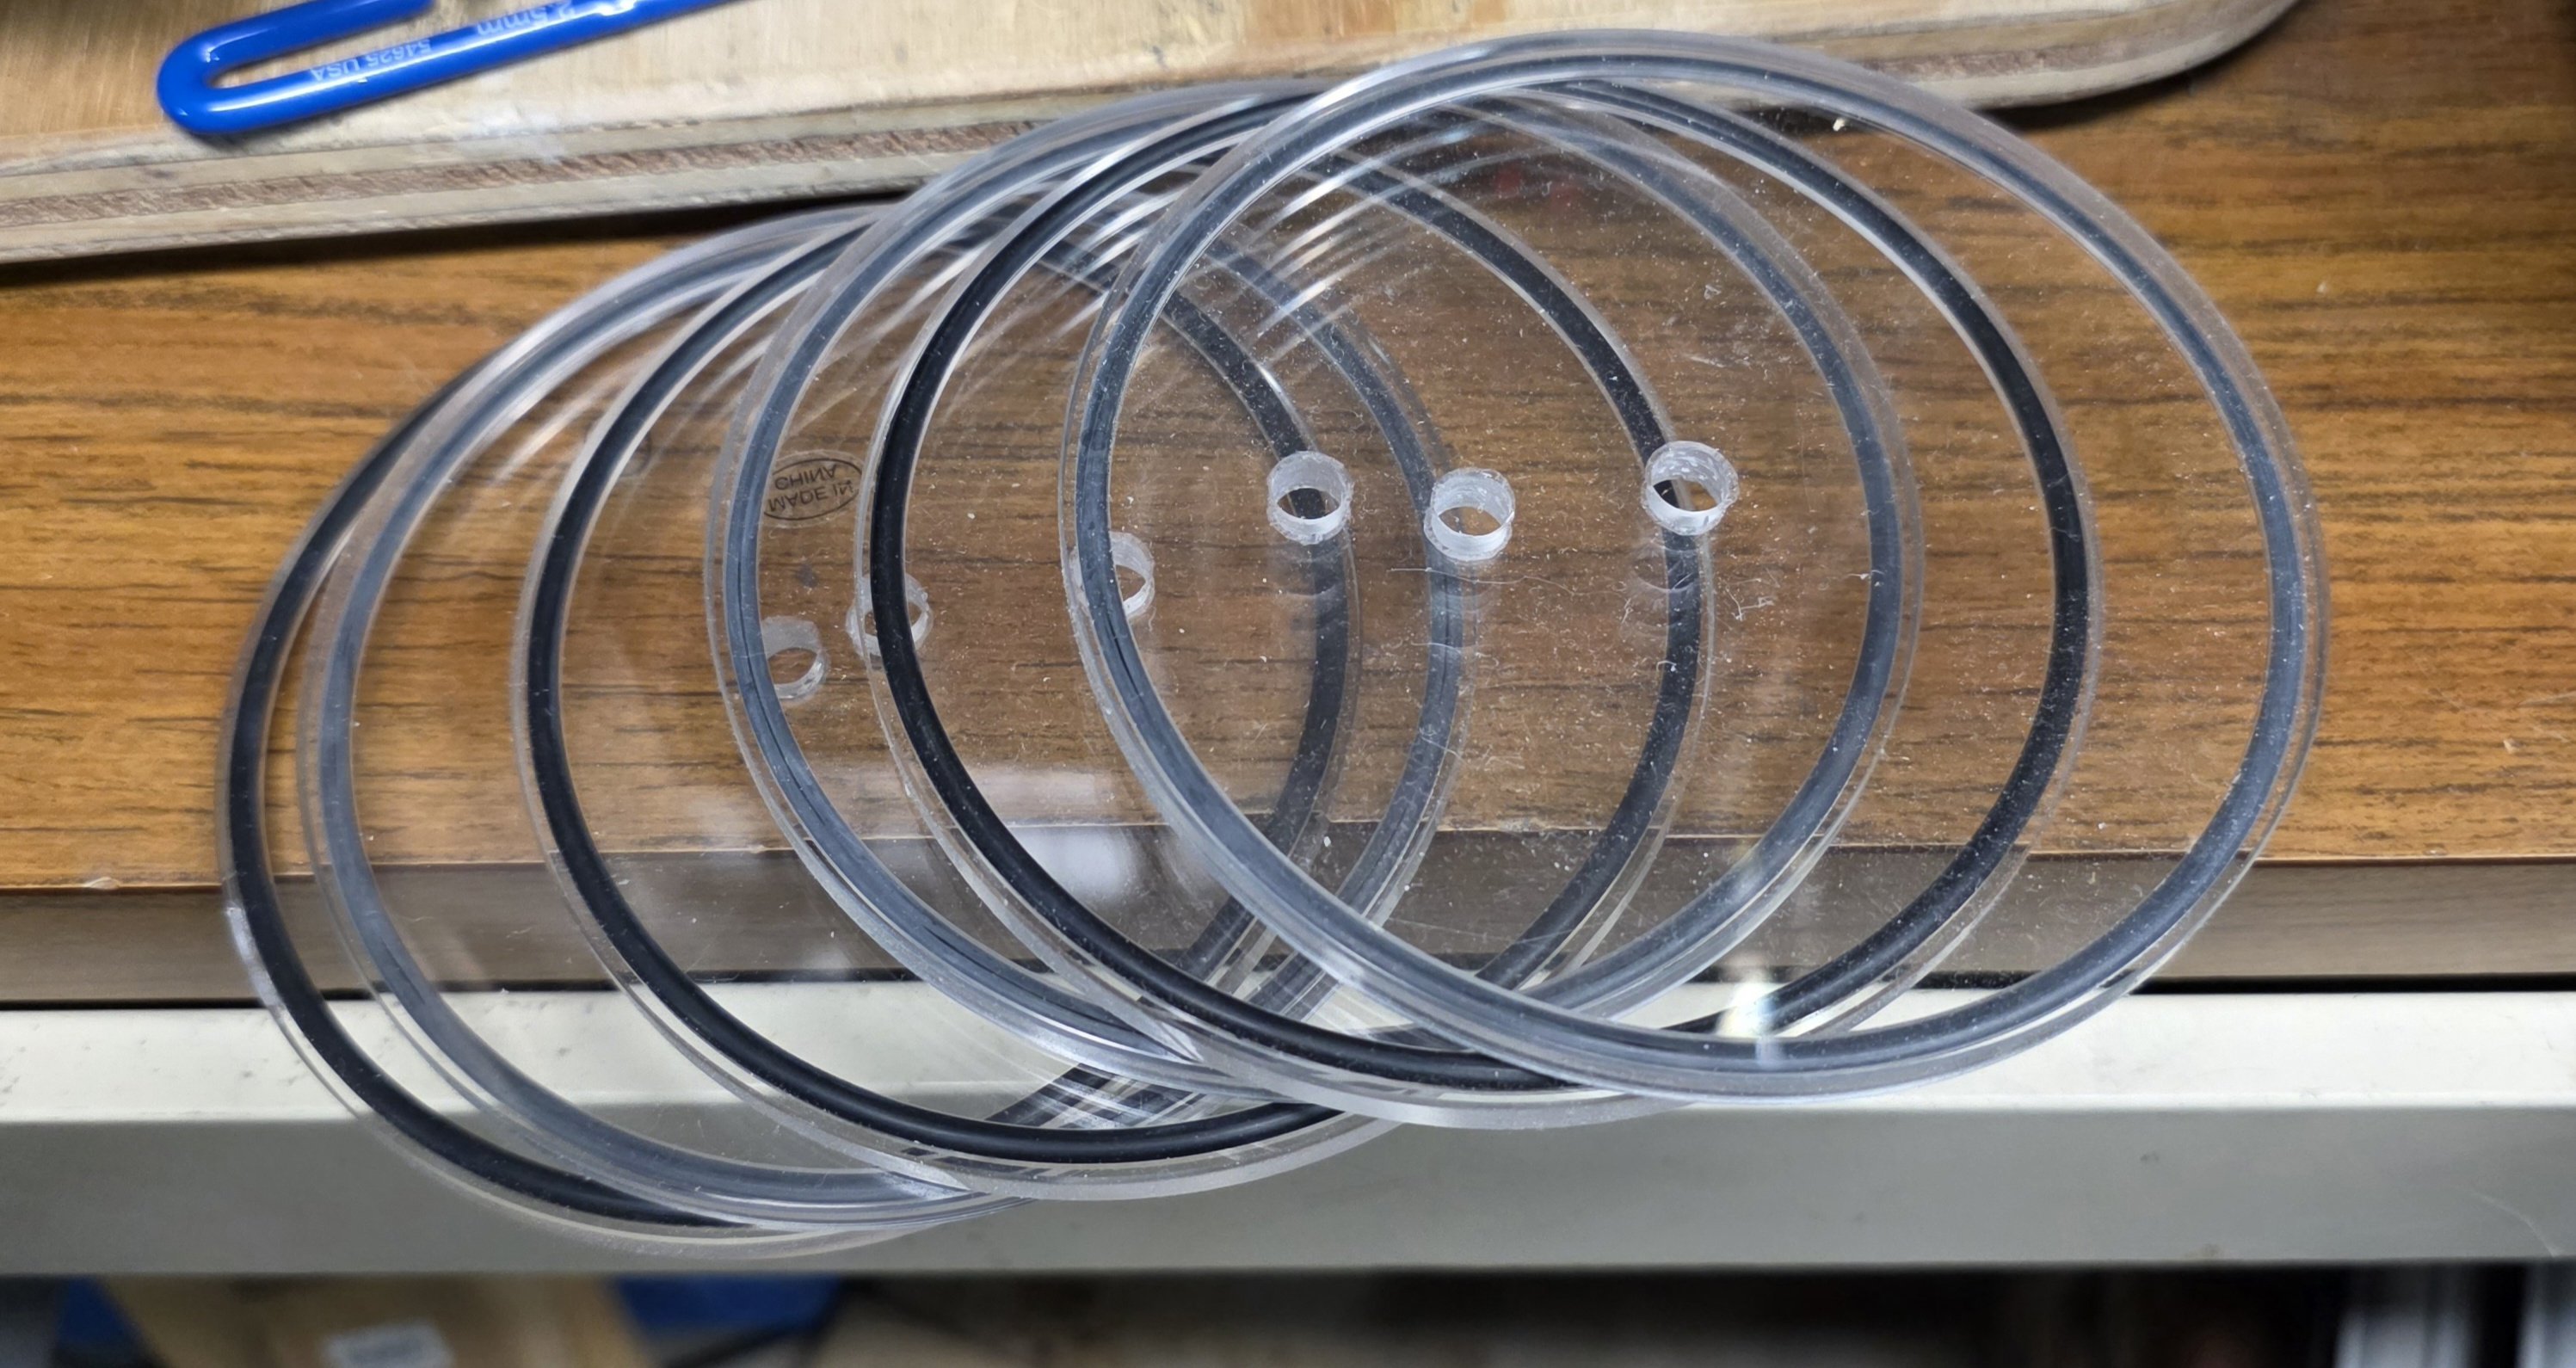
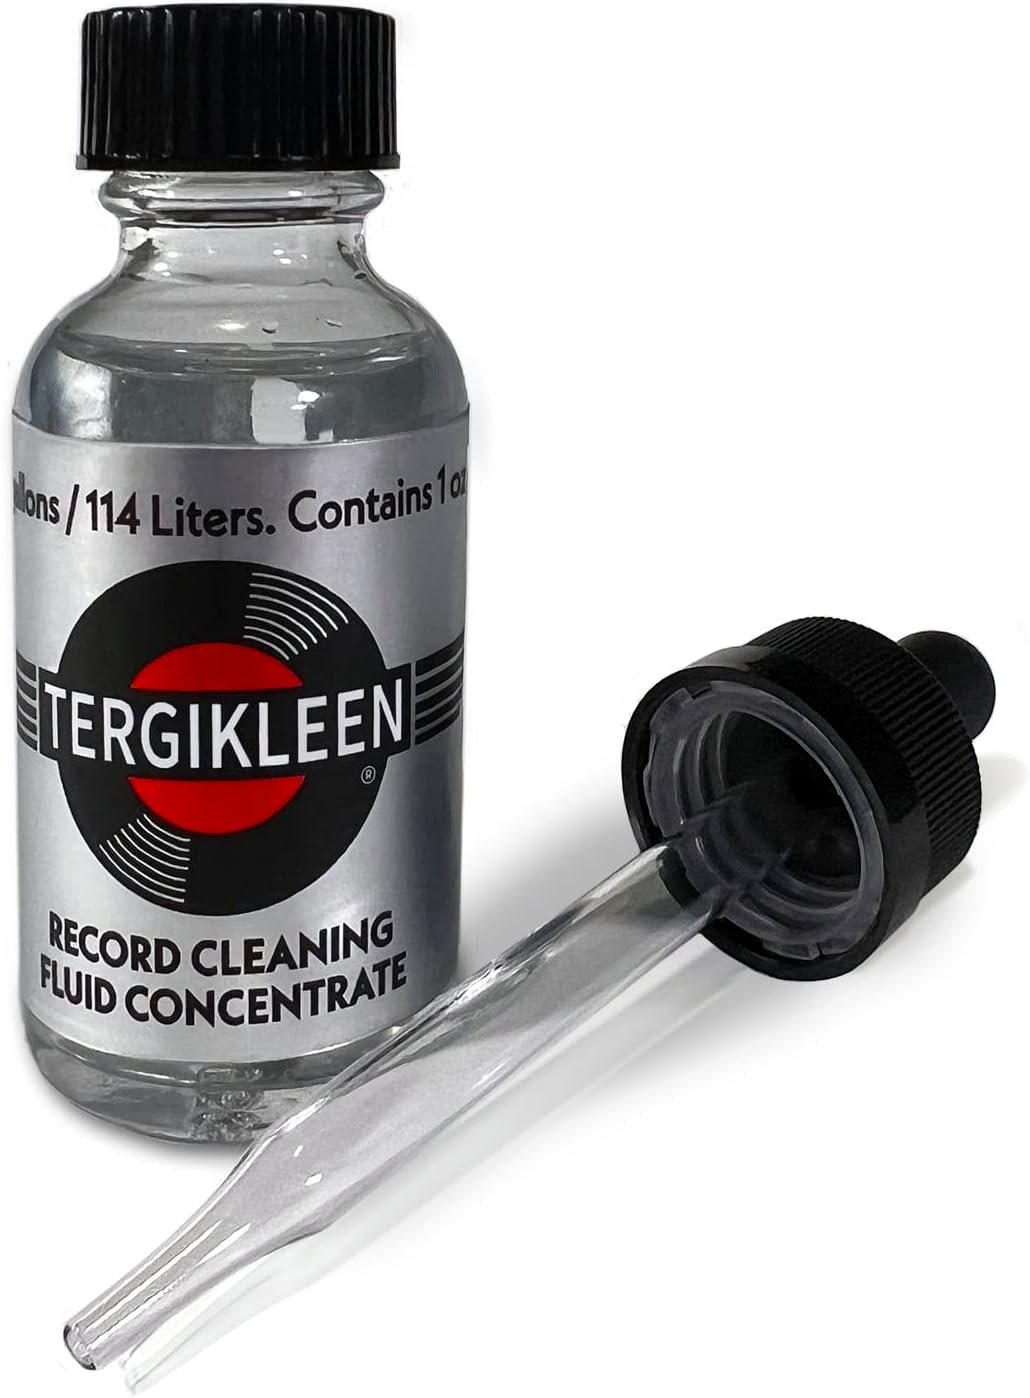
I use these label savers with O rings on my ultrasonic so the labels don't get wet. I got them on ebay, from China of course. With six of these I do three LP at a time. I can put the records away right after cleaning, distilled rinse and vacuuming on the VPI 16.5. I use TergiKleen, a concentrated Tergitol based fluid.
 SCompRacer
1 ·