Some RTA-11tl Love

westmassguy
Posts: 6,850
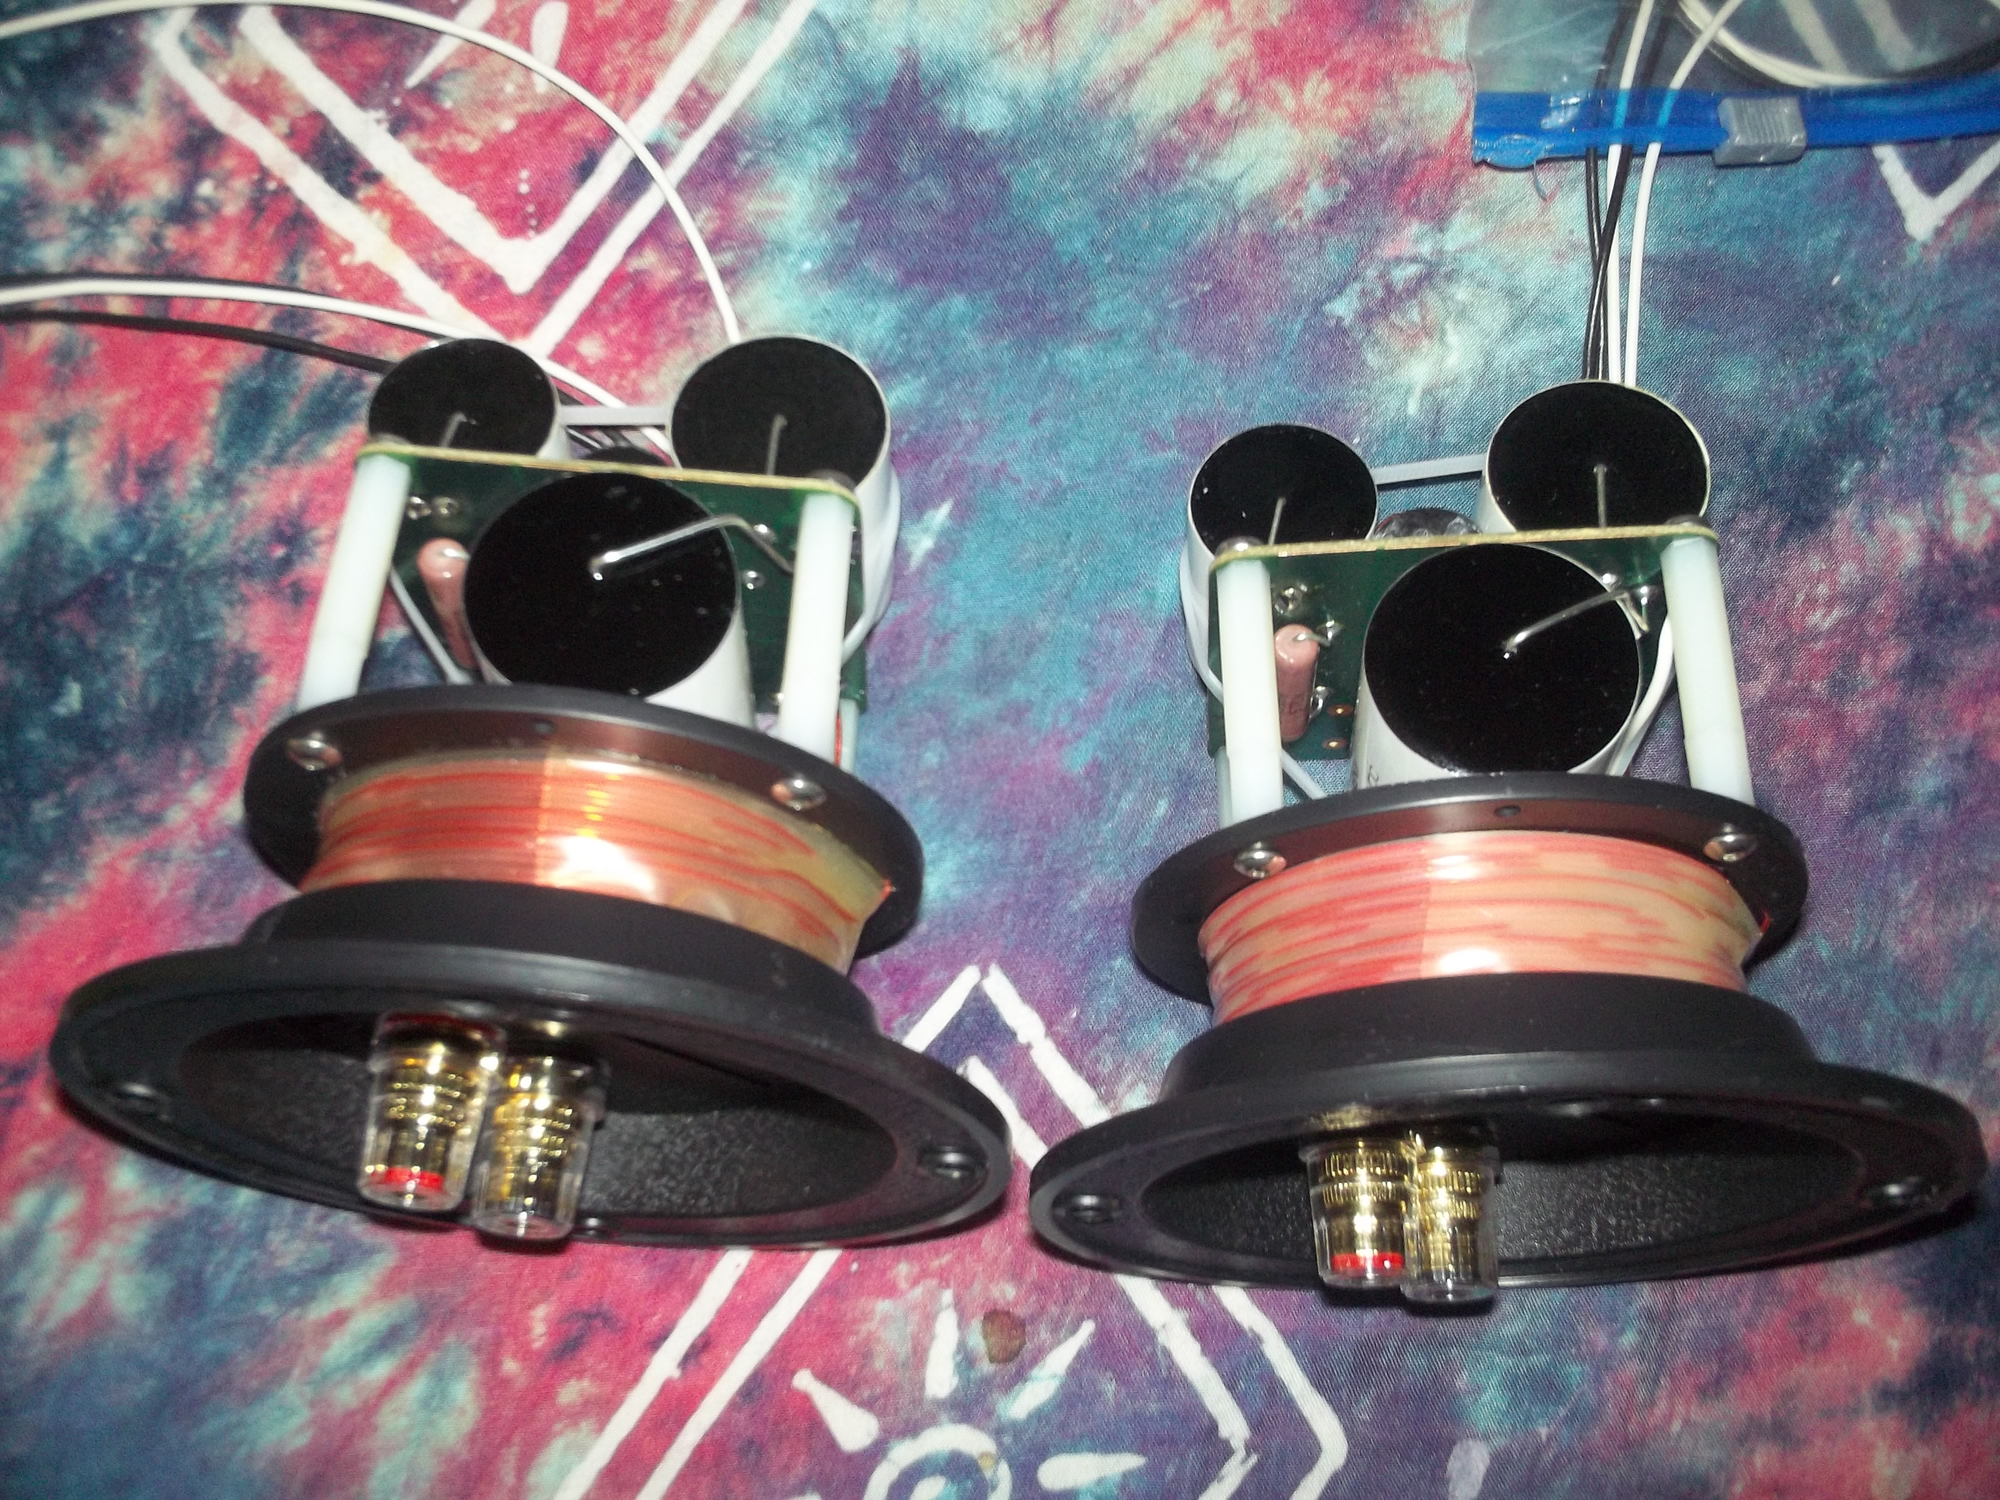
Sonicaps, Mills Resistors, Imported Insulating Binding Posts. Those last revision Circuit Boards can be a PITA.
Home Theater/2 Channel:
Front: SDA-2ATL forum.polkaudio.com/discussion/143984/my-2as-finally-finished-almost/p1
Center: Custom Built forum.polkaudio.com/discussion/150760/my-center-channel-project/p1
Surrounds & Rears: Custom Built forum.polkaudio.com/discussion/151647/my-surround-project/p1
Sonicaps, Mills, RDO-194s-198s, Dynamat, Hurricane Nuts, Blackhole5
Pioneer Elite VSX-72TXV, Carver PM-600, SVS PB2-Plus Subwoofer
dhsspeakerservice.com/
Comments
-
butterbean wrote: »You are a Jedi master!
These aren't the crossovers you're looking for...Home Theater/2 Channel:
Front: SDA-2ATL forum.polkaudio.com/discussion/143984/my-2as-finally-finished-almost/p1
Center: Custom Built forum.polkaudio.com/discussion/150760/my-center-channel-project/p1
Surrounds & Rears: Custom Built forum.polkaudio.com/discussion/151647/my-surround-project/p1
Sonicaps, Mills, RDO-194s-198s, Dynamat, Hurricane Nuts, Blackhole5
Pioneer Elite VSX-72TXV, Carver PM-600, SVS PB2-Plus Subwoofer
dhsspeakerservice.com/ -
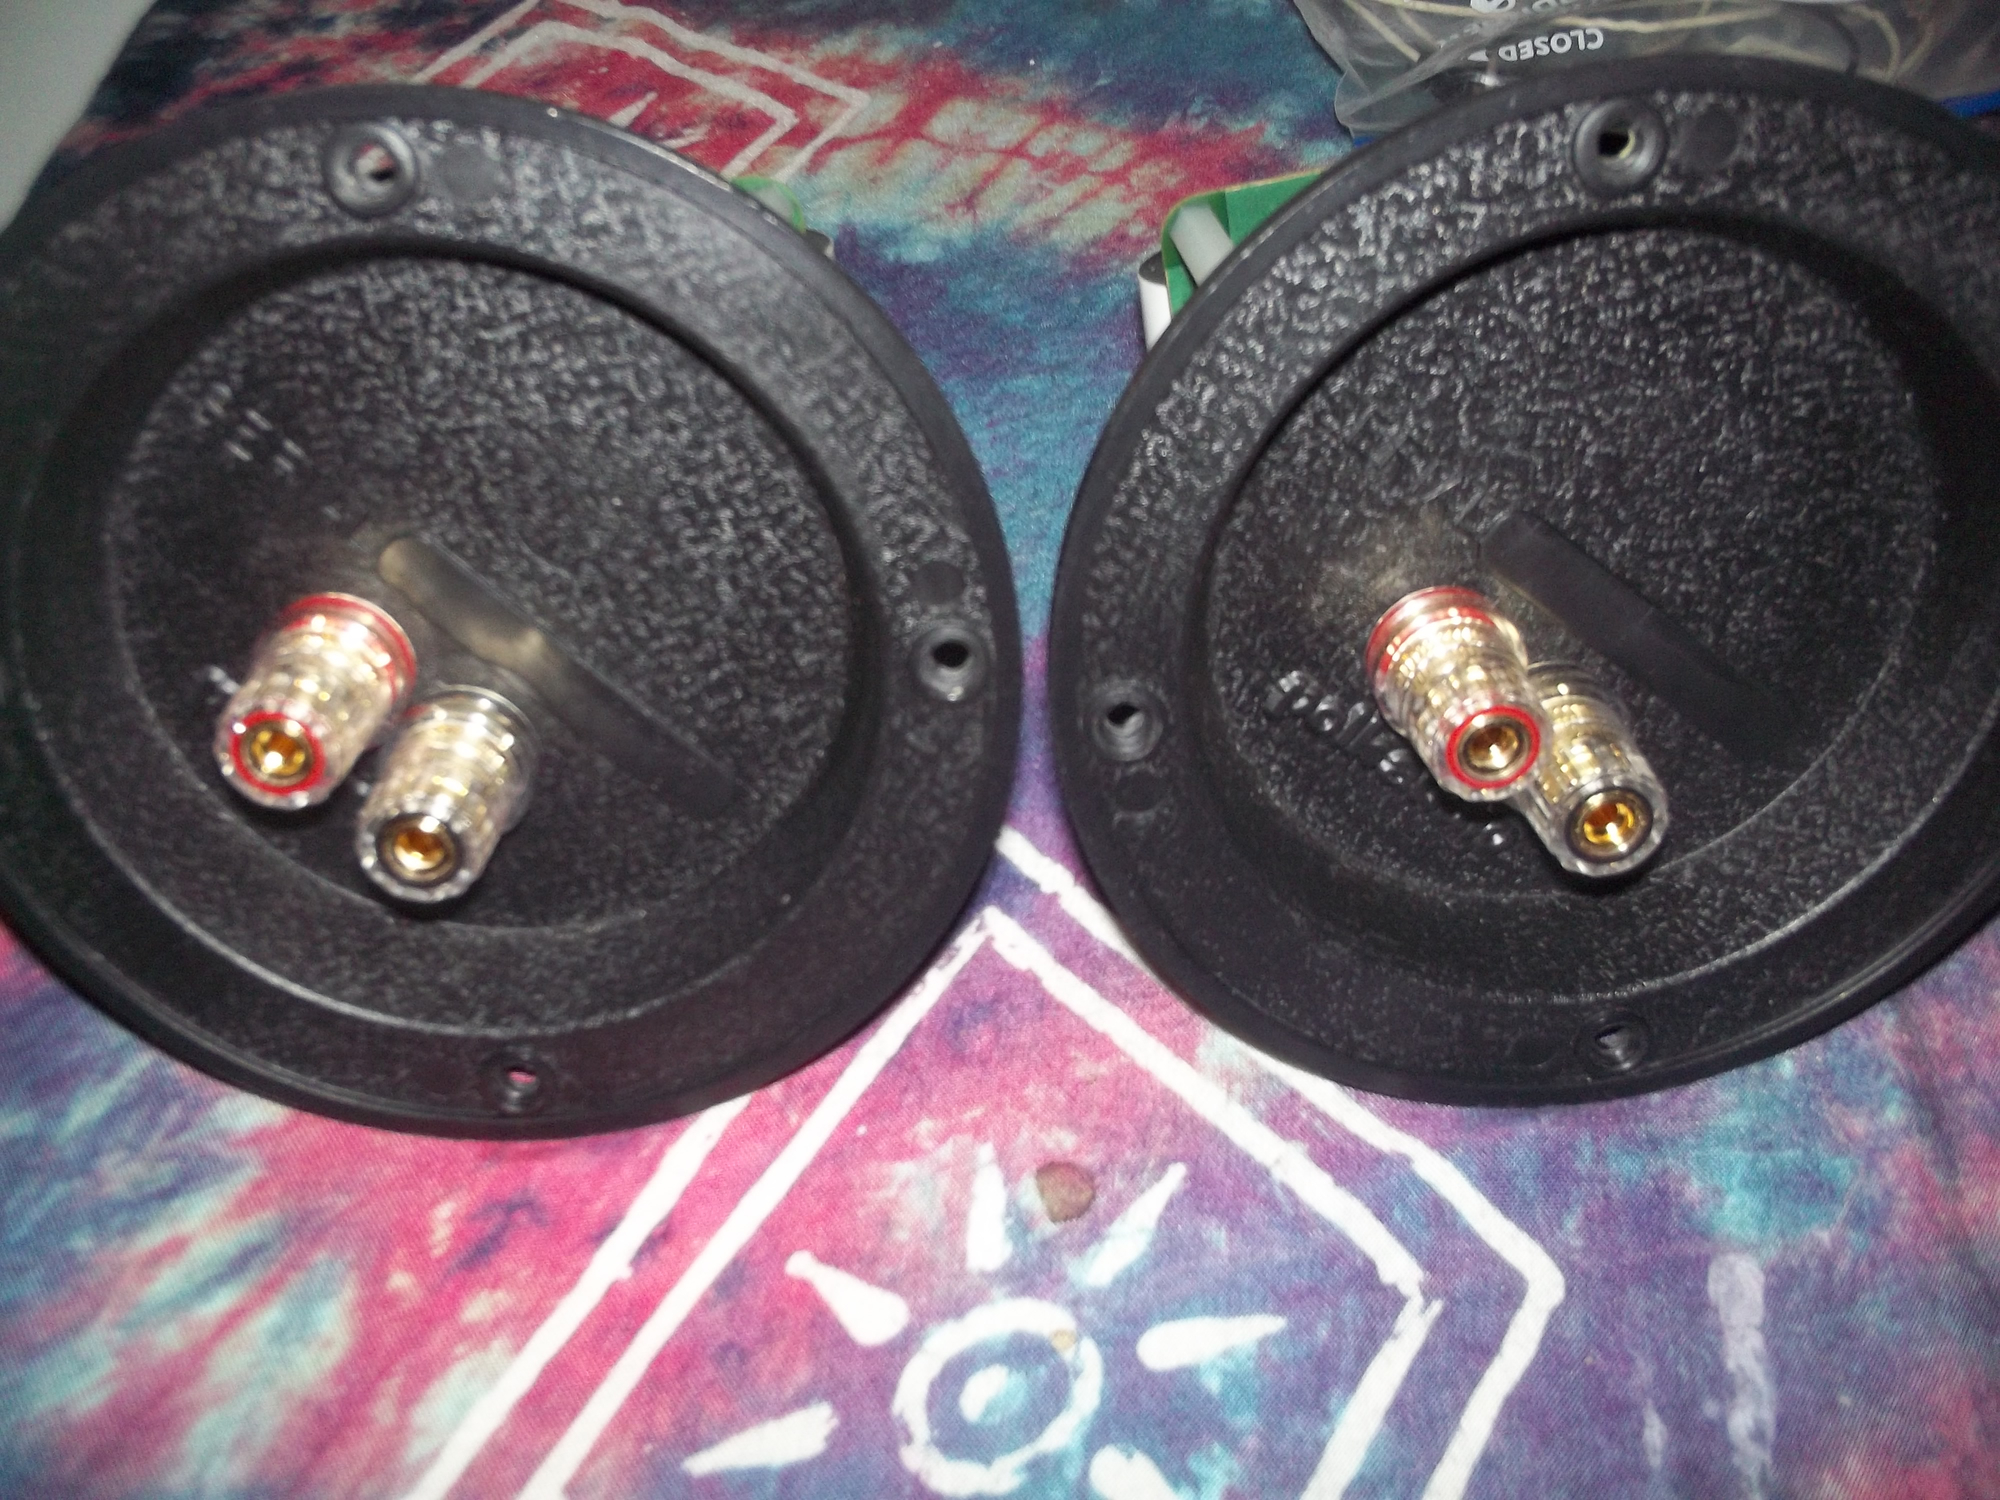
Are those WBT posts? Nice double decker install.
-
butterbean wrote: »Yeah I know, I was just commenting on the quality of your work! I am still planning on updating my crossovers just trying to figure out a way to get the wife on board. Yeah I know, good luck with that!
Thanks. Guess you're not a Star Wars fan. https://www.youtube.com/watch?v=532j-186xEQ Home Theater/2 Channel:
Front: SDA-2ATL forum.polkaudio.com/discussion/143984/my-2as-finally-finished-almost/p1
Center: Custom Built forum.polkaudio.com/discussion/150760/my-center-channel-project/p1
Surrounds & Rears: Custom Built forum.polkaudio.com/discussion/151647/my-surround-project/p1
Sonicaps, Mills, RDO-194s-198s, Dynamat, Hurricane Nuts, Blackhole5
Pioneer Elite VSX-72TXV, Carver PM-600, SVS PB2-Plus Subwoofer
dhsspeakerservice.com/ -
Are those WBT posts? Nice double decker install.
Thanks. Those are the imported ones I keep in stock.Home Theater/2 Channel:
Front: SDA-2ATL forum.polkaudio.com/discussion/143984/my-2as-finally-finished-almost/p1
Center: Custom Built forum.polkaudio.com/discussion/150760/my-center-channel-project/p1
Surrounds & Rears: Custom Built forum.polkaudio.com/discussion/151647/my-surround-project/p1
Sonicaps, Mills, RDO-194s-198s, Dynamat, Hurricane Nuts, Blackhole5
Pioneer Elite VSX-72TXV, Carver PM-600, SVS PB2-Plus Subwoofer
dhsspeakerservice.com/ -
Wow, that's quite an upgrade.
I like those RTA-11 series speakers, too.I disabled signatures. -
Home Theater/2 Channel:
Front: SDA-2ATL forum.polkaudio.com/discussion/143984/my-2as-finally-finished-almost/p1
Center: Custom Built forum.polkaudio.com/discussion/150760/my-center-channel-project/p1
Surrounds & Rears: Custom Built forum.polkaudio.com/discussion/151647/my-surround-project/p1
Sonicaps, Mills, RDO-194s-198s, Dynamat, Hurricane Nuts, Blackhole5
Pioneer Elite VSX-72TXV, Carver PM-600, SVS PB2-Plus Subwoofer
dhsspeakerservice.com/ -
Nice idea lifting the boards. Work looks great!
-
Home Theater/2 Channel:
Front: SDA-2ATL forum.polkaudio.com/discussion/143984/my-2as-finally-finished-almost/p1
Center: Custom Built forum.polkaudio.com/discussion/150760/my-center-channel-project/p1
Surrounds & Rears: Custom Built forum.polkaudio.com/discussion/151647/my-surround-project/p1
Sonicaps, Mills, RDO-194s-198s, Dynamat, Hurricane Nuts, Blackhole5
Pioneer Elite VSX-72TXV, Carver PM-600, SVS PB2-Plus Subwoofer
dhsspeakerservice.com/ -
Hack

-
Home Theater/2 Channel:
Front: SDA-2ATL forum.polkaudio.com/discussion/143984/my-2as-finally-finished-almost/p1
Center: Custom Built forum.polkaudio.com/discussion/150760/my-center-channel-project/p1
Surrounds & Rears: Custom Built forum.polkaudio.com/discussion/151647/my-surround-project/p1
Sonicaps, Mills, RDO-194s-198s, Dynamat, Hurricane Nuts, Blackhole5
Pioneer Elite VSX-72TXV, Carver PM-600, SVS PB2-Plus Subwoofer
dhsspeakerservice.com/ -
OK,
The crossovers for my 11TL's (in David's photos, first post above) have arrived, and a day ahead of schedule.
First let me say, David did a superb job with the packaging. Take it from a guy who worked for UPS for almost thirty years- Top Notch job David. It is appreciated because I have seen it all when it comes to packaging. He even returned my old components. I was not (ha!) expecting that. Not sure what I'll do with them.... but thanks.
Secondly... I will say it... these babies are Sexy. There.. I said it.. SEXY! (said it again).
Thirdly, yes, they will still 'fit'. Thus, I do not have to install them thru the front of the speaker. Again, well done David and Thank You, sir. Sorry I had the late version of the board... really didn't know about that. It won't happen again.
And now... the game is officially afoot! Let the RTA 11TL refurb begin...hopefully I can post the following here since the thread title seems to fit. If not, my apologies.
Skinning the Polks
The wife and I spent about 3.5 hours removing Polk's "furniture grade finish" (aka woodgrain vinyl) from the speaker boxes. It was an interesting endeavor...and please note I did not refer, in any way, to what we removed... as being 'veneer'. ha!
I read (I think) just about every and any post still available in this forum on this subject matter..and then I/we just kind of "winged it". Here are some "tips" I'd like to offer when it comes to removing the vinyl from your 11TL's (or similar). YMMV...*
Tools I used... 25 year old heat gun, tweezers, work gloves, scrap plywood, Exacto knife.
Tips/suggestions
-After removing all the components, grill pins, spikes, threaded inserts, etc from your speaker boxes, I would suggest you place your speaker on a soft surface like an old towel. Its not to prevent damage to the vinyl of course, but rather the p-board underneath. Any dings you add now are just more repairs you'll have to do before veneering, painting, whatever (please don't paint your Polks). I suggest you start your vinyl removal adventure with the bottom of a speaker. That way, if you happen to #@## something up, in all likelihood it will never show. Plus, the speaker bottoms are small in terms of surface area, so you can build up your 'confidence'. The photo below represents my progress after my first 15 minutes of work... at which point I remember thinking "I should be done by Halloween at this rate, sheeesh".
-Set up your work area at a comfortable height. You will be jerking on these for awhile, and even if you manage to get your spouse to help, as I did, you will feel better the next day if you're not straining as you work. This hasn't gone off the rails, has it? Of course it hasn't.
-I began this adventure, solo, and wearing a pair of work gloves that had rubber grips on the fingers. These really helped in gripping the vinyl, although ultimately I ended up working bare-handed. Yes, the vinyl will be *hot*. No, even bare-handed I managed not to burn myself. I did however, end up with identical blisters(not burns) on each index finger... go figure. Anyway...
-Trying to remove the vinyl in one large piece (see again, the above photo) didn't work for me. Sensing I needed to change tactics, I then began a rather loud tirade of expletives which worked exactly as desired. I was then quickly joined by my wife who had feared I had seriously hurt myself, or worse. I explained that I had been "working forever and only got this much done, honey" (again, see the photo above). Pitying me, and my manliness, she offered to pitch in and frankly, the entire project then switched gears.
(continued)
-
part 2
-We decided to adopt a 'slice and peel' strategy. Using an exacto blade we *lightly* scored the 38" long speaker side every 2-3", working from the back of the cabinet to the front, one end to the other. Your target is to just slice thru the vinyl, but not into the p-board underneath. A sharp blade, as always, is your best friend here. Your first cut (preferably on the speaker bottom!) is your test cut. After lightly scoring a 2" strip, heat it, remove it, and see if you have also scored the p-board as well. If so, adjust the pressure on your next cut. Most of our cuts ended up leaving no discernible mark after just a few attempts. Besides, I knew I was going to hit the entire surface with my trusty PC Speed-bloc anyways, and then of course add veneer. If you plan to paint your boxes (god, why??) then you may have more sanding ahead of you-unless you are very careful or, find another method. We found that 2-3" wide strips gave us the best success rate for removing the vinyl w/o it snapping/tearing off. Once it snaps, you have to grab the tweezers (or use your fingernails) to restart the edge which is not any fun. At this point we have done about 1/2 of a 38" side. Photo below.
-The design of the 11TL's is such that there is a 1/2" wide 'lip' of the woodgrain vinyl that surrounds the front/black baffle area. My strategy was to do this 'lip' last with each side (or top/bottom) that we did. I wanted to heat this small area last then pull 'down and away' on this last narrow strip (which is a continuation of the vinyl from the adjoining side) so hopefully, I would end up with a nice clean edge next to the black-which also appears to be vinyl. So, as not to heat the black section right next to it, we used a scrap of plywood (12"x12"x1/8") and leaned it into position with one of its sides up and under the lip (photo below). This sheltered the black beneath the ply from the heat gun. It worked like a charm! The narrow strip of woodgrain could be heated easily while the black portion just a fraction of an inch away remained cool to the touch. I think the thinness of the ply worked to our advantage here. It kept the plywood under the small lip, but wasn't thick enough to block the heat from reaching the last of the woodgrain vinyl. We heated a 3 or 4" wide section at a time, pulled down and away, then slid the ply over to the next section. Lather, rinse, repeat. I was very happy with the results.
-It took us a little under 2 hours to do the first speaker, with the steep learning curve, but then just an hour and twenty minutes for the second. We were almost having fun by the time we finished. Almost. I won't lie.
-With the tools we used, I found the key to be... I had to develop a 'feel' for how much I could pull on the vinyl strip, w/o it tearing prematurely. Yeah, that sounds simple enough, but if you want to avoid the frustration of repeatedly starting a new edge to grab onto, you must develop this feel. Otherwise my wife will laugh at you, like she did at me, for most of the first speaker box that we did. Don't be me, doing the first speaker box. Be smarter. We worked as a team, she would heat a strip and then while I worked attempting to pull it off, she would move onto starting the next strip with the heat gun..etc. We found it best to heat a strip, then wait for a 'count of ten' before I started trying to pull it off. Without waiting that ten seconds, the vinyl would still be so soft it would just tear off immediately sometimes. But wait much longer then 10 seconds and you could hardly make any progress before having to reheat that strip again. We were really pretty good at it by the time we finished, and it is a method that worked with the old heat gun that we had. It only has two temp settings, hot, and not hot enough. But it worked, and I soon found it worked better for me w/o wearing the gloves, because I had a better 'feel' for when the vinyl was about to tear.
Here's a photo of a now skinned rta 11TL...
Hurricane nuts are installed, new tweets (98's) from Midwestern are in hand, and veneer will be ordered tomorrow-ish. Dynamat-xtreme is around here somewhere, as well as my old friend JB.
I may end up re-doing the mounting holes for spikes, the 'levelers' (don''t know what else to call them) that Polk sold these with just look kinda silly by todays standards and, they were installed in a very 'informal' manner. There was no jig or template used as to where they drilled the mounting holes because none of them has any relation to the other three. Somebody at the Polk factory just "drilled a hole near this corner, and another kinda near this corner...and another.." etc. I may fill them with a 2-part-epoxy or possibly a section of hardwood dowel and start over and re-drill after veneering.
Anyway...this all should all take a 'couple of weeks' or more, emphasis on the 'more', but it will be mostly fun.
* This was our first attempt at removing speaker vinyl, and ultimately the method we used did indeed work for us. By that I mean, the vinyl is gone and our marriage is still intact. That said, we don't mean to insinuate that there aren't other ways to skin a Polk (or cat) which may be more efficient, easier, etc, and this method might not work for everybody. You decide. Be careful. Good luck.
-glenn
-
Keep us posted Glenn. Can't wait to see the veneer work.Home Theater/2 Channel:
Front: SDA-2ATL forum.polkaudio.com/discussion/143984/my-2as-finally-finished-almost/p1
Center: Custom Built forum.polkaudio.com/discussion/150760/my-center-channel-project/p1
Surrounds & Rears: Custom Built forum.polkaudio.com/discussion/151647/my-surround-project/p1
Sonicaps, Mills, RDO-194s-198s, Dynamat, Hurricane Nuts, Blackhole5
Pioneer Elite VSX-72TXV, Carver PM-600, SVS PB2-Plus Subwoofer
dhsspeakerservice.com/ -
Thanks David.
Ah yes, the "veneer work".. also known as "Phase 2 of Glenn's
Learning Curve" on this project.
File under : Mods, Tweaks, and other Misadventures
First batch of veneer should arrive tomorrow.
-glenn
-
That is some good love!Stan
Main 2ch:
Polk LSi15 (DB840 upgrade), Parasound: P/LD-1100, HCA-1000A; Denon: DVD-2910, DRM-800A; Benchmark DAC1, Monster HTS3600-MKII, Grado SR-225i; Technics SL-J2, Parasound PPH-100.
HT:
Marantz SR7010, Polk: RTA11TL (RDO198-1, XO and Damping Upgrades), S4, CS250, PSW110 , Marantz UD5005, Pioneer PL-530, Panasonic TC-P42S60
Other stuff:
Denon: DRA-835R, AVR-888, DCD-660, DRM-700A, DRR-780; Polk: S8, Monitor 5A, 5B, TSi100, RM7, PSW10 (DXi104 upgrade); Pioneer: CT-6R; Onkyo CP-1046F; Ortofon OM5E, Marantz: PM5004, CD5004, CDR-615; Parasound C/PT-600, HCA-800ii, Sony CDP-650ESD, Technics SA 5070, B&W DM601 -
OK,,
The veneer for my 11TL's did arrive..uh.. a couple of weeks ago. I decided, for nostalgic reasons I guess, that I wanted a 'look' from the veneer for this project that I would have appreciated both back in '92 when I bought these Polks, as well as going forward in time from now. As such, I finally went with an 'Australian Walnut'(not actually a member of the Walnut family) that really caught my eye.. and(!)... it came in pieces that were large enough to do the side of an 11TL box(14"x38") without needing to be pieced-this was pretty-much a prerequisite for me! It's from a veneer supplier here in MD and arrived well packed and spent a few days relaxing(it was shipped rolled up) and acclimating to our environ here. I need 4 sheets(if I don't drop the ball) of the veneer to do the speakers, so I ordered 5 so as to have 1 sheet to 'play' with first because.... I've never done veneer before. Here's what I purchased....each sheet is 18"x62" and will do a speaker side, and still have enough to do the adjoining top/bottom. It's even prettier in person... it actually looks like a piece of sawn lumber to me, instead of a composite of side-by-side pieces joined together like some veneer sheets, and it has a wonderful curl 'going on' throughout the piece. It has no backing paper nor adhesive, it is 'raw' and 1/45" thick.
Not having a bagging setup, and not wanting to mess with contact cement if avoidable, I have chosen to try a 'hot press' application method for this raw veneer. Simply cut(with a veneer saw-I'm still getting the hang of it) a section of the veneer to fit the side of the object you're working on with about a 1/2" overhang all around and then with a glue roller, roll on a layer of the adhesive(HeatLock) on both the backside of the veneer and your target surface. Wait 30 mins for glue to feel dry to the touch, then position your piece of veneer onto the surface(it won't bond at this point so you can move it around until you have it exactly where you want it-try that with contact cement!), then cover with an old t-shirt and iron away-working from the center out of course. Sounds simple enough...and it mostly was.
Here's the item I chose from around the house to 'practice' on, before starting an actual speaker. Its an el-cheapo 'bin' of my wife's, she uses them to hold her prints at art shows. It is some type of wood from SE Asia(my guess), finger-jointed in the corners. I would have preferred MDF or p-board for stability, but we didnt have any. Oh well. For size perspective, the bin is just wide enough to hold a record album. At the point in time that I took this photo, I had already started applying the veneer..my apologies for being out of chronological order. For this project, I ran the grain in the veneer in the same direction as the grain of the box. For the speakers, I will rotate the veneer 90 degrees of course, like it is the photo above.
The adhesive dries to a shiny pinkish color. It's very easy to tell where you have applied it, in case you miss a spot. The veneer does tend to want to curl a bit as the glue dries, thus the tape to hold the edges until it sets. The tape also prevents getting any glue on the 'good side' which is facing down. Blue tape did end up working better than the frog tape shown here. I started with the frog tape, but my second piece
of veneer popped loose from the tape while I was upstairs and wound itself up to the size of a paper towel tube-sticky side out. Oops! It was blue tape only, after that.
Anyway, once I ironed a side down-which took less than 2 minutes on this small bin (including doing a visual check of all the edges to make sure they were down good) I let the reactivated adhesive fully set(about 2-3 hours) and then,, trimmed any veneer overhang with my favorite(!) new tool...a trim router with a down-cut spiral bit with guide bearing. It weighs in at only 4 pounds and was a very easy to control compared to the 13 pound Elu router I was going to use. It worked very well, and the bearing did not mar the veneer on the adjoining surface. I tried placing a layer of frog tape on the surface the bearing would ride on- and sure enough- this made the cut a little proud of the edge. I then took a t-bar sander and finished the edge by hand. I just felt batter doing it this way. And this Australian (non-)Walnut really does smell like our Black Walnut when its worked. I really enjoy that smell.
When I started veneering this bin, I didn't think the process thru and started cutting off pieces at one end of the veneer sheet, instead of in the center. Lesson learned. As such, I was only able to attempt to match the grain at one end of the bin, instead of both ends...which is a shame because I definitely could still use the practice! Anyway, here's the 'good' end...(it could have been better, if i had minimized the overhang/waste when I cut the veneer-another lesson learned)
and the not-so-matched corner...("not-so-matched" = not at all, ha! but it is a crisp,clean corner)
I think both are acceptable, but I'll be trying for matched corners when possible on the speaker boxes-which I will be starting in earnest this weekend for sure. They are sanded and ready to be veneered.
The practice bin above will become my test subject for a few different finishes in a couple of weeks.I want a low-luster(!) finish on these, I'm not a "high-gloss" guy and these will be parked in the living room and never see duty as drink holders, end tables, or the like. If anybody has any tips or advice for possible finishes for this veneer, I'd be glad to listen. I've gotten some advice from David(#westmassguy) on what finishes he has used on veneers in the past, and I'm certainly open to more advice. I don't have a spray booth- but I am pretty good with rattle cans if that is an option. I do know that the glue manufacturer claims that the veneer adhesive does form a 'hard line' once fully cured so that is supposed to broaden my options, ie, I supposedly don't have to worry about the finish I choose damaging the adhesive and allowing the veneer to creep. I have done exactly one French Polish finish in my life, on my first wife's hope chest 35 years ago, and it turned out quite nicely, but I would rather not go that route this time. lol. This veneer is rather porous, but filling those pores is not a priority either. OK, it's time for hockey...
Thanks for looking.
-glenn
Post edited by gramey on -
Wow, looks freaking great!
-
Looks great Glenn. Maybe @F1nut Jesse can offer some professional advice on the finishHome Theater/2 Channel:
Front: SDA-2ATL forum.polkaudio.com/discussion/143984/my-2as-finally-finished-almost/p1
Center: Custom Built forum.polkaudio.com/discussion/150760/my-center-channel-project/p1
Surrounds & Rears: Custom Built forum.polkaudio.com/discussion/151647/my-surround-project/p1
Sonicaps, Mills, RDO-194s-198s, Dynamat, Hurricane Nuts, Blackhole5
Pioneer Elite VSX-72TXV, Carver PM-600, SVS PB2-Plus Subwoofer
dhsspeakerservice.com/ -
uh, OK, I attempted to edit a typo, and my entire post went bye-bye. LOL. I have a copy of it that I will attempt to post below....
-
uh, OK, I attempted to edit a typo, and my entire post went bye-bye. LOL.
The glory that is VanillaHome Theater/2 Channel:
Front: SDA-2ATL forum.polkaudio.com/discussion/143984/my-2as-finally-finished-almost/p1
Center: Custom Built forum.polkaudio.com/discussion/150760/my-center-channel-project/p1
Surrounds & Rears: Custom Built forum.polkaudio.com/discussion/151647/my-surround-project/p1
Sonicaps, Mills, RDO-194s-198s, Dynamat, Hurricane Nuts, Blackhole5
Pioneer Elite VSX-72TXV, Carver PM-600, SVS PB2-Plus Subwoofer
dhsspeakerservice.com/ -
OK,,
Here's a copy of my post from above(that I disappeared somehow)that I saved a little before actually posting it.............
sorry about the confusion...
The veneer for my 11TL's did arrive..uh.. a couple of weeks ago. I decided, for nostalgic reasons I guess, that I wanted a 'look' from the veneer that I would have appreciated back in '92, as well as going forward from now. As such, I went with an 'Australian Walnut'(not actually a member of the walnut family) that really caught my eye.. and(!)... it came in pieces that were large enough to do the side of an 11TL box(14"x38") without needing to be pieced-this was pretty-much a prerequisite!! It's from a veneer supplier here in MD and arrived well packed and spent a few days relaxing(it was shipped rolled up) and acclimating to our environ here. I need 4 sheets(if I don't drop the ball) of the veneer to do the speakers, so I ordered 5 so as to have 1 sheet to 'play' with first because.... I've never done veneer before. Here's what I purchased....each sheet is 18"x62" and will do a speaker side, and still have enough to do the adjoining top/bottom. Its even prettier in person... it actually looks like a piece of sawn lumber to me, instead of a composite of side-by-side pieces like some veneers, and has a wonderful curl 'going on' through out the piece. It has no backing paper nor adhesive, it is 'raw' and 1/45" thick.
Not having a bagging setup, and not wanting to mess with contact cement if avoidable, I have chosen to try a 'hot press' application method for this raw veneer. Simply cut(with a veneer saw-still getting the hang of it!) a section of the veneer to fit the side you're working on(with a little(1/2") overhang all around) and then roll on a layer of the adhesive(HeatLock) on both the backside of the veneer and your target surface. Wait 30 mins for glue to feel dry to the touch, then position veneer onto the surface(it won't bond at this point so you can move it around until you have it exactly where you want it-try that with contact cement!), then cover with an old t-shirt and iron away to reactivate the adhesive-working from the center out of course. Sounds simple enough...and mostly it was.
Here's what I chose from around the house to 'practice' on, before starting an actual speaker. Its an el-cheapo 'bin' of my wife's, she uses them hold her prints at art shows. It is some type of wood from SE Asia(my guess), finger-jointed in the corners. I would have preferred MDF or p-board for stability, but we didnt have any. Oh well. For size perspective, it's just wide enough to hold a record album. At this point in time, I had already started applying the veneer..my apologies for being out of chronological order.
The adhesive dries to a shiny pinkish color. It's very easy to tell where you have applied it, in case you miss a spot. The veneer does tend to want to curl a bit as the glue dries, thus the tape to hold the edges until it sets. Blue tape did end up working better than the frog tape shown here. I started with the frog tape, but my second piece
popped loose from the tape while I was upstairs and wound itself up to the size of a paper towel tube. oops! It was blue tape after that.
Anyway, once I ironed a side down-which took less than 2 minutes on this small bin (including do a visual check of all the edges to make sure it was down good) I let the reactivated adhesive fully set(about 2-3 hours) and then,, trimmed the veneer overhang with my favorite(!) new tool...a trim router and a down-cut spiral bit with guide bearing. It weighs in at only 4 pounds and was a very easy to control compared to the 13 pound Elu router I was going to use. It worked very well, and the bearing did not mar the veneer on the adjoining surface. I tried placing a layer of frog tape on the surface the bearing would ride on- and sure enough- this made the cut a little proud of the edge. I then took a t-bar sander and finished the edge by hand. I just felt batter doing it this way. And this Australian (non-)Walnut really does smell like our Black Walnut when its worked. I really enjoy that.
When I started veneering this bin, I didnt think the process thru and started cutting off pieces at one end of the veneer sheet, instead of in the center. Lesson learned. As such, I was only able to attempt to match the grain at one end of the bin, instead of both ends...which is a shame because I definitely could still use the practice! Anyway, here's the 'good' end...(which would look better if I had left less overhang when I cut the veneer-another lesson learned).
and the not-so-matched corner...
I think both are acceptable, but I'll be trying for matched corners when possible on the speaker boxes-which I will be starting in earnest this weekend for sure. They are sanded and ready to be veneered.
The practice bin above will become my test subject for a few different finishes in a couple of weeks.I want a low-luster(!) finish on these, I'm not a "high-gloss" guy and these will be parked in the living room and never see duty as drink holders, end tables, or the like. If anybody has any tips or advice for possible finishes for this veneer, I'd be glad to listen. Ive gotten some advice from David(#westmassguy) on what finishes he has used on veneers in the past, and I'm certainly open to more advice. I dont have a spray booth- but I am pretty good with rattle cans if that is an option. I do know that the glue manufacturer claims that the veneer adhesive does form a 'hard line' once fully cured so that is supposed to broaden my optionsI dont have to worry about the finish damaging the adhesive and allowing the veneer to creep. I have done exactly one french Polish finish in my life, on my first wife's hope chest 35 years ago, and it turned out quite nicely, but I would rather not go that route this time. lol. This veneer is rather porous, but filling those pores is not a priority either.
Thanks for looking.
-glenn -
butterbean wrote: »Wow you do beautiful work brother!
2nd that. Wish I could find someone local to do similar. That grain is unique.Don't take experimental gene therapies from known eugenicists. -
Looks good 👍
-
Veneer Update...
First, Thanks for the kind comments above.
I believe, I may(!) have finished the raw veneer application to my 11TL's.
It has been a learn-on-the-fly adventure. My apologies for the 3-week gap.
So, the 'plan' in brief, was to apply raw veneer to the sides, tops, and bottoms of my RTA 11TL's. I practiced above on a small wooden bin and then proceeded by working on the real thing. I had 4 sheets (18"x62"x.022") of sequential veneer each of which was large enough for a side(14"x38") and a top/bottom(14"x10.5") plus a little more than a linear foot leftover. Since I had some wiggle room, I had the option to choose where(!) on the veneer sheets I was going to cut my pieces from. This was a part of the reason I chose this veneer to begin with. I liked having some measure of creative control.
So, I started by cutting out a chipboard 'frame' whose inside(!) dimensions matched the exterior(!) dimensions of the speaker side. Then I could move this frame about on the veneer sheet and see exactly where I like the grain pattern the best. This frame is just an extra piece of the same 'chipboard' I used for a cutting surface for this project, it worked great, and a huge sheet is only about $3-$4. This photo shows what position on the veneer sheet I ultimately chose. Basically, I centered the main grain structure(dark area) left to right and ended it up top where it wouldn't look to me like I had 'beheaded' it.
The plan being.. to cover the left side of a speaker first, then using the remainder of that same sheet to move right across the speaker top (continuing the grain pattern at the top/left corner), then, cover down the speaker right side(also continuing the grain at the top/right corner) and finally across the speaker bottom, again matching the grain at the bottom/right corner. That's a total of 97" of linear coverage from veneer sheets that are only 62" long. So, of course, I had to buy a veneer stretcher to make it work. Just kidding, I'm pretty sure there's no such thing as a veneer stretcher...
I could have been satisfied(not really) with matching the grain only at opposite corners..say 'top-left' and 'bottom-right' but I decided to give it a shot and see how close I could come to matching 3 out of the 4,, with the top two corners of the speaker being most important visually of course. If I couldn't get it to work on this first speaker, then I would go a simpler route on the second, no biggie.
This photo below, hopefully shows how I set up my frame on the first sheet and visually extended that first veneer sheet by setting up my second sheet at its far end, but,, flipping it over so the grain essentially becomes not an actual continuation of the pattern, but actually a reversal of it. In either case, if I cut the second sheet at exactly the right place to begin the second side of the speaker...then the grain will match visually and 'flow' right around the speaker corner.
How to know where to cut the second sheet to start down the right side...? I just used the remainder/leftover piece of the first sheet as a template and flipped it over and laid it on the second sheet(which also was flipped over) and cut along its termination edge. Yeah, it sounds confusing, but really does work, mostly. The tricky part is you can leave yourself only the slightest(about 1/16") bit of extra/hangover for each piece so when it comes time to iron those pieces into position. The more waste you leave to be trimmed off, the less likely the grain lines will actually match because that waste becomes a 'missing' section. How well this works will also depend somewhat on the grain pattern of the particular veneer being used.
Ok, my process...and as a reminder I don't claim that any of the following is the best way, or only way to try to do this..., I was learning as I went....
My cutting set-up in this photo. A piece of 1x3 lumber which I ran one edge over my jointer so I could establish a straight edge. In this photo that edge is facing to your right and will be my guide for running the veneer saw along. The 'good' edge is under the board, the 'waste' is the narrow(about 2" wide) piece to the right of the guide board.
Once a side is cut to size, I put my glue setup(two pieces of black gator-board) on top
of my cutting setup and... hope for the best!
This photo..a long side of veneer taped down and with glue(HeatLock) added....
..and a couple of minutes later, the glue is rolled out using a glue roller...
Then repeat this process on the side of the speaker box..and let the glue dry to the touch- anywhere from 30 mins(which I chose) up to 3 hours. The speaker box remained a speaker box once the glue was dry, but this veneer did the fandango !! You can see(hopefully) how the once very flat veneer became a wavy, puckered 'thing'... especially along the edge of the dark center grain. Yeah, I was a little intimidated.
So, I got up enough nerve and ironed down this first side to the speaker, working from center(!) outward with the household iron, until... I heard a "c-c-crack" when I was nearly finished. Yikes. Along the bottom edge where it was wavy, the grain split open. You know what I said out loud at this point. Uh huh. In the photo there are cracks on either side of the dark grain area. The one on the right was contained within the overhang/scrap portion and would trim off with the router...no problem. The one on the left was not as polite and extended a bit onto the side of the speaker. I had to patch this one with a scrap piece of veneer later, and surprisingly the repair turned out well. I guess the final test will be when a finish is applied. In any case, it is at the very bottom edge and will be against the carpet.
Then, I just followed this same procedure, working clockwise around the speaker, cutting, fitting, and then applying one piece at a time, ultimately finishing with the speaker bottom.
Here's a photo of the top/right corner(the speaker is lying on its left side) where I had the grain reverse itself in order to get it to line up. The lighting is a little funky with the top being in slight shadow..but the match turned out really well. I am pleased.
Here are the 'left' sides of each speaker...
..and a shot from above...
The 11TL's have a 'face',, a 1/2" wide portion that faces toward the listener that also needs veneering. So, I saved my scraps and did these surfaces last, matching the grain to the sides and tops, mostly. Oh yeah, and mitered corners as well, just for kicks. Thanks Polk! I am pleased with these results as well.
various points:
-For the raw version like I am using here, I cant imagine a better tool for cutting it than a veneer saw. They're made for righties and I am a lefty, but we southpaws have been adapting all our lives and it was a pleasure to use. Great tool.
-The heatLock adhesive, we shall see. I did learn that letting the glue dry longer before ironing did result in the veneer returning mostly to its original, flat state. And 'mostly flat' is much less stressful to iron than 'wavy'.
-Whiteside downcut spiral bit, 1/4", made in the USA, worked wonderfully.
-Frog tape-the yellow version. Very low tack so it was easy to remove w/o fear of damaging the veneer. I used most of a roll for this project, so far. Worth the higher price.
-Blue painters tape...stronger tack made it best for holding down veneer while glue was rolled on and then dried. Also for masking off the front/component portion of each speaker. Used a small portion of a roll, so far.
Now I'm going to use my veneer scraps, and the bin I veneered earlier this month to try some finishes on in the coming 'days'. The roster includes, but not limited to Watco Danish, Maloof's poly/oil, Minwax penetrating stain, and as of now unknown topcoat-could be poly or lacquer. We shall see.
-glenn
-
Looking great.Pio Elete Pro 520
Panamax 5400-EX
Sunfire TGP 5
Micro Seiki DD-40 - Lyra-Dorian and Denon DL-160
PS Audio GCPH phono pre
Sunfire CG 200 X 5
Sunfire CG Sig 405 X 5
OPPO BDP-83 SE
SDA SRS 1.2TL Sonicaps and Mills
Ctr CS1000p
Sur - FX1000 x 4
SUB - SVS PB2-Plus
Workkout room:
Sony Bravia XBR- 32-Inch 1080p
Onkyo TX-DS898
GFA 555
Yamaha DVD-S1800BL/SACD
Ft - SDA 1C
Not being used:
RTi 38's -4
RT55i's - 2
RT25i's -2, using other 2 in shop
LSI 15's
CSi40
PSW 404 -
Very nice.Home Theater/2 Channel:
Front: SDA-2ATL forum.polkaudio.com/discussion/143984/my-2as-finally-finished-almost/p1
Center: Custom Built forum.polkaudio.com/discussion/150760/my-center-channel-project/p1
Surrounds & Rears: Custom Built forum.polkaudio.com/discussion/151647/my-surround-project/p1
Sonicaps, Mills, RDO-194s-198s, Dynamat, Hurricane Nuts, Blackhole5
Pioneer Elite VSX-72TXV, Carver PM-600, SVS PB2-Plus Subwoofer
dhsspeakerservice.com/ -
You have a bigger set than I. I would foul that up bid as sh...
Looks good.
One question is from wood class yrs ago we always needed a paste wood filler on certain woods walnut being one of them. Is that not necessary with veneer?
-
Nice job. Consider contact cement in the future.
If you want to really make the figure pop use a dye such as ILVA, which is best applied by mixing it in with one of the types of lacquer. Pigmented stains such as Minwax tend to obscure.Political Correctness'.........defined
"A doctrine fostered by a delusional, illogical minority and rabidly promoted by an unscrupulous mainstream media, which holds forth the proposition that it is entirely possible to pick up a t-u-r-d by the clean end."
President of Club Polk -
You are very intrepid! And those look absolutely beautiful!
I know nothing of veneer work....do they ever spray water on the veneer to make it more pliable or would that just make things worse by raising the grain and shrinkage when it dries?George / NJ
Polk 7B main speakers, std. mods+ (1979, orig owner)
Martin Logan Dynamo sub w/6ft 14awg Power Cord
Onkyo A-8017 integrated
Logitech Squeezebox Touch Streamer w/EDO applet
iFi nano iDSD DAC
iPurifier3
iDefender w/ iPower PS
Custom Steve Wilson 1m UPOCC Interconnect
iFi Mercury 0.5m OFHC continuous cast copper USB cable
Custom Ribbon Speaker Cables, 5ft long, 4N Copper, 14awg, ultra low inductance
Custom Vibration Isolation Speaker Stands and Sub Platform -
There are a number of veneer softener products available.Political Correctness'.........defined
"A doctrine fostered by a delusional, illogical minority and rabidly promoted by an unscrupulous mainstream media, which holds forth the proposition that it is entirely possible to pick up a t-u-r-d by the clean end."
President of Club Polk