SDA 1C dovetailed walnut project
crispybrown
Posts: 21
Warning: Long and boring post.
Earlier in the year I bought nspindel's pair of 1Cs. He'd already done all of the usual audio upgrades: Dynamat, Armacell, Cardas binding posts, new large inductors, sonicaps, new tweeters, larry's rings, spikes, probably more that I've forgotten.
They sounded excellent, but at some point I knew I'd want to start on cosmetic work.. Replacing the grille covers was the easy part because I just handed the to a local furniture restorer! When a recent party-related accident caused most of the drivers to get melted, it seemed like a good time to send my amp away for service and make a start on the 1Cs while I waited.
I knew I wanted to replace the end caps with solid wood, and have never been a big fan of the fabric covered side panels, so decided to replace at least some of the expanse of black with wood. I thought it would be difficult to find solid wood that thin and even if I did, it wouldn't be very stable. This led me toward the idea of using ply or mdf for the sides, but veneering it with whatever wood I chose for the end caps.
The trouble with doing this however is that the design will always ensure that the side panels look separate from the end caps: There will be a seam between them, which is acceptable when they are finished in two completely different materials but I was not convinced it would look right if they matched. I wondered if it would be possible to dovetail the side panels into the end caps to make a somewhat "rustic toy chest" look - still obviously two separate pieces of wood, but nicely joined.
I started by trying to find the right material for the sides - the stock wood is 1/4" thick, but it is covered in fabric effectively on both sides and veneer is thinner than that, so I looked for something in 3/8". My local lumber yard only stocked "MDO" in this thickness. Medium Density Overlay, which is basically plywood with paper on each side to make a perfectly smooth surface. It looked like a potential candidate, so I picked up a sheet.
I then needed a way to cut the dovetails.. I already had a router from a kitchen project years ago and it seems several companies sell cheap dovetail jigs. Unfortunately these are limited to cutting fixed width dovetails about an inch apart, like you see on drawers. Leigh make a jig that can cut arbitrary patterns of dovetails, and the idea of having just a few large ones appealed. Unfortunately their jig is very expensive. I managed to find an old one on eBay with a few missing parts though, and eventually find the right guidebush etc to fit my router. Time to test out some cuts in the MDO..
Back to square one! The MDO being plywood had the grain going in both directions, so whilst one cut smoothly, the other would just shatter when the router bit hit it. Now I needed to find some 3/8" MDF. No one stocked it, but a local yard could order it in. I waited until I needed some other wood for a building project and placed the order.
Test joints on the MDF were ultimately successful, but even with it you have to be slow and careful when the router bit 'breaks through' to the other side.
Time to choose a wood species... I went to a local woodwork store to see what they had. Depending on the species, boards were available in varying sizes. I liked the idea of a single wide board for the end caps, so there would be no 'planks' effect from where smaller boards laminated together. This narrowed the options to pine and walnut, so the walnut was an obvious choice: I picked up a 1ft by 1" by long enough board, and a roll of paper-backed laminate.
A lot of reading up on laminating taught me that there are basically two ways to do it - raw laminate attached using glue and a vacuum press, or paper backed attached using contact adhesive, a spreader to push the sheet down, and weights left on it overnight.
I rough cut my mdf sheet and laminate to 1x4ft pieces - enough to do each side panel plus some extra. I then glued the laminate to the mdf, again roughly not bothering to line the edges up ...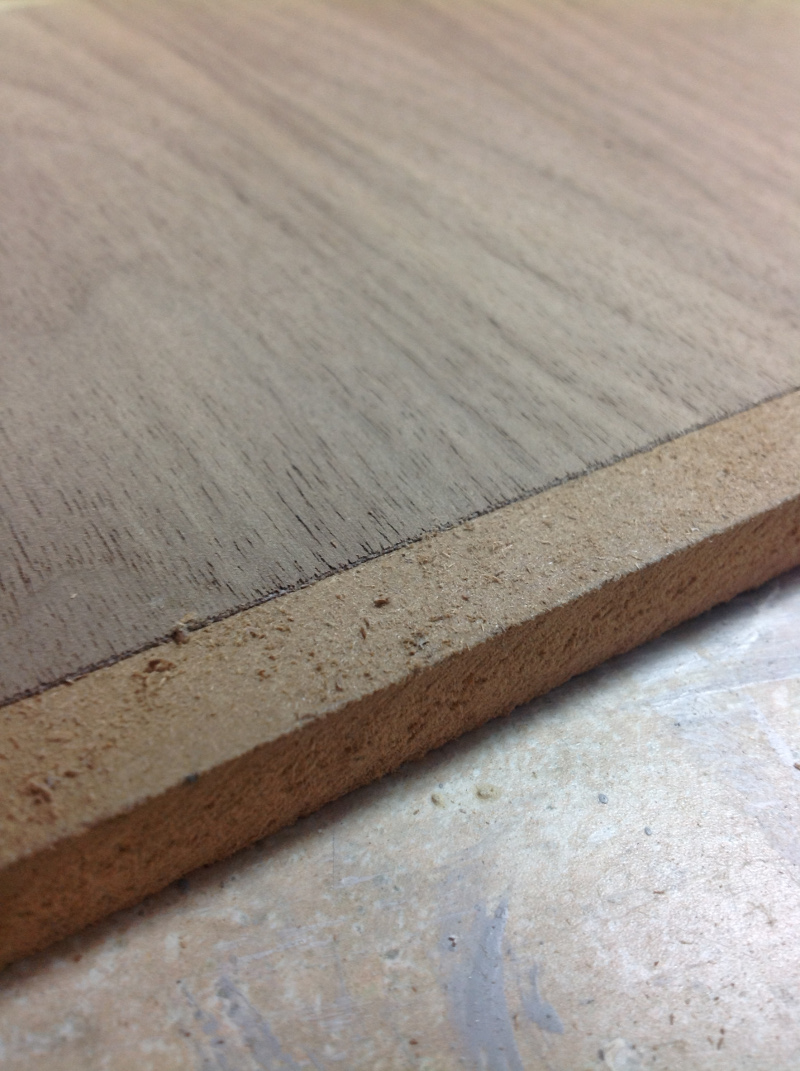
Trimming the MDF pieces down on the saw table to a size closer to the final one then ensured the veneer and base material lined up perfectly...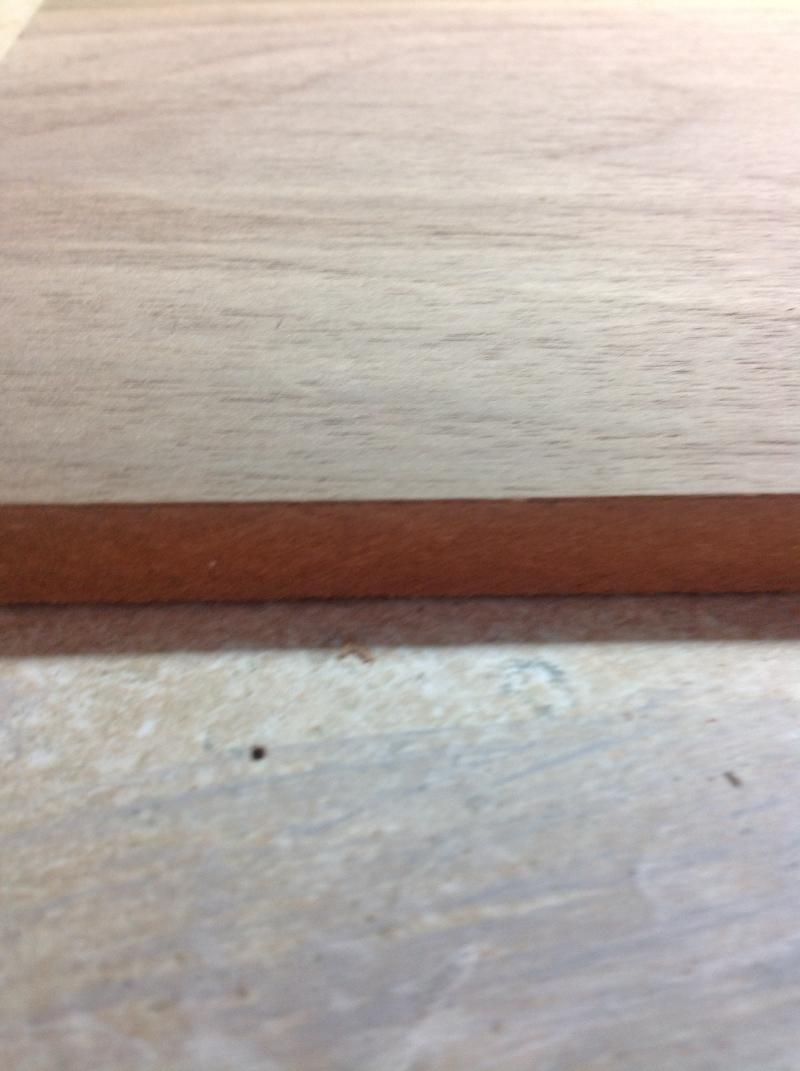
Unlike the MDF, cutting dovetails in the solid walnut was incredibly easy - I just had to take it very slowly, or the bit would overheat and shift position in the router.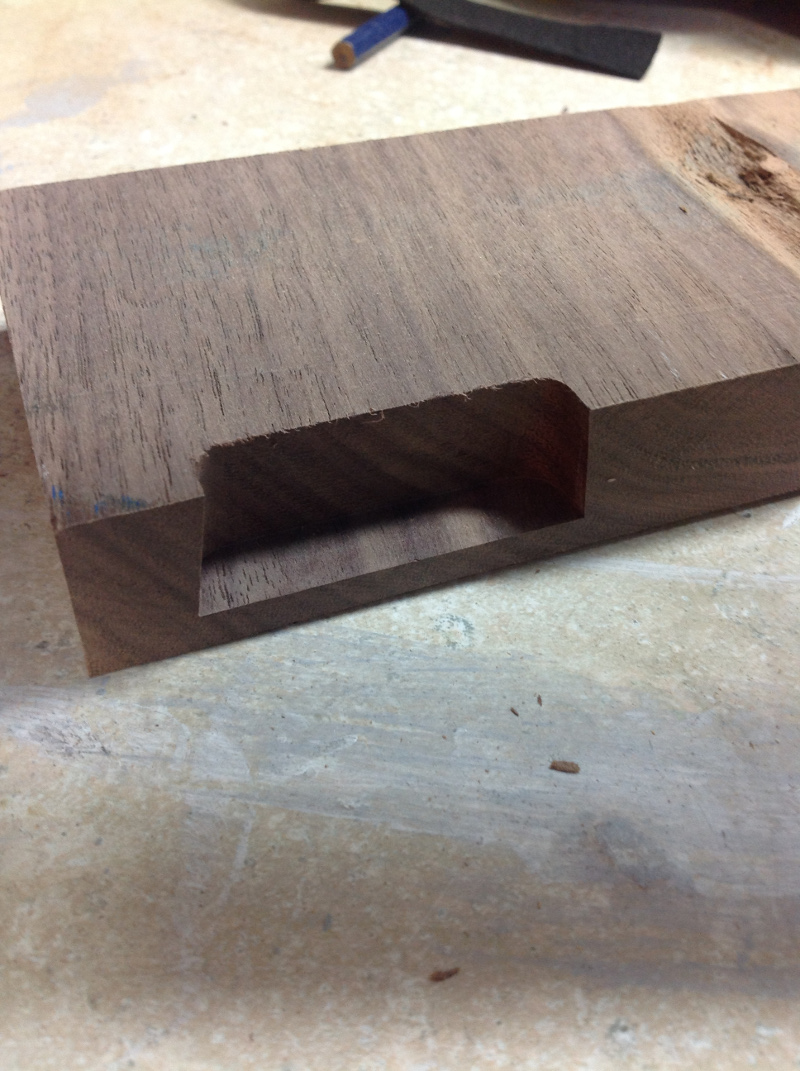
After a few attempts at cutting the dovetail on the veneered mdf that I wasn't quite happy with, I was worried that whilst on the first end of the board I could simply chop the end off and try again, when I did the other end I had one chance to get it right. I finally worked out what seemed obvious afterwards - if I clamped a scrap piece of mdf against the veneered face, the router bit would never 'exit' and therefore never make a mess. The final result was much nicer: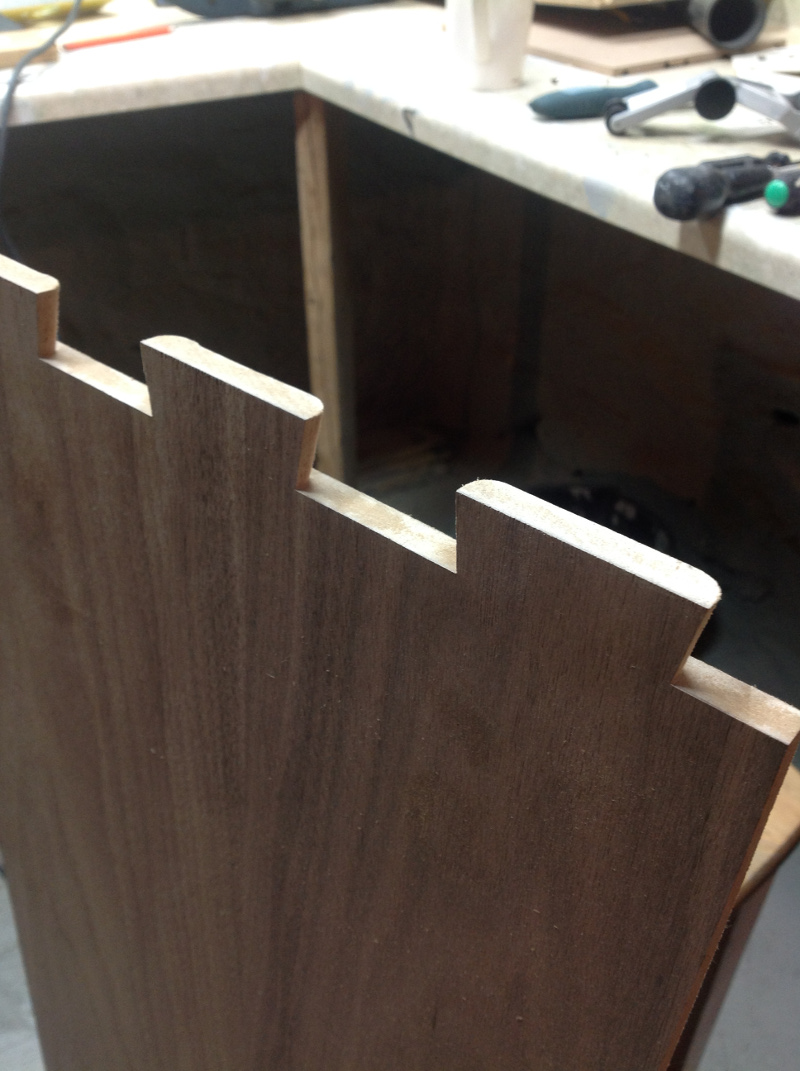
Now after many evenings and a few weekends all of the side and end panels have been cut. I used screws from the inside to attach the end caps, and construction adhesive to attach the side panels. A bead of clear caulk around the edge both will hopefully keep the edges down and avoid any nasty vibrations. This arrangement is now in my basement clamped together whilst everything dries, so a perfect time to write this post! I did however cut the T-nuts for the spikes into the bottom panels before I put it all together: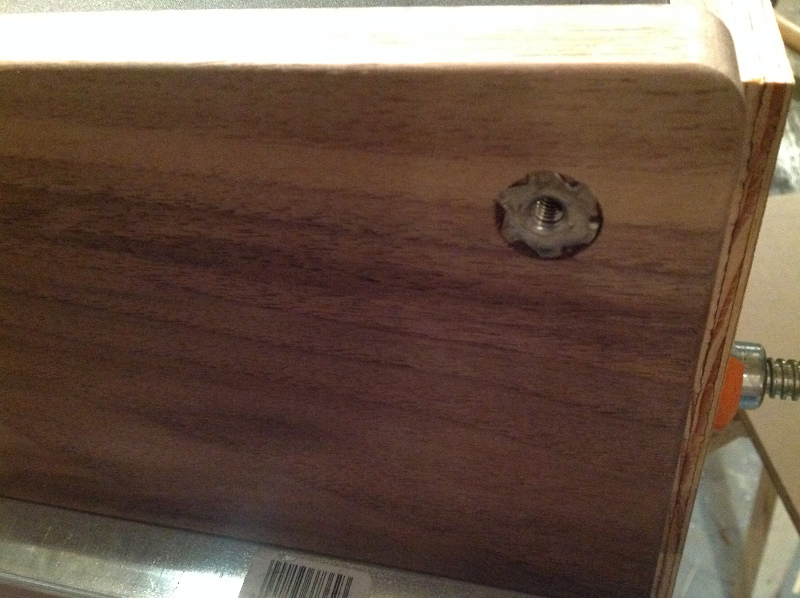
The next step is finishing - I'm planning on many coats of tung oil as it seems to bring out the grain more than a stain does. Hopefully I can also use walnut sanding dust and tung oil to fill the minor cracks in the grain and in the dovetails. At that point I'll need to decide what else to do while the speakers are 'apart'... Thoughts so far:
- replace the armacell
- dynamat the new drivers I had to buy to replace the melted ones!
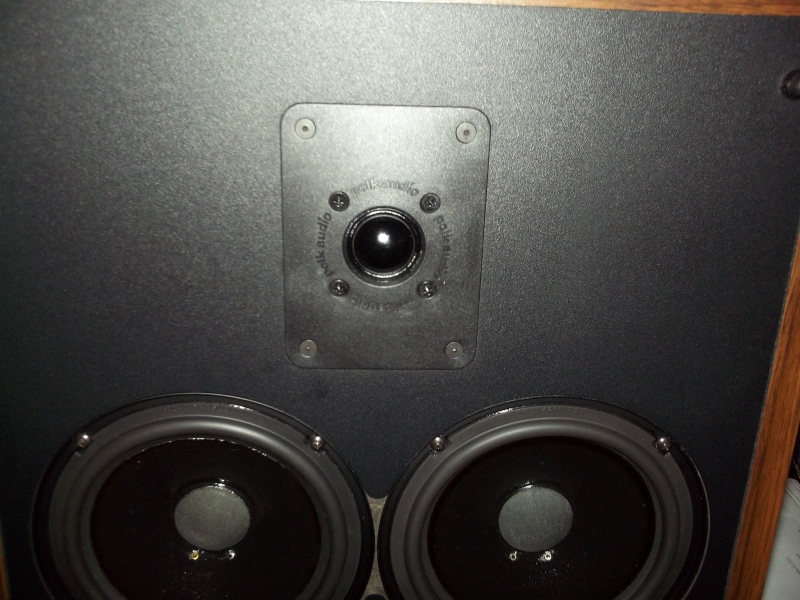
- replace the wood screws holding the tweeters and binding post panel in place with T-Nuts and machine screws - not quite larry's rings, but same principle.
- replace the nylon clips holding the boards to the large inductor and binding post panel with nylon screws and nuts - basically a more solid mounting
- fit cardas single binding post insulators in red and black so it's easier to see which is which than the stock black plastic mount
- fit half a sheet of sonic barrier behind the mid/bass drivers
Gimpod's boards would be nice, but $100 seems like a lot to spend on something that won't be noticeable at the end.. maybe I'll leave that until I need to replace at least one crossover component!
I'm also wondering whether to try replacing the 1/4" bolt holding the large inductors in place with a nylon one that won't affect the inductance - but the inductor/crossover assembly is heavy so the bolt may be overloaded.
More posts and pics to follow when the clamps come off and finish goes on!
Earlier in the year I bought nspindel's pair of 1Cs. He'd already done all of the usual audio upgrades: Dynamat, Armacell, Cardas binding posts, new large inductors, sonicaps, new tweeters, larry's rings, spikes, probably more that I've forgotten.
They sounded excellent, but at some point I knew I'd want to start on cosmetic work.. Replacing the grille covers was the easy part because I just handed the to a local furniture restorer! When a recent party-related accident caused most of the drivers to get melted, it seemed like a good time to send my amp away for service and make a start on the 1Cs while I waited.
I knew I wanted to replace the end caps with solid wood, and have never been a big fan of the fabric covered side panels, so decided to replace at least some of the expanse of black with wood. I thought it would be difficult to find solid wood that thin and even if I did, it wouldn't be very stable. This led me toward the idea of using ply or mdf for the sides, but veneering it with whatever wood I chose for the end caps.
The trouble with doing this however is that the design will always ensure that the side panels look separate from the end caps: There will be a seam between them, which is acceptable when they are finished in two completely different materials but I was not convinced it would look right if they matched. I wondered if it would be possible to dovetail the side panels into the end caps to make a somewhat "rustic toy chest" look - still obviously two separate pieces of wood, but nicely joined.
I started by trying to find the right material for the sides - the stock wood is 1/4" thick, but it is covered in fabric effectively on both sides and veneer is thinner than that, so I looked for something in 3/8". My local lumber yard only stocked "MDO" in this thickness. Medium Density Overlay, which is basically plywood with paper on each side to make a perfectly smooth surface. It looked like a potential candidate, so I picked up a sheet.
I then needed a way to cut the dovetails.. I already had a router from a kitchen project years ago and it seems several companies sell cheap dovetail jigs. Unfortunately these are limited to cutting fixed width dovetails about an inch apart, like you see on drawers. Leigh make a jig that can cut arbitrary patterns of dovetails, and the idea of having just a few large ones appealed. Unfortunately their jig is very expensive. I managed to find an old one on eBay with a few missing parts though, and eventually find the right guidebush etc to fit my router. Time to test out some cuts in the MDO..
Back to square one! The MDO being plywood had the grain going in both directions, so whilst one cut smoothly, the other would just shatter when the router bit hit it. Now I needed to find some 3/8" MDF. No one stocked it, but a local yard could order it in. I waited until I needed some other wood for a building project and placed the order.
Test joints on the MDF were ultimately successful, but even with it you have to be slow and careful when the router bit 'breaks through' to the other side.
Time to choose a wood species... I went to a local woodwork store to see what they had. Depending on the species, boards were available in varying sizes. I liked the idea of a single wide board for the end caps, so there would be no 'planks' effect from where smaller boards laminated together. This narrowed the options to pine and walnut, so the walnut was an obvious choice: I picked up a 1ft by 1" by long enough board, and a roll of paper-backed laminate.
A lot of reading up on laminating taught me that there are basically two ways to do it - raw laminate attached using glue and a vacuum press, or paper backed attached using contact adhesive, a spreader to push the sheet down, and weights left on it overnight.
I rough cut my mdf sheet and laminate to 1x4ft pieces - enough to do each side panel plus some extra. I then glued the laminate to the mdf, again roughly not bothering to line the edges up ...

Trimming the MDF pieces down on the saw table to a size closer to the final one then ensured the veneer and base material lined up perfectly...

Unlike the MDF, cutting dovetails in the solid walnut was incredibly easy - I just had to take it very slowly, or the bit would overheat and shift position in the router.

After a few attempts at cutting the dovetail on the veneered mdf that I wasn't quite happy with, I was worried that whilst on the first end of the board I could simply chop the end off and try again, when I did the other end I had one chance to get it right. I finally worked out what seemed obvious afterwards - if I clamped a scrap piece of mdf against the veneered face, the router bit would never 'exit' and therefore never make a mess. The final result was much nicer:

Now after many evenings and a few weekends all of the side and end panels have been cut. I used screws from the inside to attach the end caps, and construction adhesive to attach the side panels. A bead of clear caulk around the edge both will hopefully keep the edges down and avoid any nasty vibrations. This arrangement is now in my basement clamped together whilst everything dries, so a perfect time to write this post! I did however cut the T-nuts for the spikes into the bottom panels before I put it all together:

The next step is finishing - I'm planning on many coats of tung oil as it seems to bring out the grain more than a stain does. Hopefully I can also use walnut sanding dust and tung oil to fill the minor cracks in the grain and in the dovetails. At that point I'll need to decide what else to do while the speakers are 'apart'... Thoughts so far:
- replace the armacell
- dynamat the new drivers I had to buy to replace the melted ones!
- replace the wood screws holding the tweeters and binding post panel in place with T-Nuts and machine screws - not quite larry's rings, but same principle.
- replace the nylon clips holding the boards to the large inductor and binding post panel with nylon screws and nuts - basically a more solid mounting
- fit cardas single binding post insulators in red and black so it's easier to see which is which than the stock black plastic mount
- fit half a sheet of sonic barrier behind the mid/bass drivers
Gimpod's boards would be nice, but $100 seems like a lot to spend on something that won't be noticeable at the end.. maybe I'll leave that until I need to replace at least one crossover component!
I'm also wondering whether to try replacing the 1/4" bolt holding the large inductors in place with a nylon one that won't affect the inductance - but the inductor/crossover assembly is heavy so the bolt may be overloaded.
More posts and pics to follow when the clamps come off and finish goes on!
Post edited by crispybrown on
Comments
-
I liked the idea of a single wide board for the end caps, so there would be no 'planks' effect from where smaller boards laminated together.
Polk used glued up wood for the end caps on the early models because solid wood tends to warp and crack when it is unable to move with seasonal changes in humidity. They used veneered MDF later on, which is the best choice. Since you've already made the end caps, you can try to slow down that process by finishing all sides.I'm planning on many coats of tung oil as it seems to bring out the grain more than a stain does.
Wiping stains rely on heavy pigments for the color, which tends to obscure the grain. Dyes are transparent and impart a depth that cannot be achieved by a finishing product alone. Using a dye will also allow you to change the color tone of new walnut from a cold tone to a warmer one. In addition, using a dye mixed into a spray on clear coat such as lacquer will allow you to achieve an even color tone between the solid end caps and the veneered sides. Not because of being solid and veneer, but because the wood products came from different trees.Hopefully I can also use walnut sanding dust and tung oil to fill the minor cracks in the grain and in the dovetails.
Wood paste filler is a better choice and will fill the large pores in the walnut allowing you to obtain a more professional look.replace the wood screws holding the tweeters and binding post panel in place with T-Nuts and machine screws
Do not use T-nuts as they will damage the particle board. Use Hurricane nuts instead.Gimpod's boards would be nice, but $100 seems like a lot to spend on something that won't be noticeable at the end..
In addition to a vastly improved layout, Tony's boards have heavier traces.I'm also wondering whether to try replacing the 1/4" bolt holding the large inductors in place with a nylon one that won't affect the inductance - but the inductor/crossover assembly is heavy so the bolt may be overloaded.
Use brass or stainless steel.Political Correctness'.........defined
"A doctrine fostered by a delusional, illogical minority and rabidly promoted by an unscrupulous mainstream media, which holds forth the proposition that it is entirely possible to pick up a t-u-r-d by the clean end."
President of Club Polk -
Can't wait to see your projects pictures. I am always impressed by people that are willing to tackle woodworking jobs.
It makes such a huge difference in the appearance of the speakers. -
Polk used glued up wood for the end caps on the early models because solid wood tends to warp and crack when it is unable to move with seasonal changes in humidity. They used veneered MDF later on, which is the best choice. Since you've already made the end caps, you can try to slow down that process by finishing all sides.
That and hopefully some variation in size will be acceptable - if it gets wider it will simply slide over the tails on the side panels making the corner joints not quite flush. They are already slightly off despite the fact I used a flush trim bit to get the end caps precisely correct based on the veneered side panels, but to be honest having visible dovetails and end-grain is building a certain amount of imperfection into the look in the first place, so I'm not going to get upset providing the movement doesn't get out of control.
It's hard to believe cost didn't play some role in Polk's choice to use glued up wood too.. Wide planks don't come cheap, especially if you limit yourself to heartwood.Wiping stains rely on heavy pigments for the color, which tends to obscure the grain. Dyes are transparent and impart a depth that cannot be achieved by a finishing product alone. Using a dye will also allow you to change the color tone of new walnut from a cold tone to a warmer one. In addition, using a dye mixed into a spray on clear coat such as lacquer will allow you to achieve an even color tone between the solid end caps and the veneered sides. Not because of being solid and veneer, but because the wood products came from different trees.
Thanks, I will try some dyes on a scrap piece and see what I like. It also seems the more coats of tung oil you add, the warmer the tone of walnut gets.. The end grain of the caps is already quite different to the sides because the end caps include both heartwood (dark) and sapwood (light).Wood paste filler is a better choice and will fill the large pores in the walnut allowing you to obtain a more professional look.
I've never tried it before, so will look into it, but why is it better? I would expect a slurry of the original wood and the oil finish would be as close a match as possible, although not necessarily the best material to make a perfectly smooth finish..Do not use T-nuts as they will damage the particle board. Use Hurricane nuts instead.
Thanks, I hadn't heard of those.. I noticed the t-nuts used to fit the spikes to the original base caps had made a mess of the particle board.In addition to a vastly improved layout, Tony's boards have heavier traces.
Fair enough...Use brass or stainless steel.
From a bit of googling, iron/steel tends to increase the inductance and aluminium decrease it.. I assume any conductive thing will have some effect, but 'magnetic' metals would be worst. Presumably the stainless you have in mind is the nonmagnetic type? If so, brass seems like the better option if only because there is no such thing as magnetic brass to worry about ordering by mistake!
Thanks for the detailed reply, btw! -
if it gets wider it will simply slide over the tails on the side panels making the corner joints not quite flush.
Most movement will be width wise against the grain, not much along the length with the grain.It's hard to believe cost didn't play some role in Polk's choice to use glued up wood too..
It's been a long standing practice to prevent the potential issues of using solid wood.Thanks, I will try some dyes on a scrap piece and see what I like.
If you apply a base coat of yellow dye topped with a medium brown toned lacquer you will get that golden/amber look of 100+ year old walnut.It also seems the more coats of tung oil you add, the warmer the tone of walnut gets..
True to an extent. I'm no fan of tung oil, but if you don't have spray equipment I understand its appeal.The end grain of the caps is already quite different to the sides because the end caps include both heartwood (dark) and sapwood (light).
That's where spraying a toned lacquer has a major advantage as it will even out the differences.I've never tried it before, so will look into it, but why is it better? I would expect a slurry of the original wood and the oil finish would be as close a match as possible, although not necessarily the best material to make a perfectly smooth finish..
Both are work, no doubt. Wood paste fillers come in different colors or you can add your own blend of color to the uncolored paste filler. It fills the pores quicker and better, but again it takes work.Presumably the stainless you have in mind is the nonmagnetic type?
Of course.Political Correctness'.........defined
"A doctrine fostered by a delusional, illogical minority and rabidly promoted by an unscrupulous mainstream media, which holds forth the proposition that it is entirely possible to pick up a t-u-r-d by the clean end."
President of Club Polk -
The clamps are off, and in all the excitement I forgot to take a photo of the unfinished wood before putting a couple of coats of oil-based stain and tung oil on. As F1nut predicted though, I needed to even out the differences between the sides and end caps as they were cut from a different tree. Although I was prepared for considerable variation in shade, the 'base colour' of each was too obviously different.
I evened it out a bit but putting two coats of a darker stain on the sides than on the top - so they are now at least 'in keeping' with one another :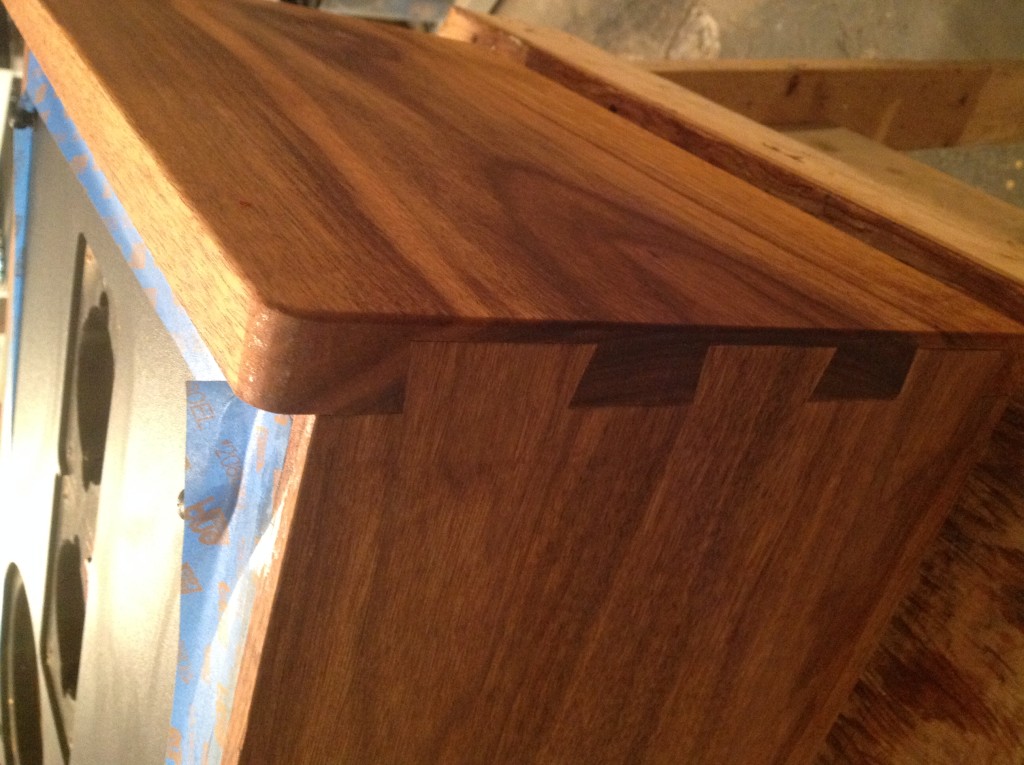
As this stage will take a long time, with each coat of oil needing at least 24 hours to dry, I've started replacing the armacell on the back of the drivers. While doing this I noticed a problem with one of the passive radiators: The fabric 'spider' has come unglued from the polystyrene baffle. Good:v's Bad: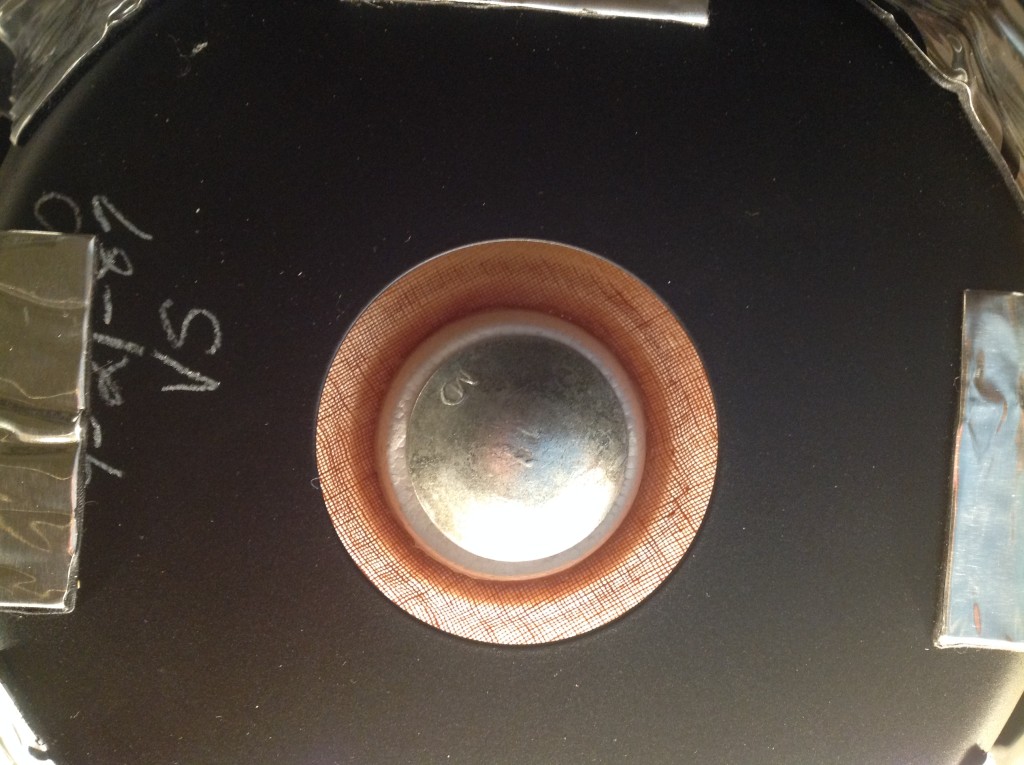
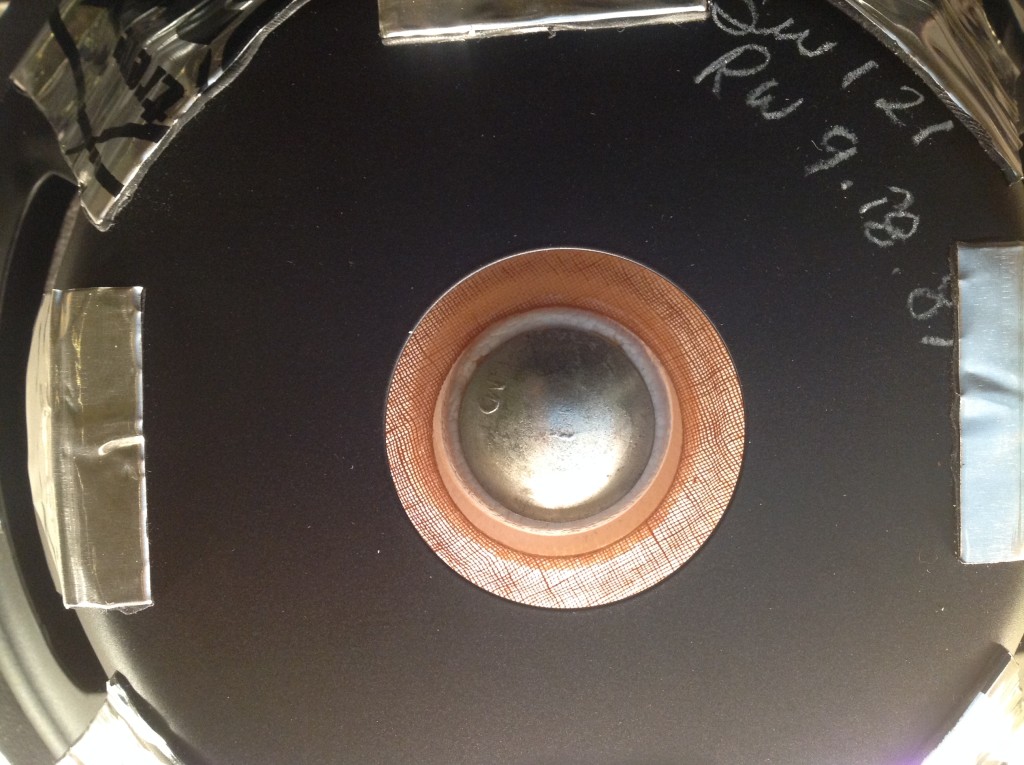
Does anyone have any advice on a good glue to use to reattach it? The original glue looks like something between polystyrene cement used to assemble model planes, and gorilla glue... -
Beautiful! Looks great!
Parts Express stocks glue for speaker surrounds should work the same
but wait for more opinions as I haven't had any exposure to it.POLK SDA 2.3 TLS BOUGHT NEW IN 1990, Gimpod/Sonic Caps/Mills RDO-198
POLK CSI-A6 POLK MONITOR 70'S ONKYO TX NR-808 SONY CDP-333ES
PIONEER PL-510A SONY BDP S5100
POLK SDA 1C BOUGHT USED 2011,Gimpod/Sonic Caps/Mills RDO-194
ONKYO HT RC-360 SONY BDP S590 TECHNICS SL BD-1 -
IIRC, some have used Alene's Tacky Glue. Do not use epoxy as it will melt the polystyrene.Political Correctness'.........defined
"A doctrine fostered by a delusional, illogical minority and rabidly promoted by an unscrupulous mainstream media, which holds forth the proposition that it is entirely possible to pick up a t-u-r-d by the clean end."
President of Club Polk -
How did I not see this post until now?
First of all, welcome to the forum Chris! In my posts about migrating from 1C's to my 4.1TL's, I mentioned selling my 1C's to a friend at work. Well folks, meet my friend from work. It's about time you chimed in, although I can understand waiting until you have some great work to share before you jumped in!
I've seen Chris's woodwork in progress in person, and he is taking his time to do it right. Chris wasn't familiar with SDA's before he heard them in my house, but then he did his research, realized what he'd stumbled on to, and immediately recognized the opportunity to do a quality cosmetic upgrade to these classics that had already gone through the interior upgrades. Suffice it to say, I sold these to the right person. We as a forum place a lot of value in seeing these speakers end up in caring hands, and Chris is obviously up for treating these right.
I was at the party at his house the night the drivers burned out on him. We both learned something that night about the perils of a single volume control in whole-house audio. While you're out on the porch and turn up the volume for the small system you have outside, the SDA's in the unattended living room may inadvertently end up subjected to unfriendly clipping from an overdriven amp. Besides sending his Carver out for service, Chris has also set his Squeezebox Touch in the SDA system to fixed volume, so it can only be changed from the volume control on the pre-amp, not accidentally from a whole-house control.
Chris - a few things for the project. For securing the tweeters and binding post cups, Larry (Toolfan66) does make tweeter brackets, you should be able to get some from him. I got the last pair of binding post rings that he had on hand, but that was over a year ago so he might have fabricated some more since then. I'd check with him before you start with the hurricane nuts. On the inductors, it's a moot point - I bypassed those large inductors with the Erse Super Q's. They're not in the crossover circuit anymore, they're just there to mount the crossover. No need to change the mounting bolt. And on the crossover, as much as I love Tony's boards, my one concern if you were to try to switch to them is that the leads on the Sonicaps and Mills resistors have been trimmed to fit the stock boards, as I did those mods before Tony came out with his crossover boards. I can't guarantee that the trimmed leads will be long enough to fit Tony's boards, in which case you'd need to extend them which could get sloppy. Not a show stopper, but certainly something to be aware of.
Great work taking care of these, I'm very happy they ended up in your hands and I can't wait to get eyes and ears on them when they're done!Good music, a good source, and good power can make SDA's sing. Tubes make them dance. -
Also Chris, have a look at this thread:
http://www.polkaudio.com/forums/showthread.php?139282-Cardas-Internal-Wire-Replacement-For-The-SDA-SRS-1.2TL
Another mod on the electronics side you may want to think about, Riafe did this research after I had done the electronics mods. I'm about to do new wiring harnesses for my 4.1's. If you wanted to do the Cardas Litz chassis wire for the 1C's, I've got the solder pot you'll need - always helps to have the right tool for the job!Good music, a good source, and good power can make SDA's sing. Tubes make them dance. -
Beautiful job, I can't wait to see more pics...
-
Ah, just the right guy shows up on the thread! Larry, not sure if you saw this in my earlier post:For securing the tweeters and binding post cups, Larry (Toolfan66) does make tweeter brackets, you should be able to get some from him. I got the last pair of binding post rings that he had on hand, but that was over a year ago so he might have fabricated some more since then. I'd check with him before you start with the hurricane nuts.Good music, a good source, and good power can make SDA's sing. Tubes make them dance.
-
IIRC, some have used Alene's Tacky Glue. Do not use epoxy as it will melt the polystyrene.
Thanks, that looks like it will work - whatever I use I'll try it on a styrofoam cup first to ensure it doesn't have tenancies to melt it. -
Also Chris, have a look at this thread:
http://www.polkaudio.com/forums/showthread.php?139282-Cardas-Internal-Wire-Replacement-For-The-SDA-SRS-1.2TL
Another mod on the electronics side you may want to think about, Riafe did this research after I had done the electronics mods. I'm about to do new wiring harnesses for my 4.1's. If you wanted to do the Cardas Litz chassis wire for the 1C's, I've got the solder pot you'll need - always helps to have the right tool for the job!
Btw, his name is Raife, not Riafe. Blame autocorrect....Good music, a good source, and good power can make SDA's sing. Tubes make them dance. -
Aleene's is the best glue for what you're doing. It dries clear, and remains flexible. The only thing it won't adhere to, is the rubber surrounds. Those require a special solvent based glue, or thickened/modified Cyanoacrylate.crispybrown wrote: »Thanks, that looks like it will work - whatever I use I'll try it on a styrofoam cup first to ensure it doesn't have tenancies to melt it.
BTW, awesome work on the Cabs!Home Theater/2 Channel:
Front: SDA-2ATL forum.polkaudio.com/discussion/143984/my-2as-finally-finished-almost/p1
Center: Custom Built forum.polkaudio.com/discussion/150760/my-center-channel-project/p1
Surrounds & Rears: Custom Built forum.polkaudio.com/discussion/151647/my-surround-project/p1
Sonicaps, Mills, RDO-194s-198s, Dynamat, Hurricane Nuts, Blackhole5
Pioneer Elite VSX-72TXV, Carver PM-600, SVS PB2-Plus Subwoofer
dhsspeakerservice.com/ -
Beautiful cabinet work! Something you should be proud of.
- SDA 2BTL · Sonicaps · Mills resistors · RDO-198s · New gaskets · H-nuts · Erse inductors · BH5 · Dynamat
- Crossover upgrades by westmassguy
- Marantz 1504 AVR (front speaker pre-outs to Adcom 555)
- Adcom GFA-555 amp · Upgrades & speaker protection added by OldmanSRS
- Pioneer DV-610AV DVD/CD player
- SDA CRS+ · Hidden away in the closet
- SDA 2BTL · Sonicaps · Mills resistors · RDO-198s · New gaskets · H-nuts · Erse inductors · BH5 · Dynamat
-
Very nice work Chris, your 1C's will be unique to say the least!
-
Mike Reeter wrote: »Very nice work Chris, your 1C's will be unique to say the least!
Thanks, hopefully the wife will agree and certify them to leave the basement! It's a shame to lose that 'SDA look' of the cloth covered sides, but it makes them stand out at least. -
Chris has also set his Squeezebox Touch in the SDA system to fixed volume, so it can only be changed from the volume control on the pre-amp, not accidentally from a whole-house control.
Also, a pre-amp with remote control volume has been added to the shopping list, since that was ultimately why I was using the SB Touch volume. Any excuse to buy more gear must be a good one... I'm tempted by the Jolida JD5T as it has auxillary line power outputs that could be used to control my power-switch-less Carver M-1.5t.For securing the tweeters and binding post cups, Larry (Toolfan66) does make tweeter brackets, you should be able to get some from him. I got the last pair of binding post rings that he had on hand, but that was over a year ago so he might have fabricated some more since then. I'd check with him before you start with the hurricane nuts.
Will do - it looks like the right size screws to fit the tweeters and binding post cups is #6-32, and hurricane nuts don't appear to be available smaller than #8. This is probably because they would be too small to grip the wood. This narrows down the options to T-nuts (which interestingly have only three prongs in that size so wouldn't damage the particle board /as much/ as the larger ones), or basically replicating what Larry has done by fitting weld-nuts or t-nuts to sheet metal.On the inductors, it's a moot point - I bypassed those large inductors with the Erse Super Q's. They're not in the crossover circuit anymore, they're just there to mount the crossover. No need to change the mounting bolt.
D'oh! I hadn't even looked.. I just assumed both inductors were connected and had a purpose. -
Also Chris, have a look at this thread:
http://www.polkaudio.com/forums/showthread.php?139282-Cardas-Internal-Wire-Replacement-For-The-SDA-SRS-1.2TL
Another mod on the electronics side you may want to think about, Riafe did this research after I had done the electronics mods. I'm about to do new wiring harnesses for my 4.1's. If you wanted to do the Cardas Litz chassis wire for the 1C's, I've got the solder pot you'll need - always helps to have the right tool for the job!
Argh! I was trying to ignore that thread:DarqueKnight wrote: »Imagine the fun I'll have demonstrating how internal speaker wire can make an audible difference.
It worries me that I do actually think that would be fun... -
Will do - it looks like the right size screws to fit the tweeters and binding post cups is #6-32, and hurricane nuts don't appear to be available smaller than #8.
Everyone uses 8-32. Just drill out the holes to accommodate the #8 Hurricane nuts. Easy peasy.Political Correctness'.........defined
"A doctrine fostered by a delusional, illogical minority and rabidly promoted by an unscrupulous mainstream media, which holds forth the proposition that it is entirely possible to pick up a t-u-r-d by the clean end."
President of Club Polk -
Everyone uses 8-32. Just drill out the holes to accommodate the #8 Hurricane nuts. Easy peasy.
It's not the nuts I was concerned about, but getting the screw head size right. Whilst the original wood screws look like round-pan head, the holes in the plastic look like they are shaped for flat head a.k.a. counter-sunk. Head diameters on flat head machine screws appear to be more or less standard - I looked at a few tables and concluded that a #6 would fit best in the plastic of the tweeter/binding post cup. I guess a round-pan head in #8 would fit, because the round-pan head ones don't really 'fit' perfectly in the first place... -
Try these, they fit perfectly: http://www.ebay.com/itm/390032926762?ssPageName=STRK:MEWNX:IT&_trksid=p3984.m1439.l2649crispybrown wrote: »It's not the nuts I was concerned about, but getting the screw head size right. Whilst the original wood screws look like round-pan head, the holes in the plastic look like they are shaped for flat head a.k.a. counter-sunk. Head diameters on flat head machine screws appear to be more or less standard - I looked at a few tables and concluded that a #6 would fit best in the plastic of the tweeter/binding post cup. I guess a round-pan head in #8 would fit, because the round-pan head ones don't really 'fit' perfectly in the first place...
Been using them on all recent rebuilds, and look much nicer than the pan heads.Home Theater/2 Channel:
Front: SDA-2ATL forum.polkaudio.com/discussion/143984/my-2as-finally-finished-almost/p1
Center: Custom Built forum.polkaudio.com/discussion/150760/my-center-channel-project/p1
Surrounds & Rears: Custom Built forum.polkaudio.com/discussion/151647/my-surround-project/p1
Sonicaps, Mills, RDO-194s-198s, Dynamat, Hurricane Nuts, Blackhole5
Pioneer Elite VSX-72TXV, Carver PM-600, SVS PB2-Plus Subwoofer
dhsspeakerservice.com/ -
Here's a couple photos, my 2As

 Home Theater/2 Channel:
Front: SDA-2ATL forum.polkaudio.com/discussion/143984/my-2as-finally-finished-almost/p1
Center: Custom Built forum.polkaudio.com/discussion/150760/my-center-channel-project/p1
Surrounds & Rears: Custom Built forum.polkaudio.com/discussion/151647/my-surround-project/p1
Sonicaps, Mills, RDO-194s-198s, Dynamat, Hurricane Nuts, Blackhole5
Pioneer Elite VSX-72TXV, Carver PM-600, SVS PB2-Plus Subwoofer
dhsspeakerservice.com/ -
I guess a round-pan head in #8 would fit, because the round-pan head ones don't really 'fit' perfectly in the first place...
Gotcha. Yes, those are what most of have used. The ones westmassguy linked would be an excellent choice.Political Correctness'.........defined
"A doctrine fostered by a delusional, illogical minority and rabidly promoted by an unscrupulous mainstream media, which holds forth the proposition that it is entirely possible to pick up a t-u-r-d by the clean end."
President of Club Polk -
I've been trying to hunt down some Flat, Phillips Head, with the black oxide coating. I may end up changing the four Phillips Head screws that hold the plastic bezel and voice coil on the tweeter, to the same type Flat Head Cap screw. All eight would then match, and have a cleaner look.Gotcha. Yes, those are what most of have used. The ones westmassguy linked would be an excellent choice.Home Theater/2 Channel:
Front: SDA-2ATL forum.polkaudio.com/discussion/143984/my-2as-finally-finished-almost/p1
Center: Custom Built forum.polkaudio.com/discussion/150760/my-center-channel-project/p1
Surrounds & Rears: Custom Built forum.polkaudio.com/discussion/151647/my-surround-project/p1
Sonicaps, Mills, RDO-194s-198s, Dynamat, Hurricane Nuts, Blackhole5
Pioneer Elite VSX-72TXV, Carver PM-600, SVS PB2-Plus Subwoofer
dhsspeakerservice.com/ -
westmassguy wrote: »Here's a couple photos, my 2As


Excellent, thanks - the heads can be smaller on hex drive screws than phillips I guess, but they look perfect and match the hex screws used on my bass/mid and passive radiators. -
westmassguy wrote: »I've been trying to hunt down some Flat, Phillips Head, with the black oxide coating. I may end up changing the four Phillips Head screws that hold the plastic bezel and voice coil on the tweeter, to the same type Flat Head Cap screw. All eight would then match, and have a cleaner look.
I found this site useful for sourcing just about any screw type - the trick is knowing what you need!
http://www.fastenal.com/web/products?term=&termca=&termpx=&sortby=webrank&sortdir=descending&searchmode=productSearch&zipcode=&filterByStore=&filterByVendingMachine=&r=~|categoryl1:%22600000%20Fasteners%22|~%20~|categoryl2:%22600051%20Screws%22|~%20~|categoryl3:%22600059%20Machine%20Screws%22|~%20~|sattr03:^Phillips$|~%20~|sattr02:^Flat$|~%20~|sattr06:^%22Black%20Oxide%22$|~%20~|sattr01:^Steel$|~
I don't know what thread size the ones holding the plastic bezel and voice coil are, but I suspect you'll find the same issue I did - the correct phillips head size comes on #6 screws. This implies changing the voice coil/bezel ones to hex rather than the other way round. -
crispybrown wrote: »I found this site useful for sourcing just about any screw type - the trick is knowing what you need!
OK, so the link to the filtered list of black oxide machine screws with phillips head made from steel didn't work, you'll have to find it yourself from the home page: http://www.fastenal.com/ -
Great resource. The four, Flat, Phillips Head screws on the RDOs are M4 X1/4" or 6.35 MM. I think it will be easier to find 8-32 Flat Head Phillips for the outer mounting screws, rather than the other way around.crispybrown wrote: »OK, so the link to the filtered list of black oxide machine screws with phillips head made from steel didn't work, you'll have to find it yourself from the home page: http://www.fastenal.com/Home Theater/2 Channel:
Front: SDA-2ATL forum.polkaudio.com/discussion/143984/my-2as-finally-finished-almost/p1
Center: Custom Built forum.polkaudio.com/discussion/150760/my-center-channel-project/p1
Surrounds & Rears: Custom Built forum.polkaudio.com/discussion/151647/my-surround-project/p1
Sonicaps, Mills, RDO-194s-198s, Dynamat, Hurricane Nuts, Blackhole5
Pioneer Elite VSX-72TXV, Carver PM-600, SVS PB2-Plus Subwoofer
dhsspeakerservice.com/ -
Spoke too soon:
http://www.ebay.com/itm/330936096752?ssPageName=STRK:MEWAX:IT&_trksid=p3984.m1438.l2649
http://www.ebay.com/itm/221268946601?ssPageName=STRK:MEWAX:IT&_trksid=p3984.m1438.l2649Home Theater/2 Channel:
Front: SDA-2ATL forum.polkaudio.com/discussion/143984/my-2as-finally-finished-almost/p1
Center: Custom Built forum.polkaudio.com/discussion/150760/my-center-channel-project/p1
Surrounds & Rears: Custom Built forum.polkaudio.com/discussion/151647/my-surround-project/p1
Sonicaps, Mills, RDO-194s-198s, Dynamat, Hurricane Nuts, Blackhole5
Pioneer Elite VSX-72TXV, Carver PM-600, SVS PB2-Plus Subwoofer
dhsspeakerservice.com/


