SDA Driver Seals: Original Foam vs. Mortite vs. Armaflex Foam
Comments
-
I must ask - are you using wall braces for your 1.2TL's, and if not, are you plugging that hole with anything?DarqueKnight wrote: »No braces or spikes. The speakers rest on the original feet which are covered with Teflon caps. I am always moving the speakers around due to tweaking, so bolting them to the wall or spiking them would be inconvenient.
The hole is plugged with the original bolt.
Not any more...the hole is now plugged with a 12" long 1/4" diameter threaded rod. After xoaphexox's question, I decided to re investigate the use of the Bass Brace. I had tried bracing and spiking my 1.2TL's at my previous house. While I heard a small improvement in bass response with spikes and more improvement with braces, I didn't use either for the reasons cited above. The SDA SRS 1.2TL manual states:"Low bass response can be enhanced in impact and definition by the use of either the included
Bass Brace or spikes. The Bass Brace, while more permanent, is the more effective of the two.
Spikes are still out of the question since I have hardwood floors. Even with spike cups, I can foresee trying to slide a (180 lb.) speaker out of the way and the spike digging into the floor after it slips out of the cup. Rather than dig the original braces out of their inconveniently accessed location in the attic, it was easier to fabricate a couple of braces from threaded rods and an assortment of nuts and washers sourced from Home Depot.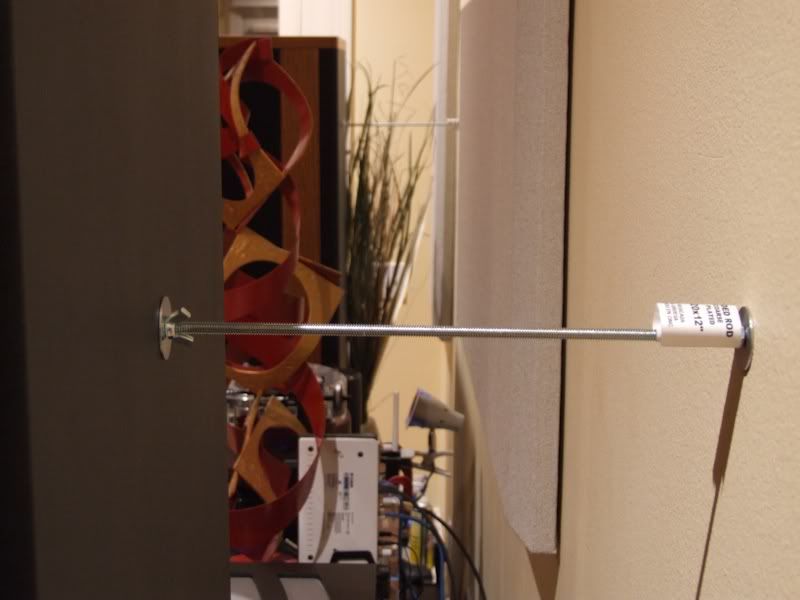
Figure 45. The bar code tag was still on because I wasn't sure if I would like this. I liked it...after a while.
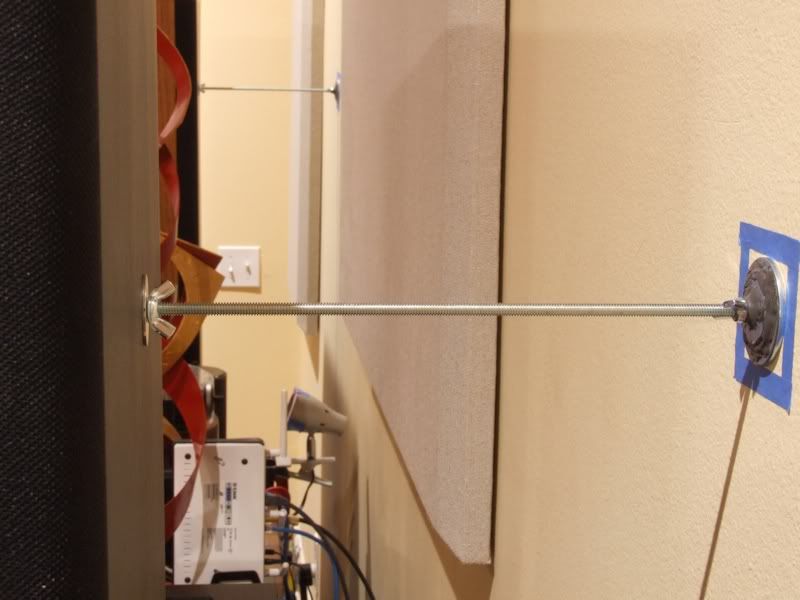
Figure 46. Finished Brace Bass. I know audiophile tweaks are supposed to be outrageously expensive, but this one worked
very well and only cost $4.00!
In the brace's final form, a 1/4" hex nut and three fender washers of increasing size were JB-Welded together. The fender washer end rests snugly against the wall (but not screwed to the wall). The blue tape on the wall in figure 46 serves two purposes:
1. It indicates if the brace shifts out of place.
2. It marks the position of the brace if the speakers need to be moved out of the way.
The plots below show modest improvements in frequency response and small decreases in harmonic distortion (primarily 2nd and 3rd order) after the installation of the braces. There might be more improvements if I were to bolt the braces to the wall, but I'll save that experiment for the future...when I'm more dedicated to audio.
The color coded lines on the harmonic distortion plots represent the following:
Black - frequency response.
Dark blue - sum of 2nd-5th harmonics.
Red - 2nd harmonic.
Purple - 3rd harmonic.
Green - 4th harmonic.
Light blue - 5th harmonic.
It is easier to discern differences in the plots if you save them to your computer and flip through them.
Figure 47. 1.2TL frequency response prior to installation of bass brace.
Figure 48. 1.2TL frequency response after installation of bass brace.
A comparison of figures 47 and 48 shows a general improvement in frequency response after the braces were installed. Both sides (27-30 Hz and 53-85 Hz) of the room resonance peak at 41 Hz are smoother as are the regions 200-350 Hz and 3-8 kHz. The high frequency response beginning at 11 kHz is much smoother with less steep roll off after 15 kHz.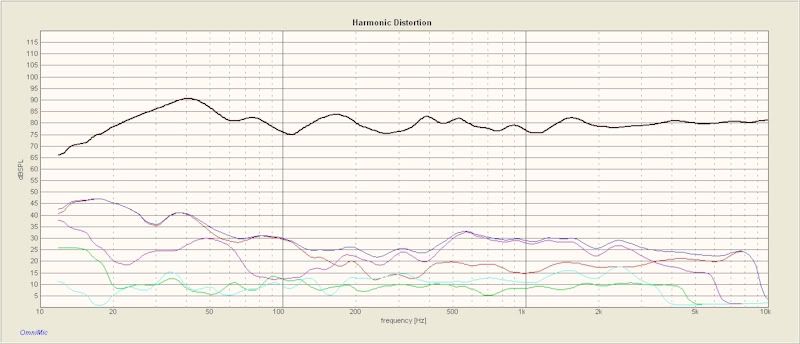
Figure 49. 1.2TL harmonic distortion prior to installation of bass brace.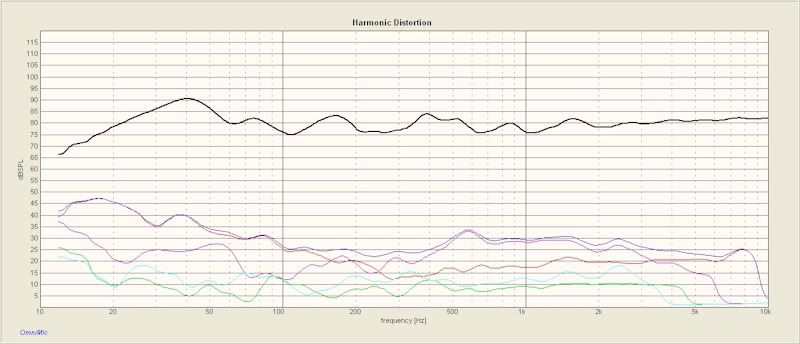
Figure 50. 1.2TL harmonic distortion after installation of bass brace.
Adjustments To Speaker Locations
After four days of listening to the braced speakers in their initial locations, I began experimenting with speaker positioning (closer to and farther from each other and closer to and farther from the rear wall). The effects of position changes were evaluated subjectively and with measurements. The initial positions of the speakers were 11" from the rear wall and 6'-7.75" apart (inside edge to inside edge). The best sounding location was 10.5" from the rear wall and 6'-6-1/4" apart. Coincidentally, this was also the location with the best measurements. Due to the small variations in the hardwood floor's surface, the speakers had to be re-leveled after every move.
Moving the speakers farther apart and closer together adversely affected imaging. Moving the speakers farther from the wall diminished bass response. Moving closer to the wall improved bass weight without muddiness, but beyond a certain point, bass sounds became too prominent. The sound with the speakers 5.5" from the rear wall was exciting to listen to...since I am a bass head...but vocals and solo instruments were diminished in sound level. It was as if the bass guitar and drums behind the singers and soloists were playing a little louder.
Figure 51. 1.2TL frequency response with bass brace and 11" spacing from rear wall.
Figure 52. 1.2TL frequency response with bass brace and 5.5" spacing from rear wall.
Figure 53. 1.2TL harmonic distortion with bass brace and 11" spacing from rear wall.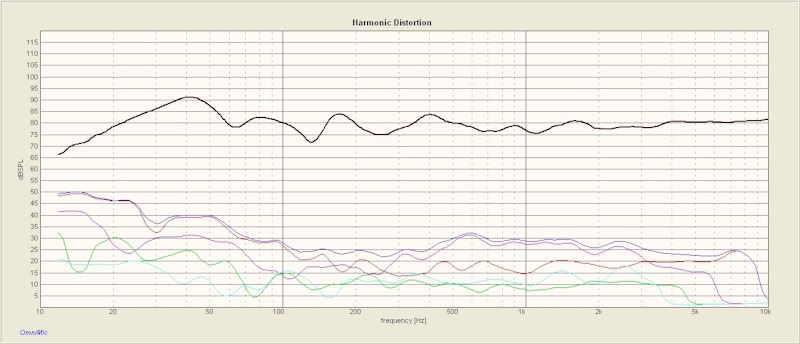
Figure 54. 1.2TL harmonic distortion with bass brace and 5.5" spacing from rear wall.
Figure 55. 1.2TL frequency response prior to installation of bass brace with 11" spacing from rear wall.
Figure 56. 1.2TL frequency response after installation of bass brace with 10.5" spacing from rear wall.
Figure 57. 1.2TL harmonic distortion prior to installation of bass brace with 11" spacing from the rear wall.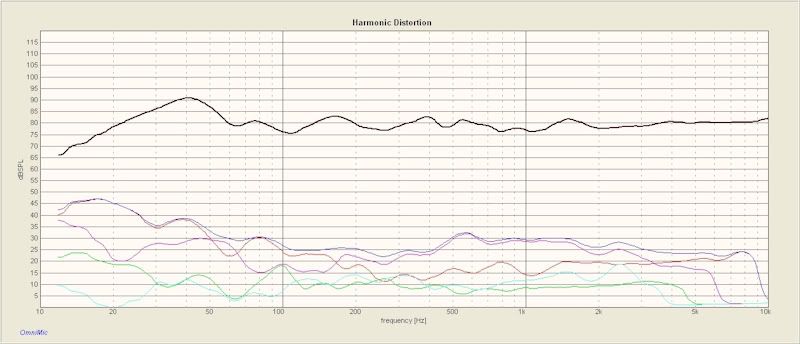
Figure 58. 1.2TL harmonic distortion after installation of bass brace with 10.5" spacing from the rear wall.
Bass Brace Sound
The bass was cleaner, tighter, faster and more sharply defined and articulate, but it had to grow on me. Initially, there seemed to be a lack of coherence between bass sounds and the rest of the frequency range. It was as if the bass guitar, drums and other percussion instruments were playing a little bit faster than the rest of the instruments. Also, I was hearing less bass (actually less bass distortion), but, as usual with enhancements to bass accuracy, I was feeling more bass (it just wasn't as heavy in my ears). I initially went back and forth between brace and no brace many times. The only thing I initially liked was the increased body, clarity and definition to male voices.
Although I was getting more bass tactile sensation, I still went through "bass withdrawal". I did not note this level of tactile sensation improvement when I tried the braces years ago. Of course, that was in a different room, in a different house, with different electronics. I also didn't have any of the extensive mechanical vibration abatements and crossover circuit improvements treatments that I now have.
There were some moderate improvements to imaging in a couple of areas. On some recordings, the kick drum, electric bass and acoustic bass moved a little further back. On some recordings where bass guitar and kick drum images were close to each other, there was more of a sense of space between them laterally and depth-wise. On the left side, some percussion instrument images moved forward a couple of feet and had more clarity. In the future, when you are more dedicated to audio than you are now,
I can envision you getting a really big listening room for your really big speakers.
Yes!! How did you know?~DK I've gotten really, really good at spotting trends in human behavior
and extrapolating outcomes.Proud and loyal citizen of the Digital Domain and Solid State Country! -
So you don't have the threaded rod mounted in the wall? Is it just resting against the wall?
I built a set of bass brace's a few months ago I just never got around to mounting them.. -
TOOLFORLIFEFAN wrote: »So you don't have the threaded rod mounted in the wall?
No.TOOLFORLIFEFAN wrote: »Is it just resting against the wall?
Yes.DarqueKnight wrote: »The fender washer end rests snugly against the wall (but not screwed to the wall). The blue tape on the wall in figure 46 serves two purposes:
1. It indicates if the brace shifts out of place.
2. It marks the position of the brace if the speakers need to be moved out of the way.
I'm going to see if I can get away with a "snug fit". If they start moving over time, I'll screw them to the wall.TOOLFORLIFEFAN wrote: »I built a set of bass brace's a few months ago I just never got around to mounting them..
You should try them out!Proud and loyal citizen of the Digital Domain and Solid State Country! -
I thought the point of the bass brace is to couple the cabinet to the wall.
If the rod is only resting on the wall, it doesn't seem like you're getting the full effect.
I have the bass brace and wall plate, but haven't fooled with it yet."Science is suppose to explain observations not dismiss them as impossible" - Norm on AA; 2.3TL's w/sonicaps/mills/jantzen inductors, Gimpod's boards, Lg Solen SDA inductors, RD-0198's, MW's dynamatted, Armaflex speaker gaskets, H-nuts, brass spikes, Cardas CCGR BP's, upgraded IC Cable, Black Hole Damping Sheet strips, interior of cabinets sealed with Loctite Power Grab, AI-1 interface with 1000VA A-L transformer -
drumminman wrote: »I thought the point of the bass brace is to couple the cabinet to the wall.
It is, but there is more than one way of coupling the cabinet to the wall.drumminman wrote: »If the rod is only resting on the wall, it doesn't seem like you're getting the full effect.
The rod is not just "resting" on the wall. It is screwed in tightly and being held in place by the weight of the cabinet. If this does not hold over time, I can always drill two holes in the wall plate and screw it down.Proud and loyal citizen of the Digital Domain and Solid State Country! -
drumminman wrote: »I thought the point of the bass brace is to couple the cabinet to the wall.
Here is a quote from the 1.2TL owner's manual:
"Move the speaker out of the way and couple the bracket to the wall using either the screws provided or the adhesive tape provided. If using screws try to position the speakers in front of a stud or use wall anchors."
Good luck with your speaker position falling right in front of a stud!!
Friction seems to be working fine for now...but I am tempted to see if screws would add any audible benefit.Proud and loyal citizen of the Digital Domain and Solid State Country! -
DarqueKnight wrote: »Good luck with your speaker position falling right in front of a stud!!
My speaker positioning always falls in front of a STUD!!! At least that's what the wife says. The Gear... Carver "Statement" Mono-blocks, Mcintosh C2800 Arcam AVR20, Oppo UDP-203 4K Blu-ray player, Sony XBR70x850B 4k, Polk Audio Legend L800 with height modules, L400 Center Channel Polk audio AB800 "in-wall" surrounds. Marantz MM7025 stereo amp. Simaudio Moon MiND2 Shunyata Triton
“When once a Republic is corrupted, there is no possibility of remedying any of the growing evils but by removing the corruption and restoring its lost principles; every other correction is either useless or a new evil.”— Thomas Jefferson
How many flies need to be buzzing a dead horse before you guys stop beating it? -
I seem to recall that you're not supposed to use the bass brace and spike them at the same time. It's either one or the other. Not sure why Polk discourages that or if my memory is serving me correctly or not.
I tried the bass brace tweak and the energy (vibration or what have you) was transferred through the rod and into the wall where it caused all kinds of nasty vibrations, artifact, etc. Keep in mind I have a finished basement using steel wall studs and a suspended ceiling so YMMV.SDA SRS 2.3TL's
Silk Audio MS-90-BT integrated tube amp
Yaqin MS-20L integrated tube amp
SDA 2B TL's -
DarqueKnight wrote: »Friction seems to be working fine for now...but I am tempted to see if screws would add any audible benefit.
As is typical, my curiosity kicked in. I grabbed a few wall anchors, screws and my trusty drill and secured the Bass Braces to the wall. Drilling and re-installation took less than half an hour.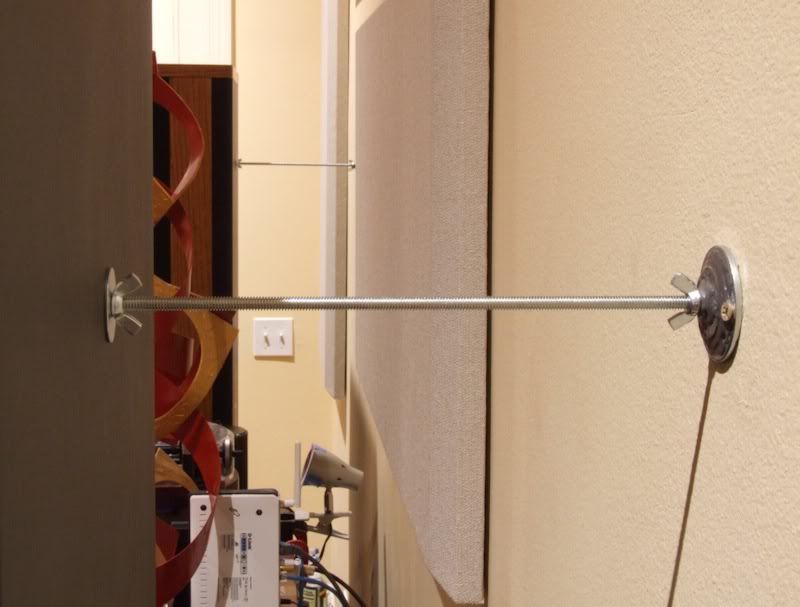
Figure 59. Bass Brace done right. In the future, when I'm more dedicated to audio than I am now, I'm going to get a prettier
wall plate.DarqueKnight wrote: »Good luck with your speaker position falling right in front of a stud!!
One of the screws for the right speaker's wall plate fell right in front of a stud.
Figure 60. 1.2TL frequency response with Bass Brace held to the wall by friction (red) and held to the wall with screws (blue).
Figure 61. 1.2TL harmonic distortion with bass brace held to the wall by friction.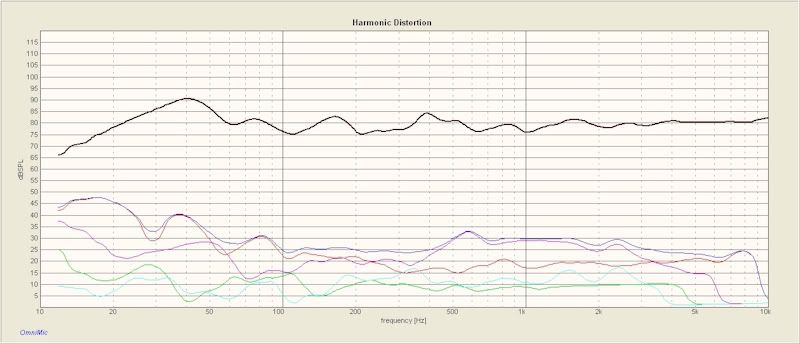
Figure 62. 1.2TL harmonic distortion with bass brace held to the wall by screws.
From the OmniMic's instructions regarding bass decay measurements:
"When a bass note is stopped within music, the sound in the room at some frequencies may still continue for some time. That is because the sound reflects back and forth between walls, resonating and forming "modes" before eventually dying down. This is not altogether bad and some reinforcement is normally desirable for natural sounding playback, but you would like to keep it under control and not have some notes sounding muddy or lingering much longer than others.
The bass decay graph shows how long it takes the sound to decay at each frequency. As shown on the legend to the right of the decay graph, the white area extends upward to indicate when the level drops no more than 5 decibels (dB). The light blue indicates when the level has dropped between 5dB and 10dB, etc."
Figure 63. 1.2TL bass decay with bass brace held to the wall by friction.
Figure 64. 1.2TL bass decay with bass brace held to the wall by screws.
The Sound
Prior to being screwed to the wall, the braces were held tightly in place by the weight of the speakers. **** the brace plates to the wall brought more improvement than I expected. After finishing the installation, I turned on the SACD player and walked to my seat. I heard an improvement in overall clarity while I was still standing at the SACD player. **** the brace plates to the wall enhanced all of the improvements previously heard.
SDA imaging aficionados will be very pleasantly surprised.
 Proud and loyal citizen of the Digital Domain and Solid State Country!
 -
michaeljhsda2 wrote: »I seem to recall that you're not supposed to use the bass brace and spike them at the same time. It's either one or the other. Not sure why Polk discourages that or if my memory is serving me correctly or not.
See attached excerpt from the 1.2TL manual.Proud and loyal citizen of the Digital Domain and Solid State Country! -
Ray, I hate to see the day you are more dedicated to audio.

My old house had plaster walls and hardwood floors. I used the factory bass brace because I didn't want spikes on the floor even with floor protectors, which seemed to me to defeat the purpose of spikes. Without a doubt, I experienced a noticeable improvement in bass response. However, one thing I observed about using the bass brace was it still allowed the speaker to walk. That is, it could move side to side in an arc. Not that I ever saw this from playing music, but by my hands and it always bothered me. My thinking was that the speaker wasn't really locked in place. However, in that room it was the best choice.
My new house has sheet rock walls and carpet over hardwood floors. I decided to go with brass spikes instead of the bass brace for two reasons. I wanted them off the carpet and I didn't think the sheet rock walls offered much of a solid foundation. The spiked speakers are rock solid and the improvement in bass response is pretty amazing verses the old house. Of course, we're talking about two very different rooms, which no doubt plays a large part in the end result.
That said, either choice will net improvements and is an absolute must do.Political Correctness'.........defined
"A doctrine fostered by a delusional, illogical minority and rabidly promoted by an unscrupulous mainstream media, which holds forth the proposition that it is entirely possible to pick up a t-u-r-d by the clean end."
President of Club Polk -
Well it don't make sense why one could not use both spikes and brace. I understand both will couple the cabinet but it's not like using both will hurt anything, worst case one using spikes will not notice any improvements in bass when adding the brace.
Now I will have to put my brace's on and see, I will try and put them on this evening.. -
TOOLFORLIFEFAN wrote: »Well it don't make sense why one could not use both spikes and brace. I understand both will couple the cabinet but it's not like using both will hurt anything,...
You can use both. Polk recommended that spikes not be used with the brace because some cabinet movement is required for brace installation and this might be difficult if the cabinets are spiked.
This is explained in the 1.2TL manual excerpt I attached in post #41.Proud and loyal citizen of the Digital Domain and Solid State Country! -
Ray, I hate to see the day you are more dedicated to audio.

You and me both, but I don't think this is even possible is it ? “The two most important days in your life are the day you are born and the day you find out why.” ~ Mark Twain
 -
Ray, you've done it again!

I just installed the armaflex and Solen 16 mH 10 awg inductors (write up to come once I get a few more hours on them), and thought I was done with tweaks.
Gotta work out how I'm gonna get she who must be obeyed to go along with this
With the other projects you can't see them when they're installed. Hmmmm. . . .this'll require a deft touch. :cool:"Science is suppose to explain observations not dismiss them as impossible" - Norm on AA; 2.3TL's w/sonicaps/mills/jantzen inductors, Gimpod's boards, Lg Solen SDA inductors, RD-0198's, MW's dynamatted, Armaflex speaker gaskets, H-nuts, brass spikes, Cardas CCGR BP's, upgraded IC Cable, Black Hole Damping Sheet strips, interior of cabinets sealed with Loctite Power Grab, AI-1 interface with 1000VA A-L transformer -
Well after about 8 months or better since I made my bass brace's I finally got around to installing them all thanks to this thread. It was not a night and day difference but it does seem to tighten up the bass a tad more, I do like the fact that the speakers are solid there is no rocking them.. I will do some more listening..
DarqueKnight wrote: »You can use both. Polk recommended that spikes not be used with the brace because some cabinet movement is required for brace installation and this might be difficult if the cabinets are spiked.
This is explained in the 1.2TL manual excerpt I attached in post #41. -
Lest you think I'm nit-picking (I probably am) I should say how grateful I am that DarqueKnight not only has the cleverness to think of this stuff, but provides detailed write-ups, in-focus photos, and those wonderful graphs.
His is a hand I'd like to shake.
However...michaeljhsda2 wrote: »I tried the bass brace tweak and the energy (vibration or what have you) was transferred through the rod and into the wall where it caused all kinds of nasty vibrations, artifact, etc. Keep in mind I have a finished basement using steel wall studs and a suspended ceiling so YMMV.
...I would not want a speaker brace wall-anchored to sheetrock--at least not long-term.I didn't think the sheet rock walls offered much of a solid foundation.
Aside from cabinet vibrations transferring to sheetrock and making the sheetrock a sort of "passive radiator"; I'd be concerned about the strength of the sheetrock (typically not much--it's just compacted gypsum powder glued to heavy paper) and resultant wall fractures at high volume (vibration) levels.
Attaching the speaker brace to a wall stud--or a fairly rigid wood or steel cross-beam mounted horizontally to the studs--would seem to be "insurance" against sonic and structural problems. I'm thinking a carefully sawn, sanded, and finished 2X4; 4X4...something of that nature. Glued to the sheetrock and screwed to the supporting studs, and then brace the speaker cabinet to that. If the crossbeam were long enough to go from speaker to speaker, across many wall studs, you could pretend it was a "shelf" and put a couple of knick-knacks on it...the discwasher brush, the static gun, a teeny bottle of expensive contact cleaner, etc.
I would kind of expect that bracing the cabinets to a typical stud wall would transfer energy (noise) into the adjacent room, too. I packed fiberglass insulation into the cavities between the studs in my listening room hoping to reduce sound transfer between rooms. It is somewhat effective, but probably not enough when the sheetrock is being mechanically vibrated.
'Course, concrete walls are a whole 'nother story. -
There really is not that much vibration going to the wall, no more then what the speakers give the room when playing, also it's not like your hanging your speakers from the wall so there is no worry about wall fractures.
-
I just replaced Mortite on the passives and two drivers in each cabinet so far in my 1.2tl's I will finish up the last 12 drivers in the morning.
I will say that mortite SUCKS to get off and as said above that the Armacell is sooooo much better to work with. I will never use Mortite again after using Armacell..
I will post more thoughts tomorrow after I finish up..
I will visit making some face plates for the tweets out of aluminum for my CRS+'s first and see if there is any improvement.. One thing is for sure they will look nice!!!
Thanks Ray!!! -
TOOLFORLIFEFAN wrote: »I will visit making some face plates for the tweets out of aluminum for my CRS+'s first and see if there is any improvement.. One thing is for sure they will look nice!!!
Thanks Ray!!!
Glad the Armacel is working out for everybody else too. Thanks DK for doing all the work to prove it.
If the tweet faceplates look better, thats good enough for me.:cool:The Gear... Carver "Statement" Mono-blocks, Mcintosh C2800 Arcam AVR20, Oppo UDP-203 4K Blu-ray player, Sony XBR70x850B 4k, Polk Audio Legend L800 with height modules, L400 Center Channel Polk audio AB800 "in-wall" surrounds. Marantz MM7025 stereo amp. Simaudio Moon MiND2 Shunyata Triton
“When once a Republic is corrupted, there is no possibility of remedying any of the growing evils but by removing the corruption and restoring its lost principles; every other correction is either useless or a new evil.”— Thomas Jefferson
How many flies need to be buzzing a dead horse before you guys stop beating it? -
nooshinjohn wrote: »Glad the Armacel is working out for everybody else too. Thanks DK for doing all the work to prove it.

If the tweet faceplates look better, thats good enough for me.:cool:
The hard part will be machining the face with it dome like.. -
How do you work armacel to get it to circle the drivers? Does it just flex or does it have to be snipped so that it doesnt bunch up as it makes the curve?
-
The Armacell's soft foam rubber naturally compresses as you round the curvature of the driver. No bunching up at all. No cutting required.Proud and loyal citizen of the Digital Domain and Solid State Country!
-
Just cut strips and work it around easy peasy..
-
Ray,
Would you like me to make you some plates for your bass brace? -
Sure!Proud and loyal citizen of the Digital Domain and Solid State Country!
-
What color? Is there a shape you would like it to be?
-
How do u pull the old drivers off if you used mortite. They are a pia.
-
I pulled the crossover and pushed from the back side then worked my way up.. I don't miss mortite at all..
-
What color?
What are my choices?Is there a shape you would like it to be?
First choice is round. Square or rectangular is ok if that is easier to make.
The mounting screw holes on the wall plates I made are 1-7/8" apart. If you can match that spacing, it would be great.Proud and loyal citizen of the Digital Domain and Solid State Country!


