Piano gloss...
Options

Just picked up a 3rd pair of 11Ts and visually they are rough. PO placed them in a wall and caulked them in!?! Anywho, they are now destined to be refinished and I thought "why not try piano gloss black?"
Any tips, tricks, hints? "Don't do it" is an acceptable answer...
Any tips, tricks, hints? "Don't do it" is an acceptable answer...
Comments
-
No clue how to help you, but will be watching this thread for my own selfish needs...
") So, are you willing to put forth a little effort or are you happy sitting in your skeptical poo pile?
So, are you willing to put forth a little effort or are you happy sitting in your skeptical poo pile?
http://audiomilitia.proboards.com/ -
There are few different ways to obtain piano black. One is polyester such as found on pianos, but it takes the right equipment and skill, so best done by a pro. Two is black dye and catalyzed lacquer, which requires spray equipment and a bunch of other materials/skills, again best done by a pro. Third is have a body shop spray them with car paint, then rubbed/buffed out, so again best done by a pro. It cannot be obtained without finishing the finish regardless, which is a skill unto itself.
Political Correctness'.........defined
"A doctrine fostered by a delusional, illogical minority and rabidly promoted by an unscrupulous mainstream media, which holds forth the proposition that it is entirely possible to pick up a t-u-r-d by the clean end."
President of Club Polk -
Here is an old thread, in which someone took on the task with a pair of Lsi9, in case you wanted some pictures....
http://forum.polkaudio.com/discussion/71657/ebony-lsi9s/p1
Polk Lsi9
N.E.W. A-20 class A 20W
NAD 1020 completely refurbished
Keces DA-131 mk.II
Analysis Plus Copper Oval, Douglass, Morrow SUB3, Huffman Digital
Paradigm DSP-3100 v.2 -
While it's not easy to do, don't let Jesse's "best left for a pro" discourage you from trying something hard. All those pros were rank amateurs at one point too. They came to be pros because they didn't listen to some curmudgeonly old pro tell them to leave it to a pro.
Actual piano black finish on pianos is the dyed lacquer method. It's also the oldest method and easier method to screw up. It's time consuming and prep work is of the utmost importance. You need to make sure the surface is baby-rear smooth before starting any finish work. Depending on what your wood and/or veneer you are doing this over is made from, that may not be possible. Softer woods will not be able to be sanded smoother than a certain grit before they start to fuzz up. So if you are going to do this with lacquer, you're going to want to do a skim coat of bondo over any plywood, MDF, particle board or veneer finish to stabilize. Then sand it down to maybe a 1000 grit if you can get it to not fuzz up. Then you're going to apply a thick coat of lacquer and wet sand that after it cures. Get that baby butt smooth and then clean it with a tack cloth and apply another coat of lacquer. Then sand that smooth and keep going for several coats. Last coat gets polished. It's the same process to do it as doing it will automotive paints and clearcoats only you're using dyed lacquer the entire time and not automotive enamels and clearcoats. The deeper the shine you want the more coats you have to do. Your last coat is going to be polished with a polisher or a hell of a lot of elbow grease.
I've never used the polyester method but that is the modern way of doing it and it's way more durable and harder than a lacquer or automotive paint finish. It can also be applied by machine easily as it cures smooth to begin with.
Lastly, painting it piano black with automotive finishes is possible to do and you can even get by with rattle can paints. Rattle can paints just require more care in prep work and more effort in smoothing between coats. However, you will have to bondo the entire speaker and block sand it smooth. It will have to be thick bondo too and a likely better option is marine grade body filler or cover the entire outside in fiberglass resin (just the resin, not the fibers) because the solvents in the automotive paints are not meant for wood and will raise the grain causing your finish to be not smooth and not piano black. Also, if it's being applied to plywood or a veneered surface, the glues that hold the veneer layers together can be dissolved by the solvents in spray paints. Typically it's not a big deal but with the amount of coats you have to do, the solvents will penetrate far enough into the wood/veneer to be a concern for delamination. So it's best to seal the surface with a resin of some sort whether it's fiberglas resin or bondo which is a polyester resin.
Once you get your base coat applied, cured and block sanded smooth (no high spots) with 220 grit, you lay down a primer/sealer and sand with 220 and then 400. Then you start with your black paint. You apply a coat, let it dry, apply another coat, let it dry, apply a 3rd coat, let it dry. You use so many coats because you are basically filling in the microscratches from the sanding in with your paint, lacquer or clearcoat. You need to build up those layers gradually so that you don't get orange-peel. Car makers don't have time to wait for this which is why new cars have the orange peel look but show cars are mirrors they are so smooth. The drying is important, though. It needs to be fully cured and hardened or it won't stand up to sanding and you'll end up overheating it and smearing it. Block sand with 220 grit again, until all the high spots are gone but being careful not to sand through your primer/sealer layer. You should have block sanded well enough at that first step that this shouldn't be a problem but if it is, sand all the way back down to the primer, block sand again and repply primer until you have no high spots then start the color coats over. Clean, apply another coat, let it dry. Apply another coat and block sand again to make sure you don't have any high spots. If you have high spots, repeat the process again until all the high spots are gone. You'll know when you don't have high spots in the color coats as the sanding block will make consistent scratches over the surface. Once you get there, apply another coat of black paint. Let it dry then sand it 3 times but lightly. Use 400 grit to scuff up the surface and knock down any dimples or flecks of dust. Clean with a tack cloth. Then move to 600-800 grit and sand again. Clean with a tack cloth and then wet sand at 1000 grit. The wet sanding is done because the grit is fine enough to clog up with paint particles and it will over heat the finish causing layers to blister. Fully cured paint will tends to blister less.
So now you should be sufficiently black and consistently black over the entire surface. If not, apply another coat and start the sanding process over again. If so, get the clearcoat and you're gonna need 400, 800, 1000, 4000 and 6000 grit sand papers and polishing cloths or an automotive polisher (not a waxer). You apply a thick coat of clearcoat. Be careful here to go smooth and evenly or you will get bubbles and that will require you to do way more sanding and repaint the black. Let that cure completely. When it's cured, sand with 400 grit to knock down any little bumps or anything. Then go over it with 800 grit. Clean it and shoot another coat of clear coat over it. Let that cure. It will look smooth again and you should be able to see some depth already. Run your fingers over it to see how smooth it is. If it's relatively smooth, block sand with 800 grit and see if there are any waves or anything. Do the same procedure as you did with the black paint on the clear coat until it sands smooth and evenly. Once you get there, clean with a tack cloth and shoot another coat. Let that cure and sand with 800, clean with a tack cloth and wet sand with 1000. Let it dry and clean again with a tack cloth and then shoot another coat of clear coat. Let that dry and wet sand with 1000 grit. When you get to like 4 coats of clearcoat like this you will see a shiny depth that looks a bit muted. After this you can go for as many more coats of clearcoat as you want, wet sanding between each layer. When you are happy with the depth, you're going to move on to your final steps. You can test the look by wetting the surface. The water will fill in the microscratches and you will get a good idea of the sheen you will have.
Expert Moron Extraordinaire
You're just jealous 'cause the voices don't talk to you! -
Said my post was too long, imagine that. Here's the rest.
Final coats of clearcoat. After everything has dried, you clean it throughly with a tack cloth. You layer your last and most important coat of clearcoat down and let it cure completely. When cured, you're going to sand lightly with the 1000 grit sand paper. This will knock down imperfections from the layering of the last coat of clear coat. Next you need to wet sand with the 4000 grit paper. You might want to use a powered sander for this, random orbit. It's time consuming and tediously difficult. You need to sand with the 4000 grit until the entire surface looks exactly the same and swirl marks are not visible. Then dry it and clean it with a tack cloth to get rid of the 4000 grit dust. OK, clean? Good. Go and do the same thing all over again with the 6000 grit sand paper. Dry and clean it. Clean it good this time as you don't want any debris left or it will make visible gouges in the clearcoat that will be painfully obvious and require a bunch of work to fix.
OK, so you're done with sanding. Once dry, check for consistency again. if you see anything that doesn't look even, wet sand with the 6000 grit some more. When you get an evenly sanded surface, get your polisher (you will need a machine for this step, by hand is going to take a very long time and not give you an even finish). The surface will have a dull sheen to it at this point. Mainly because 6000 grit leaves microscratches too small for your eye to discern. It should look like a car with oxidized paint. That's good. So following the directions on the can of polishing compound, get to work polishing your clear coat. Be careful to not burn the clearcoat as you will need to do a ton of work to fix it. So keep the polisher pad wet and moving.
This video shows you how to use a polisher to do the final polish on the clear coat. Go to about 1:04 in the video as you won't have to do the sanding part. You can get polishing compound for a clear coat in the body work section at any car parts store.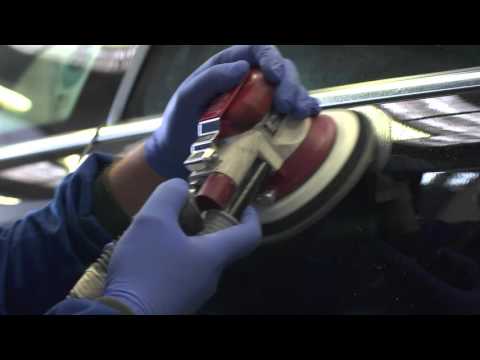 https://www.youtube.com/watch?v=26FAieu05DU
When you are done you will have a black finish so much like a mirror you can shave in it. You can wax it with a sealer and a car wax at this point too and that will further improve the shine and keep water damage to a minimum.
Advice, though, if this is your first time doing this, grab a scrap piece of wood and do some practice on it first so you can see what the different stages are supposed to look like.
You'll want to strip the cabinets completely for this, too. No insulation, no electronics, no drivers, no grilles.
Also, this takes time. A lot of time and patience and care which is why pros charge so much to do it. Also, materials are not necessarily cheap either.
I'm planning on doing a piano black finish on a set of plain plywood Klipsch Hereseys that I have. They are covered with funk, scribbles and a mailing address ink stamp stampings. It's either that or veneer them. I think I'd rather piano black them. Seems different and if done right, only improves the look, IMO.Expert Moron Extraordinaire
You're just jealous 'cause the voices don't talk to you! -
Like I said, best left to the pros and piano black on pianos has been polyester not lacquer for a very long time now.Political Correctness'.........defined
"A doctrine fostered by a delusional, illogical minority and rabidly promoted by an unscrupulous mainstream media, which holds forth the proposition that it is entirely possible to pick up a t-u-r-d by the clean end."
President of Club Polk -
Didn't say it wasn't but lacquer and pianos have both been around much longer than polyester.
So has shellac. Which is made from bugs.Expert Moron Extraordinaire
You're just jealous 'cause the voices don't talk to you! -
Ok, @Jstas, just for grins, let's say I went the automotive finish method. Many years ago, I had an instructor mention that he'd never seen a deeper gloss black than when the color coat was a matte finish, and not gloss. Your thoughts?
Most likely I'll be going with the poly resin route, as it is a new method to me. I like to learn the hard way and I've worked with auto finishes before. -
Don't do it !!!!!If you can't hear a difference, don't waste your money.
-
I didn't say to use gloss black. Just black paint.
I've heard the same about using a matte black paint. You can do that because all your shine is going to come from your clear coat anyway. But a gloss clearcoat is not going to be smooth enough on it's own to be "piano black". The idea behind piano black is not because it's a glossy black but because the surface is nearly perfectly smooth which enhances the glossiness of the gloss black.
Just make sure you use a matte black enamel and not a primer. Primer will degrade over time and lighten. It also tends to be uneven in color as the intent is not to cover but to coat and seal before covering.Expert Moron Extraordinaire
You're just jealous 'cause the voices don't talk to you! -
Didn't say it wasn't but lacquer and pianos have both been around much longer than polyester.
So has shellac. Which is made from bugs.
Shellac is made from the excrement of the female Lac bug. No Lac bugs were actually harmed in the making.Political Correctness'.........defined
"A doctrine fostered by a delusional, illogical minority and rabidly promoted by an unscrupulous mainstream media, which holds forth the proposition that it is entirely possible to pick up a t-u-r-d by the clean end."
President of Club Polk -
That's a lot of shioop
-
IndeedPolitical Correctness'.........defined
"A doctrine fostered by a delusional, illogical minority and rabidly promoted by an unscrupulous mainstream media, which holds forth the proposition that it is entirely possible to pick up a t-u-r-d by the clean end."
President of Club Polk