Tweaking Home Theater Pt. 2: Improved Plasma TV Black Levels With Proper Break In

DarqueKnight
Posts: 6,765
Part 1 is here.
Prologue
 "Submitted for your approval: A casual videophile, while evaluating the latest and greatest in plasma display technology, stumbles upon an obsure magic trick that promises prettier pictures at minimal cost. Caution is advised since cost effective visual enhancements are rare and often illusory...in the Blu-Ray Zone."
Introduction
The main criticism of the Hitachi 55HDT52 plasma HDTV (720p native resolution) has been its lower black levels relative to competing brands. When I was shopping for a plasma display for my home theater three years ago, I was willing to give up some black level performance because of the Hitachi's price, features, and appealing aesthetics. Black levels are important because a display's ability to accurately reproduce black as black, rather than as a dark shade of gray, forms the foundation of its ability to reproduce other colors vividly and in a three dimensional fashion.
Immediately after setting up my Pioneer Elite BFD-09FD Blu-ray player, I noticed enhanced black levels and more detail and three dimensionality in the picture. This increased my interest in acquiring a plasma television with better black level performance. During my research on other plasma displays, I ran across a plasma display break in tool developed by Evangelos Angelides which displays a succession of full-screen color slides that works all the phosphor colors (pure red, pure blue, pure green, five shades of the three primary colors, and white). The tool is a DVD image file that you burn onto a DVD and then play for the number of break in hours recommended by your plasma display's manufacturer. The tool can be downloaded, free of charge, here. The break in tool operates on the theory that, like a fine wine, plasma phosphors must be properly and evenly "aged" for best performance.
Hitachi recommends a break in period of 100 hours. In the three years that I have owned the 55HDT52, I estimate that I have put about 250 hours on it. Therefore, I wasn't expecting much, if any, improvement. I was in for a very pleasant surprise. After 60 hours of running the break in DVD, I was seeing deeper blacks, crisper and brighter whites, richer and more vivid colors, and more detail and three dimensionality in the picture.
I had gotten into the habit of watching movies in "stretch mode", not because I didn't like seeing the black bars at the top and bottom of the screen, but because the black bars were a distracting, slightly luminous dark gray rather than black. Furthermore, the "black" of the upper and lower bars never matched the blacks in the movie picture. This was particularly noticeable when watching dark scenes and particularly space scenes in sci-fi movies.
The pictures below are low resolution versions (800 x 600 pixels) of screen shots from the "Star Wars: Episode III" DVD and the "Casino Royale" Blu-ray. The darkest black in the pictures below is the upper and lower television bezel. The green dot in the lower right of figures 2 through 7 is the television's on/off LED. In figure 1, the upper television bezel and upper black bar are shown, but the bottom of the picture only shows the lower black bar.
The 55HDT52 was initially set up three years ago using the Avia setup DVD and the settings have not been changed since. My picture settings are:
Picture mode: Day,
Contrast: 56%,
Brightness: 46%,
Color: 35%,
Tint: One click right of middle of adjustment bar,
Sharpness: 40%,
Color Temp: Medium,
Black Enhancement: Low,
Contrast Mode: Dynamic,
Noise Reduction: Off,
Auto Movie Mode: On.
I ran the break in DVD from an old Sony DVP-S360 DVD player that I connected to an unused set of the TV's component video inputs. The DVD has 90 chapters and is authored to automatically start and to automatically loop back to the beginning at the 44:57 mark. The automatic start and automatic loop back may not engage in every player, so you should verify that these features work in your player. For the first 60 hours, I ran the DVD as follows:
Day 1: 10 hours,
Day 2: 6 hours,
Day 3: 18 hours, 1 hour break, then 4 hours,
Day 4: 12 hours, 2 hour break, 10 hours.
The screen shots below are the results after running the break in DVD for 60 hours. Due to your computer monitor's resolution and/or settings, it may be difficult to see the differences in the shades of black and dark grays in the pictures.
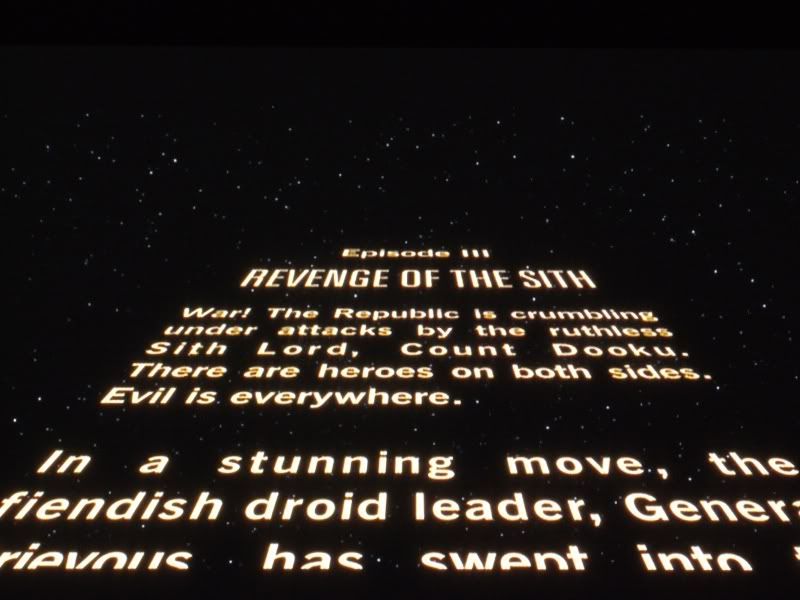
Figure 1. The blackest black is the upper TV bezel. There is a subtle difference between the black upper and lower picture
bars and black star field. This is a huge improvement over the "luminous dark gray" bars I was getting previously.
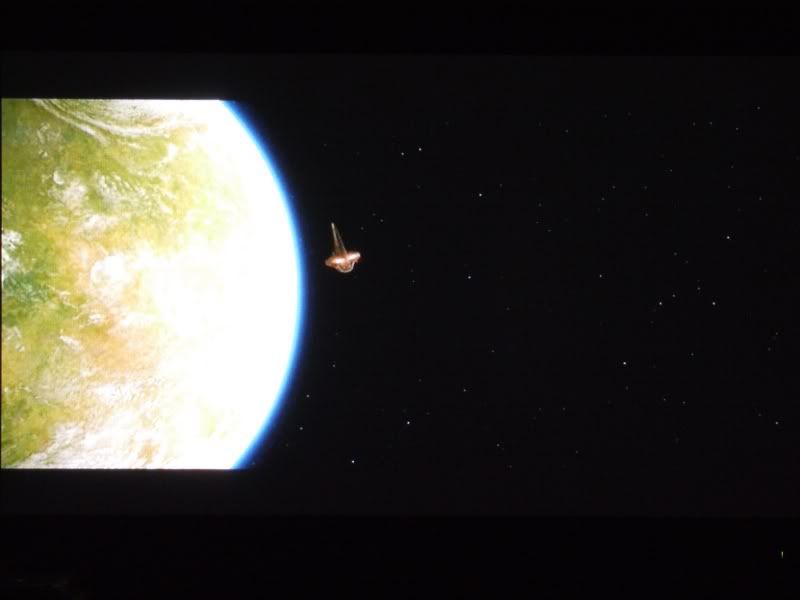
Figure 2. Not the deepest black, as compared to the upper and lower TV bezel, but the star field is a good shade of black that
provides a good contrast to the brightly lit planet and spaceship.

Figure 3. Due to the 55HDT52's black level performance, there was a lot of blotchy visual noise in the dark shadows on Anakin
Skywalker's right cheek when displayed by my previous DVD and Blu-ray players. The BDP-09FD Blu-ray player, with its
enhanced noise reduction features, rendered this scene with significantly less noise. Further noise reduction and more
shadow detail was seen after 60 hours running the Angelides break in DVD.
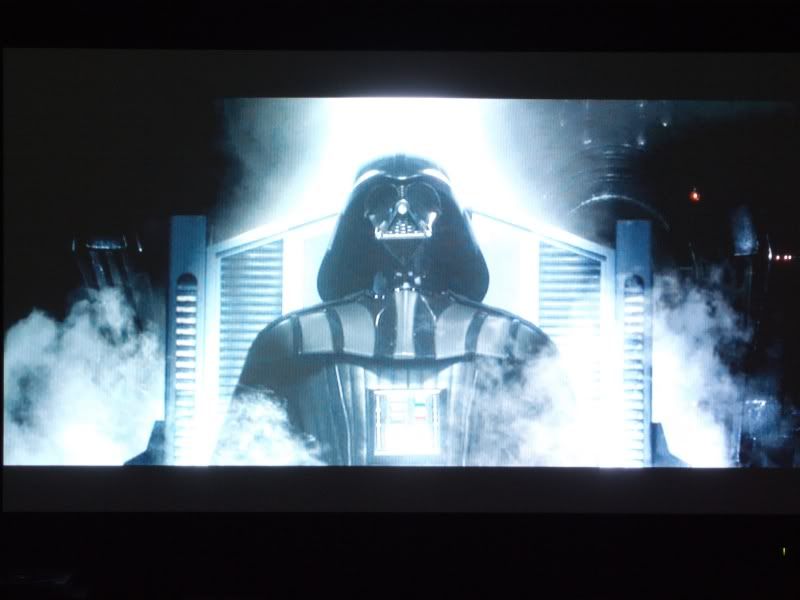
Figure 4. It is difficult to tell the border between the upper black bar and the scene shadows in the upper left of the scene.
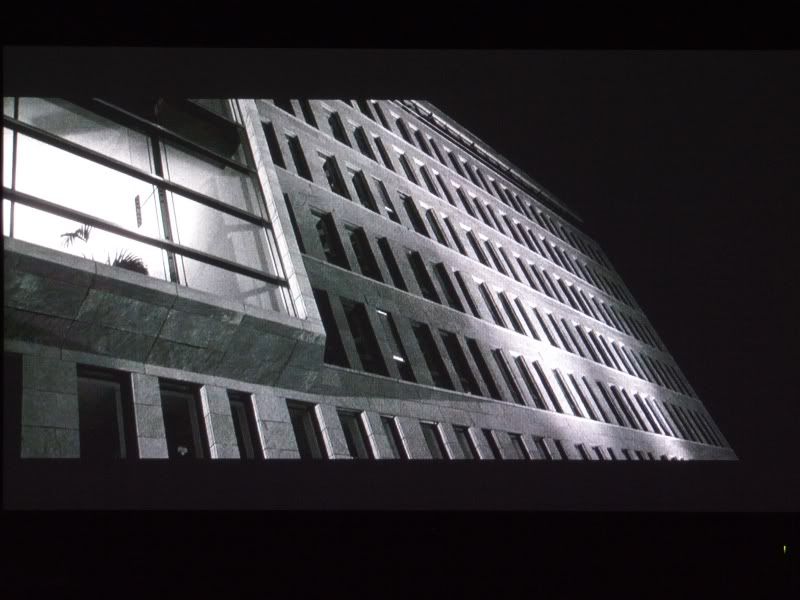
Figure 5. This scene displayed grayish blacks, but they were all well integrated. The right side of the upper black bar blended
seamlessly with the dark night sky.
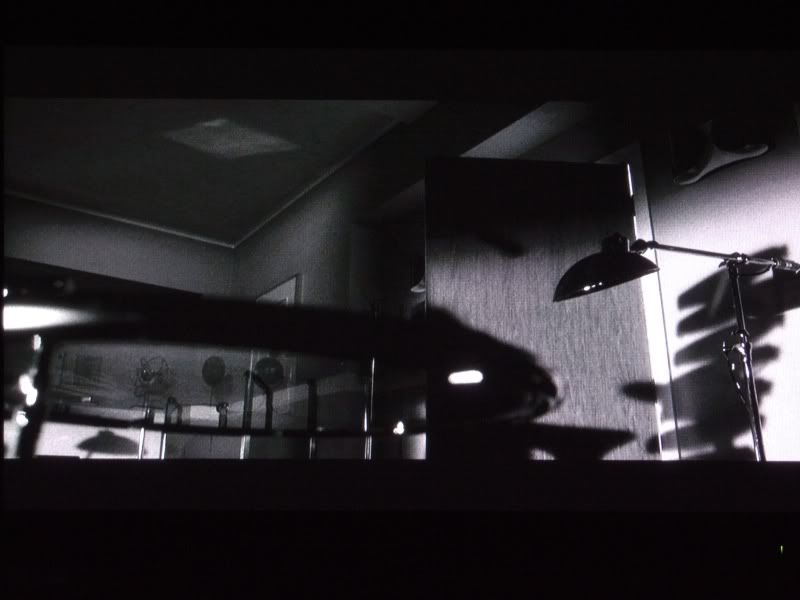
Figure 6. This scene is shot in a grainy black and white style. The wood grain pattern on the door in this scene was
reproduced with some slight video noise when it was fed from my previous Blu-ray disc player. It is rendered noise free and
in good detail here. Part of this is due to the Pioneer BDP-09FD Blu-ray player and part of this is due to properly aged plasma
phosphors.

Figure 7. Awwww...look at the nice kitty: The non-letterboxed MGM Studios "roaring lion" trademark tag prior to the opening
scene of the "Casino Royale" Blu-ray. You can see the contrast between the TV's black bezel and the "black" background of
the trademark tag. Prior to using the break in DVD, this background was a lighter dark gray and there was some very slight
"ghosting" around the edges of the silver logo. Now, there is no ghosting and the artwork and lettering are rendered sharply.
There is also more detail in the lion's fur strands that does not show up in this low resolution photograph.
I ran the break in DVD for an additional 42 hours as follows:
Day 5: 14 hours,
Day 6: 18 hours, 6 hours break,
Day 7: 11 hours.
Total: 102 hours.
I did not see any difference or improvement with additional break in hours after the first 60.
Readjusting Picture Settings
Final picture adjustments are supposed to be done after break in. Rather than reuse the Avia setup DVD, I chose the "Spears & Munsil High Definition Benchmark Blu-ray Edition" setup disc. The picture settings did not change.
Conclusion
It seems that even an "old" TV can learn new tricks. This break in tool has enhanced my viewing enjoyment and has made the wait for a 1080p plasma a lot less impatient.
Epilogue
"A moment's satisfaction actually serves to plant the seeds of "what if"...in the Blu-ray Zone."
Associated Equipment
■Hitachi 55HDT52 Plasma HDTV (720p)
■Sony TA-E9000ES Digital Preamp/Processor Ver. 2.1 Firmware
■Pioneer Elite BDP-09FD Blu-Ray Player
■Three Adcom GFA-5500 Power Amps (350 wpc into 4 ohms) for Front, Center, and Surround Speakers
■Dual Polk Audio LSi9 Center Channel Speakers
■Polk Audio LSi15 Surround Speakers
■SVS PB12 Ultra/2 Subwoofer with 1000 Watt Bash Amplifier
■Monster M1000CV Component Video Cable
■Acoustic Research Coax Cables (DVD, CD)
■Monster Z2 Reference Speaker Cables
■Monster Z100i Interconnects
■Signal Cable MagicPower Cords
■Monster UL/CL3 In-Wall 12 Gauge Speaker Cable for Subwoofer
■Salamander Synergy Quad 30 Audio Credenza
■Acoustic Research HDMI cable
■Two PS Audio Power Plant Premier Power Regenerators
■PS Audio Power Port Premier 20 Amp AC Receptacles for Power Plant Premiers
■Two Dedicated 20 Amp AC Circuits For Amps, TV, and Source Components
■Separate Dedicated 20 Amp AC Circuit for Subwoofer
■PS Audio Soloist Premier SE Power Conditioner For Subwoofer
■Isoclean and HiFi Tuning Audio Grade Fuses For Amps, Blu-ray Player, and Subwoofer
Prologue
Introduction
The main criticism of the Hitachi 55HDT52 plasma HDTV (720p native resolution) has been its lower black levels relative to competing brands. When I was shopping for a plasma display for my home theater three years ago, I was willing to give up some black level performance because of the Hitachi's price, features, and appealing aesthetics. Black levels are important because a display's ability to accurately reproduce black as black, rather than as a dark shade of gray, forms the foundation of its ability to reproduce other colors vividly and in a three dimensional fashion.
Immediately after setting up my Pioneer Elite BFD-09FD Blu-ray player, I noticed enhanced black levels and more detail and three dimensionality in the picture. This increased my interest in acquiring a plasma television with better black level performance. During my research on other plasma displays, I ran across a plasma display break in tool developed by Evangelos Angelides which displays a succession of full-screen color slides that works all the phosphor colors (pure red, pure blue, pure green, five shades of the three primary colors, and white). The tool is a DVD image file that you burn onto a DVD and then play for the number of break in hours recommended by your plasma display's manufacturer. The tool can be downloaded, free of charge, here. The break in tool operates on the theory that, like a fine wine, plasma phosphors must be properly and evenly "aged" for best performance.
Hitachi recommends a break in period of 100 hours. In the three years that I have owned the 55HDT52, I estimate that I have put about 250 hours on it. Therefore, I wasn't expecting much, if any, improvement. I was in for a very pleasant surprise. After 60 hours of running the break in DVD, I was seeing deeper blacks, crisper and brighter whites, richer and more vivid colors, and more detail and three dimensionality in the picture.
I had gotten into the habit of watching movies in "stretch mode", not because I didn't like seeing the black bars at the top and bottom of the screen, but because the black bars were a distracting, slightly luminous dark gray rather than black. Furthermore, the "black" of the upper and lower bars never matched the blacks in the movie picture. This was particularly noticeable when watching dark scenes and particularly space scenes in sci-fi movies.
The pictures below are low resolution versions (800 x 600 pixels) of screen shots from the "Star Wars: Episode III" DVD and the "Casino Royale" Blu-ray. The darkest black in the pictures below is the upper and lower television bezel. The green dot in the lower right of figures 2 through 7 is the television's on/off LED. In figure 1, the upper television bezel and upper black bar are shown, but the bottom of the picture only shows the lower black bar.
The 55HDT52 was initially set up three years ago using the Avia setup DVD and the settings have not been changed since. My picture settings are:
Picture mode: Day,
Contrast: 56%,
Brightness: 46%,
Color: 35%,
Tint: One click right of middle of adjustment bar,
Sharpness: 40%,
Color Temp: Medium,
Black Enhancement: Low,
Contrast Mode: Dynamic,
Noise Reduction: Off,
Auto Movie Mode: On.
I ran the break in DVD from an old Sony DVP-S360 DVD player that I connected to an unused set of the TV's component video inputs. The DVD has 90 chapters and is authored to automatically start and to automatically loop back to the beginning at the 44:57 mark. The automatic start and automatic loop back may not engage in every player, so you should verify that these features work in your player. For the first 60 hours, I ran the DVD as follows:
Day 1: 10 hours,
Day 2: 6 hours,
Day 3: 18 hours, 1 hour break, then 4 hours,
Day 4: 12 hours, 2 hour break, 10 hours.
The screen shots below are the results after running the break in DVD for 60 hours. Due to your computer monitor's resolution and/or settings, it may be difficult to see the differences in the shades of black and dark grays in the pictures.
Figure 1. The blackest black is the upper TV bezel. There is a subtle difference between the black upper and lower picture
bars and black star field. This is a huge improvement over the "luminous dark gray" bars I was getting previously.
Figure 2. Not the deepest black, as compared to the upper and lower TV bezel, but the star field is a good shade of black that
provides a good contrast to the brightly lit planet and spaceship.
Figure 3. Due to the 55HDT52's black level performance, there was a lot of blotchy visual noise in the dark shadows on Anakin
Skywalker's right cheek when displayed by my previous DVD and Blu-ray players. The BDP-09FD Blu-ray player, with its
enhanced noise reduction features, rendered this scene with significantly less noise. Further noise reduction and more
shadow detail was seen after 60 hours running the Angelides break in DVD.
Figure 4. It is difficult to tell the border between the upper black bar and the scene shadows in the upper left of the scene.
Figure 5. This scene displayed grayish blacks, but they were all well integrated. The right side of the upper black bar blended
seamlessly with the dark night sky.
Figure 6. This scene is shot in a grainy black and white style. The wood grain pattern on the door in this scene was
reproduced with some slight video noise when it was fed from my previous Blu-ray disc player. It is rendered noise free and
in good detail here. Part of this is due to the Pioneer BDP-09FD Blu-ray player and part of this is due to properly aged plasma
phosphors.
Figure 7. Awwww...look at the nice kitty: The non-letterboxed MGM Studios "roaring lion" trademark tag prior to the opening
scene of the "Casino Royale" Blu-ray. You can see the contrast between the TV's black bezel and the "black" background of
the trademark tag. Prior to using the break in DVD, this background was a lighter dark gray and there was some very slight
"ghosting" around the edges of the silver logo. Now, there is no ghosting and the artwork and lettering are rendered sharply.
There is also more detail in the lion's fur strands that does not show up in this low resolution photograph.
I ran the break in DVD for an additional 42 hours as follows:
Day 5: 14 hours,
Day 6: 18 hours, 6 hours break,
Day 7: 11 hours.
Total: 102 hours.
I did not see any difference or improvement with additional break in hours after the first 60.
Readjusting Picture Settings
Final picture adjustments are supposed to be done after break in. Rather than reuse the Avia setup DVD, I chose the "Spears & Munsil High Definition Benchmark Blu-ray Edition" setup disc. The picture settings did not change.
Conclusion
It seems that even an "old" TV can learn new tricks. This break in tool has enhanced my viewing enjoyment and has made the wait for a 1080p plasma a lot less impatient.
Epilogue
"A moment's satisfaction actually serves to plant the seeds of "what if"...in the Blu-ray Zone."
Associated Equipment
■Hitachi 55HDT52 Plasma HDTV (720p)
■Sony TA-E9000ES Digital Preamp/Processor Ver. 2.1 Firmware
■Pioneer Elite BDP-09FD Blu-Ray Player
■Three Adcom GFA-5500 Power Amps (350 wpc into 4 ohms) for Front, Center, and Surround Speakers
■Dual Polk Audio LSi9 Center Channel Speakers
■Polk Audio LSi15 Surround Speakers
■SVS PB12 Ultra/2 Subwoofer with 1000 Watt Bash Amplifier
■Monster M1000CV Component Video Cable
■Acoustic Research Coax Cables (DVD, CD)
■Monster Z2 Reference Speaker Cables
■Monster Z100i Interconnects
■Signal Cable MagicPower Cords
■Monster UL/CL3 In-Wall 12 Gauge Speaker Cable for Subwoofer
■Salamander Synergy Quad 30 Audio Credenza
■Acoustic Research HDMI cable
■Two PS Audio Power Plant Premier Power Regenerators
■PS Audio Power Port Premier 20 Amp AC Receptacles for Power Plant Premiers
■Two Dedicated 20 Amp AC Circuits For Amps, TV, and Source Components
■Separate Dedicated 20 Amp AC Circuit for Subwoofer
■PS Audio Soloist Premier SE Power Conditioner For Subwoofer
■Isoclean and HiFi Tuning Audio Grade Fuses For Amps, Blu-ray Player, and Subwoofer
Proud and loyal citizen of the Digital Domain and Solid State Country!
Post edited by DarqueKnight on
Comments
-
Good info. I love my sammys blacks! I ran avia 2 and haven't looked back.Honoured to be, an original SOPA founding member
Stuff...
RTi12's - front
CSi5 - center
FXi3's - surrounds
RTi4's - surrounds
SVS PB12-NSD/2 - sub
Denon 3805
Rotel RB-985 5-Channel Amplifier -
I never even heard of a DVD like this. Avia??
Guess i will have to look into it.
Nice write up DK thanks, Now i will have something else to look into and maybe play with. -
Thanks for the info, I've never heard of plasma screen break in.
Good to know, because I'm going to be in the market for a new plasma a little later in the year. I'll have to DL this file and run it through after I get a new TV.The nirvana inducer-
APC H10 Power Conditioner
Marantz UD5005 universal player
Parasound Halo P5 preamp
Parasound HCA-1200II power amp
PolkAudio LSi9's/PolkAudio SDA 2A's/PolkAudio Monitor 7A's
Audioquest Speaker Cables and IC's -
the breakin tool seems like utter bollocks, im appalled that using it would make a diff. On my marantz dv4001 i switched the setting from 0.0 to 7.0 and that boosted blacks for me on my pj even better than the ps3 for blacks on dvd's
-
Having Calibrated many panels myself may I make a suggestion?
Color Temp: Medium,
Black Enhancement: Low,
Contrast Mode: Dynamic
Color Temp should usually be set to warm; warm is usually as close to 6500k output as possible on most panels. Without this output you'll be hard pressed to set a foundation for all other adjustments.
Black Enhancement: Try setting it to off after you've adjusted the color temp.
Contrast Mode: Normal (if such a setting exists) for the same reasons as stated above. -
Good review. I returned my Hitachi due to poor black levels. I thought the Hitachi did everything else correct (color and details were great).
Since the purchase of the Pioneer, all of my video needs have been satisfied. -
Having Calibrated many panels myself may I make a suggestion?
Color Temp: Medium,
Black Enhancement: Low,
Contrast Mode: Dynamic
Color Temp should usually be set to warm; warm is usually as close to 6500k output as possible on most panels. Without this output you'll be hard pressed to set a foundation for all other adjustments.
Black Enhancement: Try setting it to off after you've adjusted the color temp.
Contrast Mode: Normal (if such a setting exists) for the same reasons as stated above.
The 55HDT52 manual, unlike others I've seen, does not match a specific numerical value for each color temperature. It just states:
"Set to High for cooler color with more blue, set to Medium for more natural color, set to Standard for accurate color or set to Black/White for more reddish color."
"Standard" introduces a very slight yellowish cast to the colors that I don't like. Whites are yellowish with the standard color temperature setting and whites are white with the medium color temperature setting.
Contrast Mode has three settings:
"Dynamic for darker images more in the level of black, Normal for a balanced White to Black level, and Auto for automatic Contrast selection."
The color settings for each video source input can be set independently. For contrast mode, I use dynamic for the Blu-ray input and normal for cable TV.
Black enhancement can be set to off, low, middle and high and is used to enhance shadow detail in dark scenes. Low is just right, off is not enough and middle and high are too much.Proud and loyal citizen of the Digital Domain and Solid State Country! -
NIce review, I wasn't aware there was a break-in disk for a Plasma TV.
Do you think it would work on a 3yr old 50" Panasonic 720p with ALOT more than 250 hours on it.
Jimmy -
Only way to know is to try it.Proud and loyal citizen of the Digital Domain and Solid State Country!