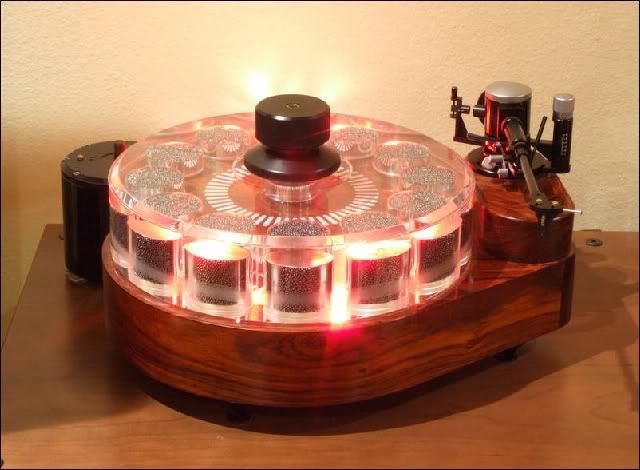
Holographic Mylar Belt Tweak For Teres 255 Turntable

DarqueKnight
Posts: 6,765
Introduction
I love cheap tweaks that pay off handsomely. I came across a simple and effective tweak for the Rube Goldberg-ish contraption that plays my records [footnote 1]. I found this tweak on the Audiogon forums.
The "holographic mylar" belt is a tweak that some Teres turntable owners have found to be a significant upgrade over the stock mylar belt. The term "holographic" does not refer to audio imaging, although the belt does enhance imaging aspects. The manufacturer, McCormick Enterprises, makes a variety of decorative mylar tapes, one of which is the "holographic" mylar tape which is a clear tape with a silver colored metal backing. This tape produces prismatic bands of color when light hits it. The color variations are due to micro-ridges embossed on one side of the tape. The ridged side is then coated with a smooth silver colored metal backing. Removing the metal backing exposes the micro-ridges. This side is then used to drive a turntable platter. Better performance is realized due to the belt's improved grip on the motor capstan and platter.
All turntable belts slip microscopically. This is an unavoidable consequence of pulling one smooth surfaced object (the belt) over another smooth surfaced object (the turntable platter). A properly tensioned belt made of an appropriate material will not slip to the point of being audibly objectionable.
Fabrication Tools And Supplies
1. McCormick Holographic Mylar 1/2" streamer tape, $4.50 for a 100' roll, add $7.50 shipping for a total of $12.00. The stock Teres belt is 41.5" long. I cut my belts from 46" lengths of mylar, therefore, a 100' roll will make 26 belts.
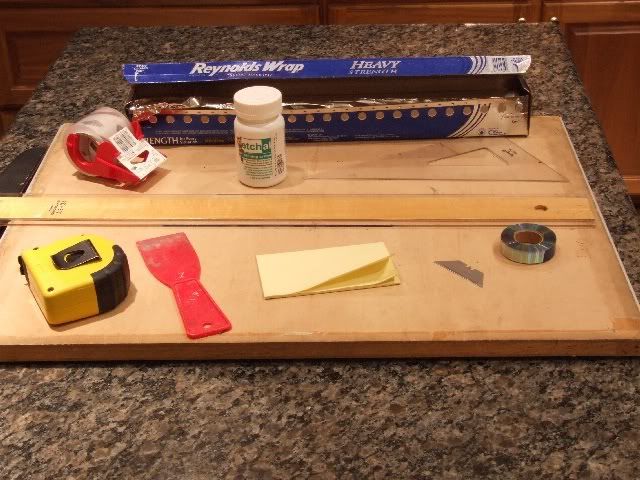
Figure 1. Belt fabrication tools and supplies.
2. Etching cream to remove the mylar tape's metal coating. The two best performing etching creams are Armour Etch and Etch All. Armour Etch is cheap ($7.25 for a 3 oz. bottle and $16.95 for a 10 oz. bottle) but contains dangerous corrosive hydrofluoric acid. It removes the metal backing on contact, but it will also remove skin and its fumes will remove the lining of your nasal passages if inhaled. It's nasty stuff.
Etch All uses a mild acid solution that only took 3 minutes to completely dissolve the metal backing. There were no dangerous fumes. I only smelled a faint ammonia scent and this was only with my nose a half inch from the bottle opening. The ammonia scent of the acrylic paints I use is much stronger. Brief contact with skin will do no harm. Long term contact with skin can cause irritation and burns. Etch All costs twice as much as Armour Etch ($21.95 for a 4 oz. bottle and $47.95 for a 16 oz. bottle). Etch All is also reusable. Although the initial cost is higher, the long term cost is lower due to the reuse factor. A 4 oz. bottle is more than enough for this project. The total cost was $30.95 ($21.95 + $9 shipping).
After the first belt was made and verified, I made three more as spares. People who use their turntables for several hours a day report a holographic mylar belt lifetime of approximately 10 months (or 900 - 1000 hours). Since I only use my turntable for several hours per week, I expect a belt to last years. My last regular mylar belt lasted over two years. However, I like this belt so much that I wouldn't complain if it only lasted two weeks.;)
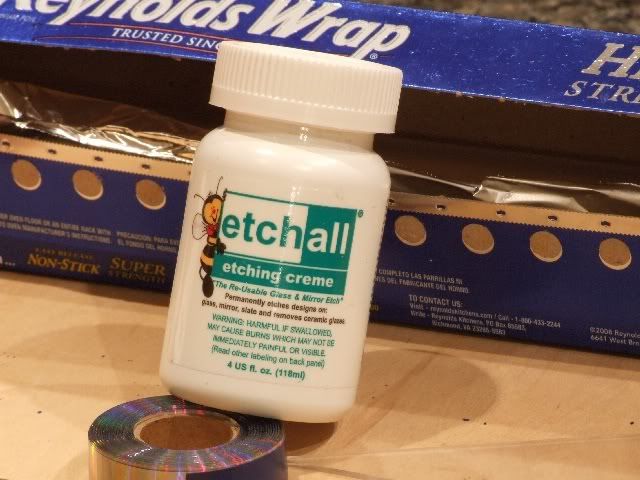
Figure 2. I used about two table spoons of Etch-All to make four belts. After etching,
I scraped up about 3/4's of the Etch-All with a plastic spatula and put it back in
its container.
3. Splicing tape. Professional archival quality tape is colored (blue, beige) so that recording engineers can easily find the splice. The most highly regarded professional splicing tape is TME Professional Archive/Studio tape. It is blue in color and costs $26 for an 82' roll.
I knew that seeing a blue (or any other color) splice segment go round and round would prove visually irritating over time. A suitable alternative is Scotch clear 2" Super Strength Mailing Tape ($3.26 for a 22' roll).
My total cost for materials was $46.18. Averaged over 26 belts this came to $1.78 per belt (+ my time, facilities, and labor). Stock replacement belts cost $10 + $5 shipping.
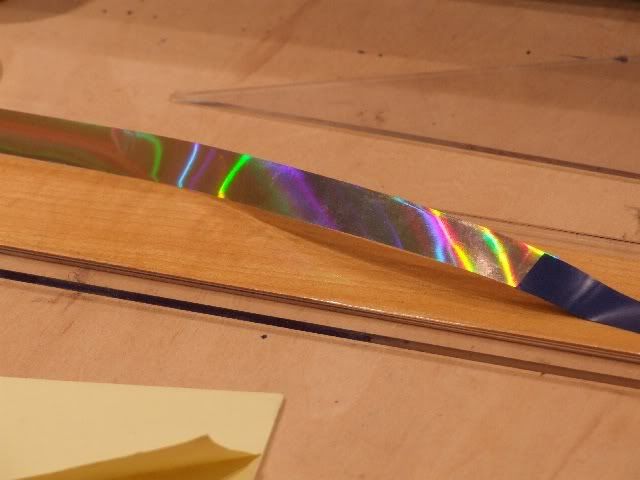
Figure 3. Holographic mylar with its silver colored metal backing.
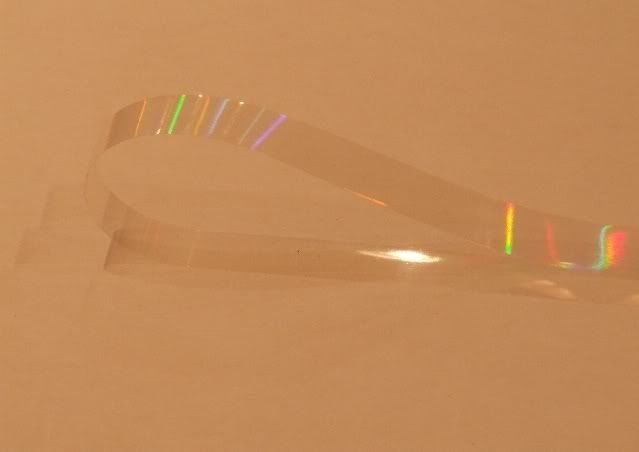
Figure 4. Holographic mylar with its metal backing stripped off.
Like any belt, audible deterioration will announce when replacement is necessary. Additionally, the holographic belt provides a visual cue that its useful life is over: the holographic/rainbow effect will be gone due to the micro-ridges being worn down.
Fabrication Procedure
I taped a 50" length of aluminum foil to my kitchen counter top to use as a work surface. The back of a small wooden drafting board was used as a splicing surface and a 30-60-90 drafting triangle was used as a cutting guide.
1. Cut a length of the silver holographic mylar tape sufficient for your turntable, plus 3"-4" extra.
2. Remove the silver metallic coating off the backside of the mylar with an acid etching cream. The side that the ends of the tape curls toward is the side to etch. I applied a thin layer of Etch-All with a gloved finger. No rubbing was required. The Etch-All dissolved the metallic coating within three minutes. The silver coating literally disappeared before my eyes.
3. Pull the tape through two fingers to remove most of the etching cream and then rinse thoroughly under running water. Inspect to make sure all the silver is off, lightly wipe and hang to dry overnight. You will not be able to hand dry all the water trapped in the small micro ridges. This trapped water will cause slippage if you try to use the belt after it is just rinsed and hand dried. Don't try to speed things up with a blow dryer or other mechanical drying methods. You could damage or warp the tape. Be patient.
4. After the tape has air dried overnight, splice as normal to make a turntable belt, making sure you tape on the OUTSIDE (which will be smoother than the etched inside). Remember, the side that the tape curls toward is the etched side.
Overlap the ends and cut on a 30-40 degree angle. Apply splicing tape across the belt at the same angle and trim away the excess. You want to end up with a short splicing tape segment no longer than about 3/4". Do not use the popular silver "tabs" splicing tape segments. These cannot stand up to the pull of a turntable capstan and platter and will lose adhesion over time. I used Post-It Notes paper to hold the tape ends in place for splicing. If your hands are not steady enough, get a splicing block.
Setup, etching, cutting and splicing four belts, and cleanup took 50 minutes.
Measurement Results
The Signature III motor is designed to maintain speed within 1% of the nominal speed. Stroboscopic measurements with the stock mylar belt showed that the speed was +0.9% over the nominal 33-1/3 RPM. The speed with the holographic mylar belt was +0.2% over the nominal 33-1/3 RPM. This was a 4.5X reduction in speed error.
The Sound
I realized the following improvements after installing the holographic mylar belt:
1. Improved micro and macro dynamics.
2. Improved micro and macro details.
3. Improved transients.
4. Lower noise floor (apparently louder sound).
5. Heavier, more detailed and more tactile bass.
6. More image weight.
Sound stage dimensions remained the same. The improvements summarized above were immediately obvious as soon as the needle was dropped in the grooves and were significant. Other turntable brands that use mylar drive belts may also benefit from this tweak and it is worth investigating.
I mentioned here and here that the 180 gram LP version of Dave Brubeck's Time Out album sounded identical to the SACD version on my two channel system. Upon revisiting the sonic twins after installing the new belt, the LP had more image weight, more fine detail throughout, more sustain and natural decay on bass and piano strings and sounded louder (but didn't measure louder).
Conclusion
Switching to a wood or composite material platter would probably result in better speed stability due to the rougher surfaces providing a better grip on the belt. Lightly sanding the edge of my clear acrylic platter would probably yield similar improvements. None of these options are aesthetically appealing at this time. Teres has discontinued the use of acrylic platters.
Revelatory and transformatory tweaks usually cost considerably more than the $46.18 I spent for this project. I gladly accepted this as karma for all the diminishing returns I have incurred over the years.:)
You sound much better, but I'm still looking forward to the day when I'm able to
quit you.
[Footnote 1] A Rube Goldberg machine is a deliberately over engineered apparatus that performs a very simple task in a very indirect and convoluted fashion, usually involving a chain reaction that includes a live animal. Wikipedia-Rube Goldberg machine
I love cheap tweaks that pay off handsomely. I came across a simple and effective tweak for the Rube Goldberg-ish contraption that plays my records [footnote 1]. I found this tweak on the Audiogon forums.
The "holographic mylar" belt is a tweak that some Teres turntable owners have found to be a significant upgrade over the stock mylar belt. The term "holographic" does not refer to audio imaging, although the belt does enhance imaging aspects. The manufacturer, McCormick Enterprises, makes a variety of decorative mylar tapes, one of which is the "holographic" mylar tape which is a clear tape with a silver colored metal backing. This tape produces prismatic bands of color when light hits it. The color variations are due to micro-ridges embossed on one side of the tape. The ridged side is then coated with a smooth silver colored metal backing. Removing the metal backing exposes the micro-ridges. This side is then used to drive a turntable platter. Better performance is realized due to the belt's improved grip on the motor capstan and platter.
All turntable belts slip microscopically. This is an unavoidable consequence of pulling one smooth surfaced object (the belt) over another smooth surfaced object (the turntable platter). A properly tensioned belt made of an appropriate material will not slip to the point of being audibly objectionable.
Fabrication Tools And Supplies
1. McCormick Holographic Mylar 1/2" streamer tape, $4.50 for a 100' roll, add $7.50 shipping for a total of $12.00. The stock Teres belt is 41.5" long. I cut my belts from 46" lengths of mylar, therefore, a 100' roll will make 26 belts.
Figure 1. Belt fabrication tools and supplies.
2. Etching cream to remove the mylar tape's metal coating. The two best performing etching creams are Armour Etch and Etch All. Armour Etch is cheap ($7.25 for a 3 oz. bottle and $16.95 for a 10 oz. bottle) but contains dangerous corrosive hydrofluoric acid. It removes the metal backing on contact, but it will also remove skin and its fumes will remove the lining of your nasal passages if inhaled. It's nasty stuff.
Etch All uses a mild acid solution that only took 3 minutes to completely dissolve the metal backing. There were no dangerous fumes. I only smelled a faint ammonia scent and this was only with my nose a half inch from the bottle opening. The ammonia scent of the acrylic paints I use is much stronger. Brief contact with skin will do no harm. Long term contact with skin can cause irritation and burns. Etch All costs twice as much as Armour Etch ($21.95 for a 4 oz. bottle and $47.95 for a 16 oz. bottle). Etch All is also reusable. Although the initial cost is higher, the long term cost is lower due to the reuse factor. A 4 oz. bottle is more than enough for this project. The total cost was $30.95 ($21.95 + $9 shipping).
After the first belt was made and verified, I made three more as spares. People who use their turntables for several hours a day report a holographic mylar belt lifetime of approximately 10 months (or 900 - 1000 hours). Since I only use my turntable for several hours per week, I expect a belt to last years. My last regular mylar belt lasted over two years. However, I like this belt so much that I wouldn't complain if it only lasted two weeks.;)
Figure 2. I used about two table spoons of Etch-All to make four belts. After etching,
I scraped up about 3/4's of the Etch-All with a plastic spatula and put it back in
its container.
3. Splicing tape. Professional archival quality tape is colored (blue, beige) so that recording engineers can easily find the splice. The most highly regarded professional splicing tape is TME Professional Archive/Studio tape. It is blue in color and costs $26 for an 82' roll.
I knew that seeing a blue (or any other color) splice segment go round and round would prove visually irritating over time. A suitable alternative is Scotch clear 2" Super Strength Mailing Tape ($3.26 for a 22' roll).
My total cost for materials was $46.18. Averaged over 26 belts this came to $1.78 per belt (+ my time, facilities, and labor). Stock replacement belts cost $10 + $5 shipping.
Figure 3. Holographic mylar with its silver colored metal backing.
Figure 4. Holographic mylar with its metal backing stripped off.
Like any belt, audible deterioration will announce when replacement is necessary. Additionally, the holographic belt provides a visual cue that its useful life is over: the holographic/rainbow effect will be gone due to the micro-ridges being worn down.
Fabrication Procedure
I taped a 50" length of aluminum foil to my kitchen counter top to use as a work surface. The back of a small wooden drafting board was used as a splicing surface and a 30-60-90 drafting triangle was used as a cutting guide.
1. Cut a length of the silver holographic mylar tape sufficient for your turntable, plus 3"-4" extra.
2. Remove the silver metallic coating off the backside of the mylar with an acid etching cream. The side that the ends of the tape curls toward is the side to etch. I applied a thin layer of Etch-All with a gloved finger. No rubbing was required. The Etch-All dissolved the metallic coating within three minutes. The silver coating literally disappeared before my eyes.
3. Pull the tape through two fingers to remove most of the etching cream and then rinse thoroughly under running water. Inspect to make sure all the silver is off, lightly wipe and hang to dry overnight. You will not be able to hand dry all the water trapped in the small micro ridges. This trapped water will cause slippage if you try to use the belt after it is just rinsed and hand dried. Don't try to speed things up with a blow dryer or other mechanical drying methods. You could damage or warp the tape. Be patient.
4. After the tape has air dried overnight, splice as normal to make a turntable belt, making sure you tape on the OUTSIDE (which will be smoother than the etched inside). Remember, the side that the tape curls toward is the etched side.
Overlap the ends and cut on a 30-40 degree angle. Apply splicing tape across the belt at the same angle and trim away the excess. You want to end up with a short splicing tape segment no longer than about 3/4". Do not use the popular silver "tabs" splicing tape segments. These cannot stand up to the pull of a turntable capstan and platter and will lose adhesion over time. I used Post-It Notes paper to hold the tape ends in place for splicing. If your hands are not steady enough, get a splicing block.
Setup, etching, cutting and splicing four belts, and cleanup took 50 minutes.
Measurement Results
The Signature III motor is designed to maintain speed within 1% of the nominal speed. Stroboscopic measurements with the stock mylar belt showed that the speed was +0.9% over the nominal 33-1/3 RPM. The speed with the holographic mylar belt was +0.2% over the nominal 33-1/3 RPM. This was a 4.5X reduction in speed error.
The Sound
I realized the following improvements after installing the holographic mylar belt:
1. Improved micro and macro dynamics.
2. Improved micro and macro details.
3. Improved transients.
4. Lower noise floor (apparently louder sound).
5. Heavier, more detailed and more tactile bass.
6. More image weight.
Sound stage dimensions remained the same. The improvements summarized above were immediately obvious as soon as the needle was dropped in the grooves and were significant. Other turntable brands that use mylar drive belts may also benefit from this tweak and it is worth investigating.
I mentioned here and here that the 180 gram LP version of Dave Brubeck's Time Out album sounded identical to the SACD version on my two channel system. Upon revisiting the sonic twins after installing the new belt, the LP had more image weight, more fine detail throughout, more sustain and natural decay on bass and piano strings and sounded louder (but didn't measure louder).
Conclusion
Switching to a wood or composite material platter would probably result in better speed stability due to the rougher surfaces providing a better grip on the belt. Lightly sanding the edge of my clear acrylic platter would probably yield similar improvements. None of these options are aesthetically appealing at this time. Teres has discontinued the use of acrylic platters.
Revelatory and transformatory tweaks usually cost considerably more than the $46.18 I spent for this project. I gladly accepted this as karma for all the diminishing returns I have incurred over the years.:)
You sound much better, but I'm still looking forward to the day when I'm able to
quit you.
[Footnote 1] A Rube Goldberg machine is a deliberately over engineered apparatus that performs a very simple task in a very indirect and convoluted fashion, usually involving a chain reaction that includes a live animal. Wikipedia-Rube Goldberg machine
Proud and loyal citizen of the Digital Domain and Solid State Country!
Post edited by DarqueKnight on
Comments
-
Nice write-up! You are dating yourself by displaying your T-square and drafting board!Carl
