NON POLK question (Acoustic Research speakers)

Schurkey
Schurkey Posts: 2,104
edited May 2014 in Vintage Speakers
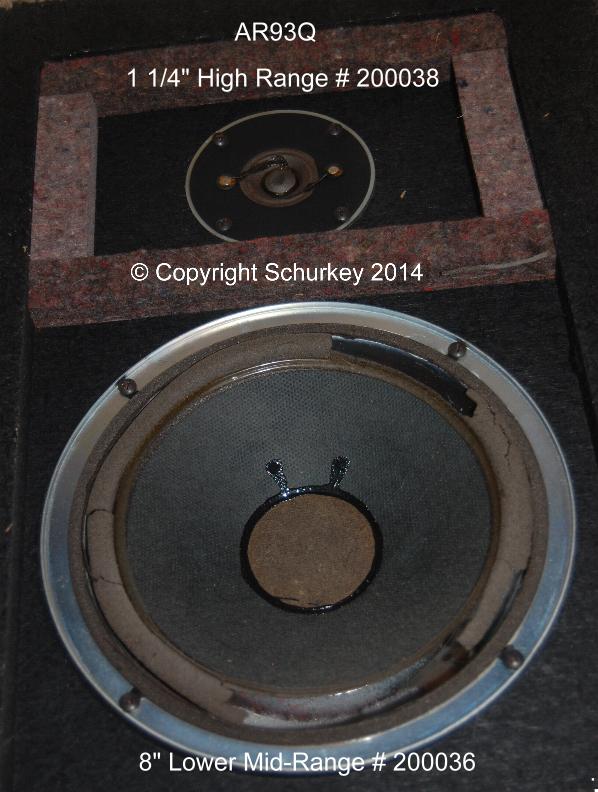
Picked up a pair of Acoustic Research AR-93Q speakers.
http://www.google.com/url?sa=t&rct=j&q=site%3Aclassicspeakerpages.net%20ar93%20classicspeaker&source=web&cd=20&ved=0CFwQFjAJOAo&url=http%3A%2F%2Fwww.classicspeakerpages.net%2FIP.Board%2Findex.php%3Fapp%3Dcore%26module%3Dattach%26section%3Dattach%26attach_id%3D5976&ei=vtYzT7z7B6Tw0gGOhoTaAg&usg=AFQjCNHe3AMwyhBjuBJS0-Z7E3pRF88lHQ

They were essentially free to me. Having popped off the tops and bottoms of the cabinets, and removed the "sock" covering the drivers, I discover that all four woofers and both midrange drivers have Foam Rot. I've never replaced a driver surround before, but it seems to be easy enough. I'm glad these aren't Bose 901s with eighteen drivers needing to be re-foamed. $32.50 for a six-piece foam kit advertised as "made in USA" and with free shipping seemed entirely reasonable to me.

Unlike most speakers, these guys have a sealed-cabinet, "Acoustic Suspension" design that AR pioneered back in the early '50s. No port, no passive radiator. Supposedly good bass at the expense of needing more amplifier power.

I am thinking that a sealed-cabinet speaker will produce internal cabinet pressure spikes far beyond what a ported or passive-radiator design will; with the result that the pressure spikes will make life more difficult for the driver surrounds. Is it true that a sealed-box has larger pressure spikes than a ported/vented cabinet design?
Post edited by Schurkey on
«1

Comments

  • pitdogg2
    pitdogg2 Posts: 25,679
    edited May 2014
    I have done many it is tedious work and you must take your time. I do not know about pressure spikes but do think that your reasoning is good anyhoot I have two places I like to get from.

    http://www.speakerrepair.com/page/product/ar-re-edge-kits/11-005-W-AR.html

    and http://www.simplyspeakers.com/acoustic-research-speaker-repair.html


    you could also ask westmassguy if he has any or can get you some.

    either way the new foam will be vastly superior to the old foam that they used way back when...
  • Mystery
    Mystery Posts: 2,546
    edited May 2014
    looneytune2001 in ebay has good foams for all kinds of speakers.

    Klipsch RB81, KG3.5, B&W DM602.5, Polk.
    Subwoofers: Klipsch RW10, Triad ProSub Bronze.
  • westmassguy
    westmassguy Posts: 6,850
    edited May 2014
    Schurkey, if you're going to do the re-foam yourself, be sure the supplier includes new dust caps and shims for the voice coil.
    It's "old school", but the only proper way to do a re-foam is to cut the old dust cap, shim the voice coil, re-align the spider, and then glue the new surround. The "glue it and pray" method just doesn't cut it. They may tell you the cone can be centered by hand or by using a test CD they provide. If you're going to attempt it, do it the proper way. As for internal pressure, and it's affect on the surrounds, don't worry about it. The original Polyurethane surrounds were quite tough, and the newer Polyether are even better.
    Home Theater/2 Channel:
    Front: SDA-2ATL forum.polkaudio.com/discussion/143984/my-2as-finally-finished-almost/p1
    Center: Custom Built forum.polkaudio.com/discussion/150760/my-center-channel-project/p1
    Surrounds & Rears: Custom Built forum.polkaudio.com/discussion/151647/my-surround-project/p1
    Sonicaps, Mills, RDO-194s-198s, Dynamat, Hurricane Nuts, Blackhole5
    Pioneer Elite VSX-72TXV, Carver PM-600, SVS PB2-Plus Subwoofer

    dhsspeakerservice.com/
  • pitdogg2
    pitdogg2 Posts: 25,679
    edited May 2014
    Schurkey, if you're going to do the re-foam yourself, be sure the supplier includes new dust caps and shims for the voice coil.
    It's "old school", but the only proper way to do a re-foam is to cut the old dust cap, shim the voice coil, re-align the spider, and then glue the new surround. The "glue it and pray" method just doesn't cut it. They may tell you the cone can be centered by hand or by using a test CD they provide. If you're going to attempt it, do it the proper way. As for internal pressure, and it's affect on the surrounds, don't worry about it. The original Polyurethane surrounds were quite tough, and the newer Polyether are even better.


    yep exactly. If they want to charge you for shims and they do not come with the kit, most of the time they are just cut paper. I have in the past just cut index cards in 1/2" strips and make sure you get the same number on every side north south east and west. Like I said tedious work but extremely satisfying in the end.
  • George Grand
    George Grand Posts: 12,258
    edited May 2014
    Schurkey wrote: »

    Unlike most speakers, these guys have a sealed-cabinet, "Acoustic Suspension" design that AR pioneered back in the early '50s. No port, no passive radiator. Supposedly good bass at the expense of needing more amplifier power.

    I am thinking that a sealed-cabinet speaker will produce internal cabinet pressure spikes far beyond what a ported or passive-radiator design will; with the result that the pressure spikes will make life more difficult for the driver surrounds. Is it true that a sealed-box has larger pressure spikes than a ported/vented cabinet design?

    Unlike most speakers (acoustic suspension)? Supposedly good bass?

    Three years after it's inception (in the 50's), AR had 30% of the speaker market. They had exceptionally smooth response throughout the entire frequency spectrum, but were phenomenal when it came to getting CLEAN, DEEP, low-end from a rational size enclosure.

    Priceless.
  • Mystery
    Mystery Posts: 2,546
    edited May 2014
    I have re-foamed over two dozen pairs or more (I can't keep track of any more) of speakers from cheap Advents to many brands like Boston Acoustics, AR, Tannoy, Genesis, Bose, Infinity etc... including expensive vintage JBL's (L26, L36, L100t, L166 etc...) and never cut dust caps.
    30Hz tone was good enough.
    I agree cutting dust caps and shimming is better, especially for spider issues but also involves taking a knife close to the cone and vc, and there's more chance of injuring or killing the woofer for newbie.
    So 30Hz tone does the job and much much much easier than cutting dust caps, shimming, aligning, putting the dust cap carefully back or replace if damaged during initial cut etc...
    I never had a single VC rub even with extreme bass test tracks and many pairs are still with me.

    Klipsch RB81, KG3.5, B&W DM602.5, Polk.
    Subwoofers: Klipsch RW10, Triad ProSub Bronze.
  • westmassguy
    westmassguy Posts: 6,850
    edited May 2014
    Mystery wrote: »
    I have re-foamed over two dozen pairs or more (I can't keep track of any more) of speakers from cheap Advents to many brands like Boston Acoustics, AR, Tannoy, Genesis, Bose, Infinity etc... including expensive vintage JBL's (L26, L36, L100t, L166 etc...) and never cut dust caps.
    30Hz tone was good enough.
    I agree cutting dust caps and shimming is better, especially for spider issues but also involves taking a knife close to the cone and vc, and there's more chance of injuring or killing the woofer for newbie.
    So 30Hz tone does the job and much much much easier than cutting dust caps, shimming, aligning, putting the dust cap carefully back or replace if damaged during initial cut etc...
    I never had a single VC rub even with extreme bass test tracks and many pairs are still with me.
    I never said the test tone method didn't work, you pays your money you takes your chances. Besides Crossovers, I re-cone, re-edge, and re-foam for a living. I've done several thousand. I have to guarantee my work, and ensure it operates exactly as it did when new. I can't tell you how many botched re-foams I've had to re-do because the customer bought into the other methods, and screwed it up. As with many things, there's the quick way, the short-cut, and then there's the correct way. The correct way always takes more time. Besides ending up with a perfectly centered voice coil, shimming also allows you to re-align and level the spider, returning it to a neutral position. As they age, spiders tend to collapse inward toward the magnet assembly. If the new surround is installed with the spider partially collapsed, cone travel can be affected, and the overall performance of the woofer may suffer.
    Home Theater/2 Channel:
    Front: SDA-2ATL forum.polkaudio.com/discussion/143984/my-2as-finally-finished-almost/p1
    Center: Custom Built forum.polkaudio.com/discussion/150760/my-center-channel-project/p1
    Surrounds & Rears: Custom Built forum.polkaudio.com/discussion/151647/my-surround-project/p1
    Sonicaps, Mills, RDO-194s-198s, Dynamat, Hurricane Nuts, Blackhole5
    Pioneer Elite VSX-72TXV, Carver PM-600, SVS PB2-Plus Subwoofer

    dhsspeakerservice.com/
  • Mystery
    Mystery Posts: 2,546
    edited May 2014
    I never said the test tone method didn't work,

    Neither did I. Both methods work. I've fooled around with fixing speakers/crossovers/foam/tweeters etc... for last 3 years and still I am scared to put a knife on a woofer so just saying it's much easier with test tone for newbies. I've slipped flat head screw few times on to the cone while cleaning foam so knife scares me there.
    shimming also allows you to re-align and level the spider, returning it to a neutral position.

    That's something I've never done. How does cutting shim have access to spider?
    Don't you have to separate VC tube to do that?

    Klipsch RB81, KG3.5, B&W DM602.5, Polk.
    Subwoofers: Klipsch RW10, Triad ProSub Bronze.
  • westmassguy
    westmassguy Posts: 6,850
    edited May 2014
    Mystery wrote: »
    Neither did I. Both methods work. I've fooled around with fixing speakers/crossovers/foam/tweeters etc... for last 3 years and still I am scared to put a knife on a woofer so just saying it's much easier with test tone for newbies. I've slipped flat head screw few times on to the cone while cleaning foam so knife scares me there.


    That's something I've never done. How does cutting shim have access to spider?
    Don't you have to separate VC tube to do that?

    You're not cutting the cone, only the dust cap. Use a fresh blade, and or a utility knife with a fresh blade. I prefer to use just the blade, with the back half taped off. On small woofers, start the cut 1/8" in on the dust cap. Only use the tip of the blade, and cut all the way around. On larger woofers, start 1/4" in on the dust cap. Again, only the tip does the cut. If you stick to this guideline, you'll never hit the coil wires or voice coil former. The replacement dust cap should be the same size or slightly larger, depending on whether its a lip up or lip down type.

    Aligning the spider is easy. Once the shims are in place, look through the basket frame. If the spider looks concave, you'll need to pull the cone out slightly, until it's flat across, (you can use a small straight-edge to check) then pull it up a little more so it's slightly convex. Once the new surround is glued in place, and the shims are removed, the spider should settle back to it's correct position, which is flat.
    Home Theater/2 Channel:
    Front: SDA-2ATL forum.polkaudio.com/discussion/143984/my-2as-finally-finished-almost/p1
    Center: Custom Built forum.polkaudio.com/discussion/150760/my-center-channel-project/p1
    Surrounds & Rears: Custom Built forum.polkaudio.com/discussion/151647/my-surround-project/p1
    Sonicaps, Mills, RDO-194s-198s, Dynamat, Hurricane Nuts, Blackhole5
    Pioneer Elite VSX-72TXV, Carver PM-600, SVS PB2-Plus Subwoofer

    dhsspeakerservice.com/
  • Mystery
    Mystery Posts: 2,546
    edited May 2014
    Aligning the spider is easy. Once the shims are in place, look through the basket frame. If the spider looks concave, you'll need to pull the cone out slightly, until it's flat across, (you can use a small straight-edge to check) then pull it up a little more so it's slightly convex. Once the new surround is glued in place, and the shims are removed, the spider should settle back to it's correct position, which is flat.
    Hmm... so the foam is glued on the cone but not on the basket, shims are in place.
    When you pull the cone out after that, doesn't it stretch the foam roll and limit it's movement?

    We're going sideways from main topic but may help OP on his refurb.

    Klipsch RB81, KG3.5, B&W DM602.5, Polk.
    Subwoofers: Klipsch RW10, Triad ProSub Bronze.
  • westmassguy
    westmassguy Posts: 6,850
    edited May 2014
    Mystery wrote: »
    Hmm... so the foam is glued on the cone but not on the basket, shims are in place.
    When you pull the cone out after that, doesn't it stretch the foam roll and limit it's movement?

    We're going sideways from main topic but may help OP on his refurb.
    You always glue the new surround to the cone first. If the voice coil isn't shimmed, the cone is frequently lower than it's supposed to be, due to the sagging spider. By doing what I described, you're actually restoring everything to it's correct location. As long as the new surround is the correct type, not generic, the part that glues to the flange will not be under any stress, and should fit perfectly.
    Home Theater/2 Channel:
    Front: SDA-2ATL forum.polkaudio.com/discussion/143984/my-2as-finally-finished-almost/p1
    Center: Custom Built forum.polkaudio.com/discussion/150760/my-center-channel-project/p1
    Surrounds & Rears: Custom Built forum.polkaudio.com/discussion/151647/my-surround-project/p1
    Sonicaps, Mills, RDO-194s-198s, Dynamat, Hurricane Nuts, Blackhole5
    Pioneer Elite VSX-72TXV, Carver PM-600, SVS PB2-Plus Subwoofer

    dhsspeakerservice.com/
  • pitdogg2
    pitdogg2 Posts: 25,679
    edited May 2014
    Mystery wrote: »
    I've slipped flat head screw few times on to the cone while cleaning foam so knife scares me there.
    That is your first mistake A sharp chisel works so much better.

    Mystery wrote: »
    That's something I've never done. How does cutting shim have access to spider?
    Don't you have to separate VC tube to do that?

    like WSG stated easy peasy. To be honest I had been very lucky to have been able to cut like Dave suggested but then just peel the former glue line right up. Sometimes you tear a very little of the top paper but if your careful use that knife blade to stop it or just cut at that area from below the glue and then start from the other side. With shims in place it is very easy to pull up the cone to get more room to work and to keep it from flopping all over.

    To be honest the only time I really felt the need to shim was on Infinity driver with a cone plug instead of dust cap it was more to keep debris out of the VC but i did learn from that. Some drivers like cerwin vega are very forgiving but others are very tight and you really should shim. I can think of several and JBL being one of them in my last experience.
  • pitdogg2
    pitdogg2 Posts: 25,679
    edited May 2014
    You always glue the new surround to the cone first. If the voice coil isn't shimmed, the cone is frequently lower than it's supposed to be, due to the sagging spider. By doing what I described, you're actually restoring everything to it's correct location. As long as the new surround is the correct type, not generic, the part that glues to the flange will not be under any stress, and should fit perfectly.

    well said^^^^ completely agree with all this. I always do them on two separate days. Cone day one frame day two then turn upside down....last part is my idiosyncrasies, I may be wrong but I think it help with even pressure on the whole woofer.
  • westmassguy
    westmassguy Posts: 6,850
    edited May 2014
    pit, the only woofer I flip, is the Large Advents, with the Masonite ring. They're a PITA to re-foam, with the inverted surround.
    All other woofers I keep upright. The shims hold everything in place perfectly.
    Home Theater/2 Channel:
    Front: SDA-2ATL forum.polkaudio.com/discussion/143984/my-2as-finally-finished-almost/p1
    Center: Custom Built forum.polkaudio.com/discussion/150760/my-center-channel-project/p1
    Surrounds & Rears: Custom Built forum.polkaudio.com/discussion/151647/my-surround-project/p1
    Sonicaps, Mills, RDO-194s-198s, Dynamat, Hurricane Nuts, Blackhole5
    Pioneer Elite VSX-72TXV, Carver PM-600, SVS PB2-Plus Subwoofer

    dhsspeakerservice.com/
  • pitdogg2
    pitdogg2 Posts: 25,679
    edited May 2014
    pit, the only woofer I flip, is the Large Advents, with the Masonite ring. They're a PITA to re-foam, with the inverted surround.
    All other woofers I keep upright. The shims hold everything in place perfectly.

    yes indeed they are. This would of been done on a woofer I didn't take off the dust cap. Sorry should of explained better.
  • JerryR1verz
    JerryR1verz Posts: 76
    edited May 2014
    I re-foamed a pair of 8" drivers not too long ago. I took the cap off and used the shims. One speaker sounded fine when I was done but the other was distorted. I choose not to do this again. Granted it was my first try but the outcome does not entice me to try it again.
    Polk Monitor 10
    Polk Monitor 7
  • pitdogg2
    pitdogg2 Posts: 25,679
    edited May 2014
    I re-foamed a pair of 8" drivers not too long ago. I took the cap off and used the shims. One speaker sounded fine when I was done but the other was distorted. I choose not to do this again. Granted it was my first try but the outcome does not entice me to try it again.

    If you would of pushed on that woofer you might of felt some rub. Either way something along the pole piece was too close or there might of been some small debris in there somewhere. When I'm done cleaning off the old I always blow air down around and everywhere to clean out all small debris.
  • westmassguy
    westmassguy Posts: 6,850
    edited May 2014
    The dust cap is the last thing to remove. After you've done all the other prep work, vacuumed the cone and flange, blow out any debris from inside the basket frame, then you cut the dust cap and install the shims. Otherwise, you risk crap falling into the air gap.
    Home Theater/2 Channel:
    Front: SDA-2ATL forum.polkaudio.com/discussion/143984/my-2as-finally-finished-almost/p1
    Center: Custom Built forum.polkaudio.com/discussion/150760/my-center-channel-project/p1
    Surrounds & Rears: Custom Built forum.polkaudio.com/discussion/151647/my-surround-project/p1
    Sonicaps, Mills, RDO-194s-198s, Dynamat, Hurricane Nuts, Blackhole5
    Pioneer Elite VSX-72TXV, Carver PM-600, SVS PB2-Plus Subwoofer

    dhsspeakerservice.com/
  • pitdogg2
    pitdogg2 Posts: 25,679
    edited May 2014
    The dust cap is the last thing to remove. After you've done all the other prep work, vacuumed the cone and flange, blow out any debris from inside the basket frame, then you cut the dust cap and install the shims. Otherwise, you risk crap falling into the air gap.

    Agreed..
  • Schurkey
    Schurkey Posts: 2,104
    edited May 2014
    Mystery wrote: »
    We're going sideways from main topic but may help OP on his refurb.
    Well, it's sure making me question how I'm going to end up doing the procedure. The instructions supplied with the surrounds do not encourage shimming the voice coil, and they aren't as clear about getting the spider positioned properly.

    Keep it up, guys. I'm learning all sorts of stuff. I had not planned to cut the dust cap and shim the coil. I guess I'll see how the first driver turns out, and reevaluate from there.

    I have one driver cleaned-up. Probably get another cleaned-up Sunday. Like everything I do, this is a slow project.

    What sort of chemical assistance are you using to release the old glue from the cone? I tried mineral spirits, it may have helped. The guide included with the surrounds suggests lacquer thinner. I'm going to buy a pint or quart or whatever small container I can find.
  • westmassguy
    westmassguy Posts: 6,850
    edited May 2014
    What is the cone made from? Pressed paper, Poly, Coated Paper?. Normally you don't remove the glue from the cone, just scrap the old foam off. The flange is a different story. I use an old, but sharp wood chisel, turn the woofer on it side, and work the chisel around the perimeter. Always work in a downward motion along the bottom, so if the chisel slips, it wont damage the cone.
    Home Theater/2 Channel:
    Front: SDA-2ATL forum.polkaudio.com/discussion/143984/my-2as-finally-finished-almost/p1
    Center: Custom Built forum.polkaudio.com/discussion/150760/my-center-channel-project/p1
    Surrounds & Rears: Custom Built forum.polkaudio.com/discussion/151647/my-surround-project/p1
    Sonicaps, Mills, RDO-194s-198s, Dynamat, Hurricane Nuts, Blackhole5
    Pioneer Elite VSX-72TXV, Carver PM-600, SVS PB2-Plus Subwoofer

    dhsspeakerservice.com/
  • pitdogg2
    pitdogg2 Posts: 25,679
    edited May 2014
    Schurkey wrote: »

    I have one driver cleaned-up. Probably get another cleaned-up Sunday. Like everything I do, this is a slow project.

    What sort of chemical assistance are you using to release the old glue from the cone? I tried mineral spirits, it may have helped. The guide included with the surrounds suggests lacquer thinner. I'm going to buy a pint or quart or whatever small container I can find.

    Do not use anything on the woofer, I have in the past been able to peel the old glue off. Once it gets going it usually just continue. You are taking your time which is a necessity
  • Schurkey
    Schurkey Posts: 2,104
    edited May 2014
    What is the cone made from? Pressed paper, Poly, Coated Paper?. Normally you don't remove the glue from the cone, just scrap the old foam off.
    Interesting. The cone is "treated paper" having a faintly waffle-texture to it. Peeling up the glue doesn't take of a "layer" of paper, but it does pull a lot of fibers. I didn't think the paper loss was too bad--but I'll see it better today now that the mineral spirits should have evaporated.

    The AR woofers have a layer of "rubberizing" over the foam at the cone. This is shown on the engineering drawing. (I found a site that shows pretty much everything that AR had for the AR93 speakers in terms of engineering drawings--cabinets, crossovers, individual drivers...you name it. They have drawings for other AR speaker components, too. My main computer died last night, so all my bookmarks are gone. If there's interest, I'll hunt it down again and post here.

    This "rubberizing" does not extend onto the "roll", it's just a top-coat over the part of the surround that would be glued to the cone. Peels off easily. The foam is so rotted that it practically wipes off. There's a glue layer that's thick and ugly, and that's what I'm having some trouble removing from the cone. It'll scrape off the basket easily enough.

    The baskets will have to be dampened. Holy crap, they ring like a bell. 'Course, I suppose the basket would have some damping from the surround, and that's gone now.
  • JerryR1verz
    JerryR1verz Posts: 76
    edited May 2014
    Good info from a wealth of experience. Sounds like there is a long history of success in foam replacement. My less than favorable outcome was likely self inflicted.
    Polk Monitor 10
    Polk Monitor 7
  • pitdogg2
    pitdogg2 Posts: 25,679
    edited May 2014
    Schurkey wrote: »
    Interesting. The cone is "treated paper" having a faintly waffle-texture to it. Peeling up the glue doesn't take of a "layer" of paper, but it does pull a lot of fibers. I didn't think the paper loss was too bad.

    For myself I've never worried too much about a thin sliver coming off with the glue. As long as it doesn't get going down toward the dust cap no worries for me. If it did I'd just slice it with the razor and continue, If it started again I went the other way and 95% of the time that would cure it.
  • Schurkey
    Schurkey Posts: 2,104
    edited May 2014
    I have the three drivers from one cabinet ready to begin gluing of the new surround. Will probably do that tomorrow. Currently looking for bowls or some other implements of destruction that will be the right diameter to apply pressure to the glue bond at the cone, and at the basket.
  • westmassguy
    westmassguy Posts: 6,850
    edited May 2014
    Schurkey wrote: »
    I have the three drivers from one cabinet ready to begin gluing of the new surround. Will probably do that tomorrow. Currently looking for bowls or some other implements of destruction that will be the right diameter to apply pressure to the glue bond at the cone, and at the basket.
    What kind of glue are you using, that you need that kind of pressure?
    Home Theater/2 Channel:
    Front: SDA-2ATL forum.polkaudio.com/discussion/143984/my-2as-finally-finished-almost/p1
    Center: Custom Built forum.polkaudio.com/discussion/150760/my-center-channel-project/p1
    Surrounds & Rears: Custom Built forum.polkaudio.com/discussion/151647/my-surround-project/p1
    Sonicaps, Mills, RDO-194s-198s, Dynamat, Hurricane Nuts, Blackhole5
    Pioneer Elite VSX-72TXV, Carver PM-600, SVS PB2-Plus Subwoofer

    dhsspeakerservice.com/
  • Schurkey
    Schurkey Posts: 2,104
    edited May 2014
    What kind of glue are you using, that you need that kind of pressure?
    White stuff in a non-labeled squeeze-bottle. Supposed to be "acrylic", looks like Elmers. Supplied with the surrounds.

    Not looking for extreme pressure, just something to keep it in place while the glue dries.
  • mhardy6647
    mhardy6647 Posts: 33,977
    edited May 2014
    FWIW (and not that anyone asked) but for years I've used Aileen's Tacky Glue for foam surrounds with excellent results. For gluing surrounds,one uses it like contact cement -- i.e., coat each surface separately, let dry then assemble. Using finger pressure will basically seat and seal the two together. I usually then set the speaker upside down on its paper gasket (if available) and let it all set up for a bit before reinstalling.


    14097232265_3240e2eff7_b.jpgDSC_9210 by mhardy6647, on Flickr
  • westmassguy
    westmassguy Posts: 6,850
    edited May 2014
    Aleen's Tacky Glue is the best for foam surrounds. The stuff they give you is usually crap. Flip the surround over, apply a bead to the lip that attaches to the cone, spread it evenly with a 1/4" wide artists brush, and set it aside. Apply another bead to the cone edge, spread it evenly with the brush. Let them sit for two or three minutes, then press them together. Make sure the inner lip is evenly attached all the way around the cone. Look at the back side of the cone, to make sure the surround is properly positioned, then let it dry for a few hours. Repeat the same procedure for the out edge. You can use a hair dryer, set on low, to speed up the process.
    You type faster than I do mhardy
    Home Theater/2 Channel:
    Front: SDA-2ATL forum.polkaudio.com/discussion/143984/my-2as-finally-finished-almost/p1
    Center: Custom Built forum.polkaudio.com/discussion/150760/my-center-channel-project/p1
    Surrounds & Rears: Custom Built forum.polkaudio.com/discussion/151647/my-surround-project/p1
    Sonicaps, Mills, RDO-194s-198s, Dynamat, Hurricane Nuts, Blackhole5
    Pioneer Elite VSX-72TXV, Carver PM-600, SVS PB2-Plus Subwoofer

    dhsspeakerservice.com/