Steel Driver And PR Rings For The Original SDA SRS
Options

DarqueKnight
Posts: 6,765
Introduction
The basic procedure for installing rand passive radiator retaining rings for the SDA SRS is the same as described in my ring installation thread for the SDA SRS 1.2TL (link). These rings are manufactured and sold by forum member TOOLFORLIFEFAN.
There are some installation differences with the SDA SRS that can add substantial time to the installation process. Whereas the SDA SRS 1.2TL ring installation procedure took 2.5 hours per speaker, the SDA SRS ring installation took 4.5 hours per speaker. In addition to the ring installation, I spent an additional 1.5 hours per speaker installing Dynamat Extreme sound installation to the driver and passive radiator baskets to eliminate ringing.

Figure 1. Dynamat Extreme installation. A little extra fun before the main event.
SDA SRS Ring Installation
The SDA SRS does not use detachable wiring harnesses like the SDA SRS 1.2TL. The SDA SRS crossover must be pulled out of the speaker and laid on something of suitable height to hold it while the driver and tweeter wires are (slowly and carefully) pulled out of the cabinet. These wires are soldered to the crossover circuit board. There are six wires terminated in female disconnects that are connected to the rear of the crossover circuit board. These wires connect to the binding posts and SDA cable jack.
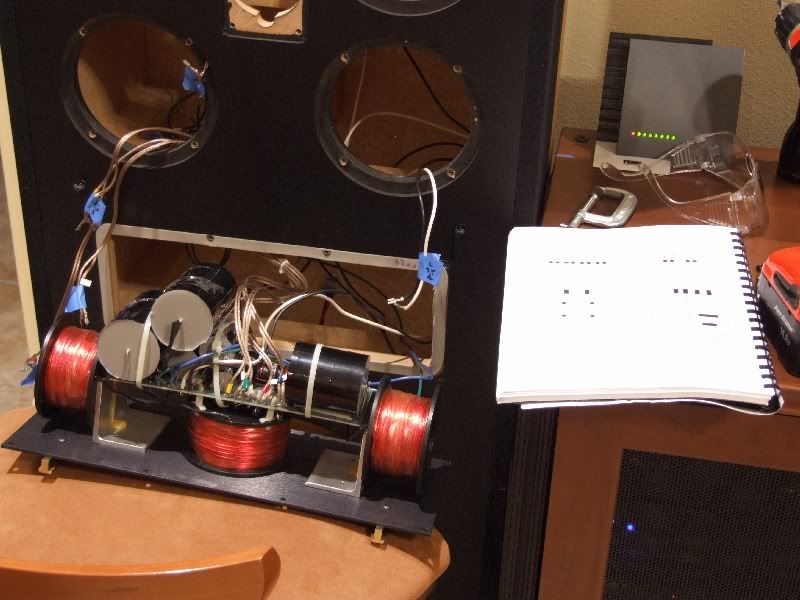
Figure 2. SDA SRS crossover assembly.
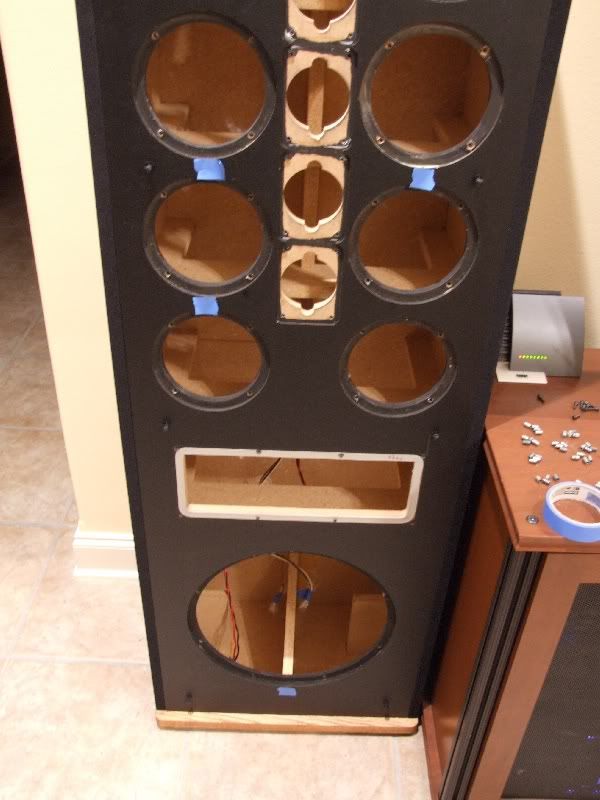
Figure 3. Left SRS empty cabinet. Note the extensive internal bracing.
During the SDA SRS 1.2TL ring installation, I found one of the two pieces of polyfill insulation had slipped down in each cabinet. There is little chance of that happening in the SRS cabinet. Rather that two long pieces of polyfill with no support under them, the SRS cabinet has eight blocks of polyfill that are contained within the bracing structure around each MW6503 driver.
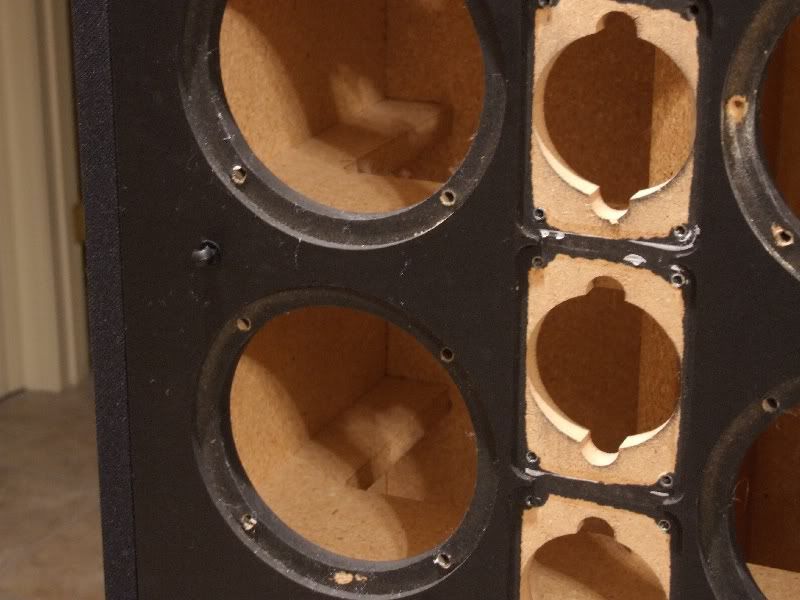
Figure 4. Closeup of the driver internal bracing structure.

Figure 5. Brace running to the lower front of the cabinet.
The brace running to the lower front of the cabinet just behind the passive radiator had to be adjusted to accommodate the passive radiator ring. I used a sharp chisel and a hammer to carefully remove enough MDF to clear the required space. On the inside of the cabinet, there was a painted on black ring that corresponded to the circular inset area for the passive radiator on the cabinet front. I used that painted ring as a guide for chiseling off the proper amount of MDF.
There was plenty of space above and below the lowermost stereo and dimensional driver. The six uppermost drivers had bracing just below their cabinet holes that interfered with the installation of the rings.
I removed a 1/4" wide (at widest point) by section of metal from the bottom of each ring for the six upper drivers. A Dremel with a cutoff wheel attachment was used to grind a slot halfway down into the metal. Pliers were used to break off the metal sections as shown in figure 6.
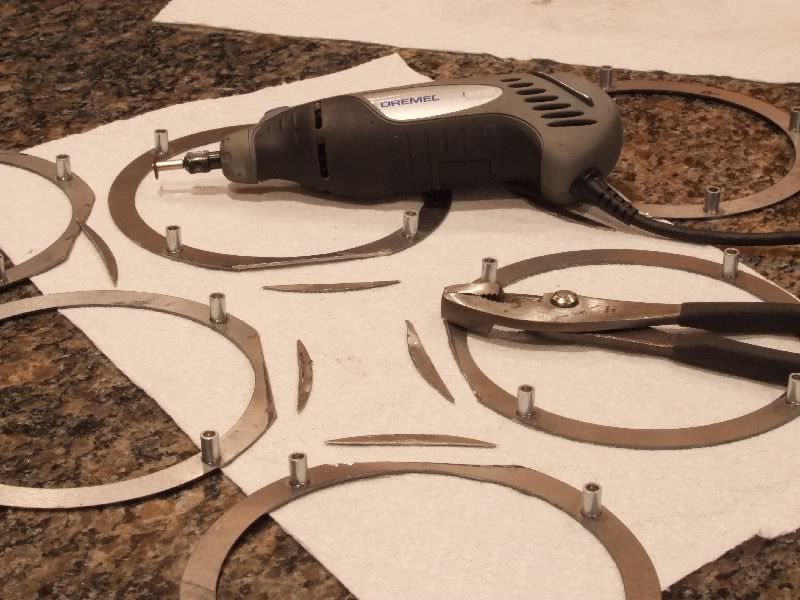
Figure 6. Six uppermost driver rings for right speaker with bottom sections cut off to clear bracing.
Listening Evaluations
The improvements in performance for music was the same as described in the SRS 1.2TL thread, therefore I won't restate them here. I will comment on the performance improvement in a multi-channel application since these SDA SRS's are used as the front speakers in my home theater system. I thought that the increased presence of the SRS's would require recalibration of the speaker levels of my home theater system. The opening battle scene from Star Wars III was used for evaluation. There was more detail and weight at the sides of the front stage, but it did not sound unbalanced from the dual center speakers. Measuring test tones with an analog sound level meter confirmed that the front speakers, as well as the other three channels and subwoofer, were still at the previously set levels. I was hesitant to undertake this mod for the SRS's because of the work that would be involved and because I was already satisfied with the sound I was getting from my home theater system. After I heard the improvement in clarity, presence and detail from my home theater front stage, the tedium involved in achieving it was quickly forgotten...because it was Such Good Sound.:)
Related Threads
Link: Steel Driver And PR Rings For The SDA SRS 1.2TL
Link: Improvements To The SDA SRS
Link: Improved SDA Interconnect Cables
Link: Mortite Speaker Seals For SDA's
The basic procedure for installing rand passive radiator retaining rings for the SDA SRS is the same as described in my ring installation thread for the SDA SRS 1.2TL (link). These rings are manufactured and sold by forum member TOOLFORLIFEFAN.
There are some installation differences with the SDA SRS that can add substantial time to the installation process. Whereas the SDA SRS 1.2TL ring installation procedure took 2.5 hours per speaker, the SDA SRS ring installation took 4.5 hours per speaker. In addition to the ring installation, I spent an additional 1.5 hours per speaker installing Dynamat Extreme sound installation to the driver and passive radiator baskets to eliminate ringing.
Figure 1. Dynamat Extreme installation. A little extra fun before the main event.
SDA SRS Ring Installation
The SDA SRS does not use detachable wiring harnesses like the SDA SRS 1.2TL. The SDA SRS crossover must be pulled out of the speaker and laid on something of suitable height to hold it while the driver and tweeter wires are (slowly and carefully) pulled out of the cabinet. These wires are soldered to the crossover circuit board. There are six wires terminated in female disconnects that are connected to the rear of the crossover circuit board. These wires connect to the binding posts and SDA cable jack.
Figure 2. SDA SRS crossover assembly.
Figure 3. Left SRS empty cabinet. Note the extensive internal bracing.
During the SDA SRS 1.2TL ring installation, I found one of the two pieces of polyfill insulation had slipped down in each cabinet. There is little chance of that happening in the SRS cabinet. Rather that two long pieces of polyfill with no support under them, the SRS cabinet has eight blocks of polyfill that are contained within the bracing structure around each MW6503 driver.
Figure 4. Closeup of the driver internal bracing structure.
Figure 5. Brace running to the lower front of the cabinet.
The brace running to the lower front of the cabinet just behind the passive radiator had to be adjusted to accommodate the passive radiator ring. I used a sharp chisel and a hammer to carefully remove enough MDF to clear the required space. On the inside of the cabinet, there was a painted on black ring that corresponded to the circular inset area for the passive radiator on the cabinet front. I used that painted ring as a guide for chiseling off the proper amount of MDF.
There was plenty of space above and below the lowermost stereo and dimensional driver. The six uppermost drivers had bracing just below their cabinet holes that interfered with the installation of the rings.
I removed a 1/4" wide (at widest point) by section of metal from the bottom of each ring for the six upper drivers. A Dremel with a cutoff wheel attachment was used to grind a slot halfway down into the metal. Pliers were used to break off the metal sections as shown in figure 6.
Figure 6. Six uppermost driver rings for right speaker with bottom sections cut off to clear bracing.
Listening Evaluations
The improvements in performance for music was the same as described in the SRS 1.2TL thread, therefore I won't restate them here. I will comment on the performance improvement in a multi-channel application since these SDA SRS's are used as the front speakers in my home theater system. I thought that the increased presence of the SRS's would require recalibration of the speaker levels of my home theater system. The opening battle scene from Star Wars III was used for evaluation. There was more detail and weight at the sides of the front stage, but it did not sound unbalanced from the dual center speakers. Measuring test tones with an analog sound level meter confirmed that the front speakers, as well as the other three channels and subwoofer, were still at the previously set levels. I was hesitant to undertake this mod for the SRS's because of the work that would be involved and because I was already satisfied with the sound I was getting from my home theater system. After I heard the improvement in clarity, presence and detail from my home theater front stage, the tedium involved in achieving it was quickly forgotten...because it was Such Good Sound.:)
Related Threads
Link: Steel Driver And PR Rings For The SDA SRS 1.2TL
Link: Improvements To The SDA SRS
Link: Improved SDA Interconnect Cables
Link: Mortite Speaker Seals For SDA's
Proud and loyal citizen of the Digital Domain and Solid State Country!
Post edited by DarqueKnight on
Comments
-
Aren't Dremel's the bomb!?!
 Political Correctness'.........defined
"A doctrine fostered by a delusional, illogical minority and rabidly promoted by an unscrupulous mainstream media, which holds forth the proposition that it is entirely possible to pick up a t-u-r-d by the clean end."
President of Club Polk -
Yeah, sure beats using a hacksaw to do it.;) Of course, I only had 10 driver rings instead of 16 driver rings to cut. Good info Raife.
Greg
Taken from a recent Audioholics reply regarding "Club Polk" and Polk speakers:
"I'm yet to hear a Polk speaker that merits more than a sentence and 60 seconds discussion."
My response is: If you need 60 seconds to respond in one sentence, you probably should't be evaluating Polk speakers.....
"Green leaves reveal the heart spoken Khatru"- Jon Anderson
"Have A Little Faith! And Everything You'll Face, Will Jump From Out Right On Into Place! Yeah! Take A Little Time! And Everything You'll Find, Will Move From Gloom Right On Into Shine!"- Arthur Lee -
-
Just received my rings from Larry today and have already installed them. BEAUTIFUL workmanship! Just outstanding. FWIW, I drilled out the holes using a 9/32" drill bit, same diameter as the anchors. However, I ended up doing a secondary drilling with a 19/64" drill bit to allow the rings to fit a bit easier. Even a little misalignment can make it difficult to insert the rings, but the secondary drilling did the trick! Looking forward to finishing the rebuild on my original set of SRS's!
-
Did you use the drill templates?