Pio SC-05 IEC Inlet Mod
Options

Hermitism
Posts: 4,344
I know most people here know how to install an IEC inlet. But I thought I'd create a thread specifically for people like me who have little to no experience with soldering, and haven't used a metal nibbler before. I recently installed an inlet in my Pioneer Elite SC-05 and I took step by step photos specifically for this thread. I'll also post links where you can pick out and order your inlet. If anyone asks questions regarding an inlet install in the future, this would be a good thread to send them to. If you don't have the balls to try it, you can live vicariously through me as you read the thread...don't hate me because I'm beautiful.

Post edited by Hermitism on
Comments
-
It's one thing to be replacing a faulty cord, but it's a little different when you plan an installing an inlet in a working unit. When you've got wire cutters in one hand, and a perfectly good cord that's attached to a perfectly good piece of equipment in the other hand, and you are about to cut the cord and turn your equipment into a non-working door stop, this is the exact moment when your brain starts sending you mixed signals, and your bunghole starts to pucker. ← longest sentence ever. But I cut the cord and went past the point of no return.
I started a thread a month ago asking question about doing this.
http://www.polkaudio.com/forums/showthread.php?161643-IEC-Inlet-Questions
If you go back a read it, you'll sense that amount of fear I had. I was a bit out of my comfort zone on this tweak. When I say a bit out of my comfort zone, I mean I would have gladly paid someone locally to do this for me. But after doing it, I wouldn't hesitate to do it again on something else. That's why I thought these pictures would help anyone thinking of doing this for the first time.
-
After removing the lid, I disconnected the cord from the internal board. Luckily this cord was removable, which made soldering easier.

-
I cut the cord, only allowing the exact length I needed, and removed the plastic sleeve. BTW, I think an AVR with a $1800 MSRP that has an 18 gauge cord is absurd. I have a VCR that has a thicker cord than this. It looks as if they planned on installing an inlet at the factory, because that area is pretty much the only free space inside the whole unit. But for what ever reason, they didn't.
I was originally going to use the existing hole and mount the inlet horizontally. I didn't for a few reasons. I would have had to expand the existing hole on the left side, taking out part of the serial numbers. Not a big deal, since it is no longer under warranty. But I didn't know if a service tech would give me crap if I ever had to take it in for repair. There is a slit cut into the back leading down to the hole for the cord. I wasn't sure if that slit would cause less stability in the sheet metal around the inlet. I didn't want any flex in the back of the unit due to the super stiff, thick cord that I'll be using. Another thing to keep in mind with such a stiff cord is how difficult it can be to bend and twist it. I plugged one end of the Pangea power cord into my power conditioner. I had to make a 90 degree turn then make a 180 turn behind my shelves, come back and make another 90 degree turn into the AVR. The end just happened to line up perfectly vertical. I thought installing the inlet vertically would create a cleaner look by not having to cut out the serial numbers. It would also avoid any problems with the slot that was cut into the metal leading down to the factory cord. Now if I would have installed the inlet vertically but turned 180 degrees, I would have had a big problem, because I don't think I could have twisted the cord a full 180 degrees. So always check first the orientation of your cord if you plan on using a stiff one before cutting a hole for the inlet. I said stiff one...uh huh huh huh.
-
Inlets...there are many to choose from. Some use set screws, some use soldered connections, some have built in fuses. They have different plating and different base metals. Good luck with that! I went with a standard Furutech gold plated inlet.
Gold Vs. Rhodium. Google it and sit back for the next six hours reading. You are going to have to make your own decision on this one. Rhodium is supposed to hold up to abuse better than gold, which makes it great for a socket, plug, or outlet that is going to get plugged into and unplugged a lot. An IEC inlet will more than likely see very little plugging and unplugging. Gold is the better conductor. You are going to see pros and cons for each. Here are a few example of what you are going to find:
"Rhodium is a good conductor of electricity but not as good as copper, gold or silver. It resists oxidation well. It is more durable then the above metals and gives a very smooth finish".
"Some may consider Rhodium an, "excellent" conductor of electricity, but to what are they comparing it? Silver's conductivity is 106, Gold's 65 and Platinum is 15 on the Electrical Conductivity chart (copper is considered the reference at 100). Rhodium (rated at 38) is better than platinum, but not as good as gold. It's attributes are durability and finish."
I decided to base my choice on sound. F1nut explained to me that "metals have different crystal structures, different densities, etc., which means they have different sound signatures." Rhodium supposedly has a neutral or bright sound, gold has a warm sound. I'm using Polk RTi speakers which are on the bright side. I've done a lot to warm them up through acoustic panels, Dynamat on the baskets, and inside the components, and changing speaker cables, which all resulted in a warmer sound. I wasn't sure if I'd even hear the difference, bit I didn't want to do anything to reintroduce a brighter sound.
Furutech makes many different inlets.
http://www.furutech.com/products/power-inlets-receptacles/iec-inlets/
You can't order from their website, placing an order may be done by phone, fax, email, or snail mail. F1nut praised their online customer service.
If you want to order online, Club Polk's helipilotdoug carries Furutech products.
http://www.douglasconnection.com/Furutech-Products_c22.htm
I also want to mention that headrott highly recommended the Oyaide "Inlet R" IEC found at the bottom of this link:
http://www.vhaudio.com/connectors-ac.html
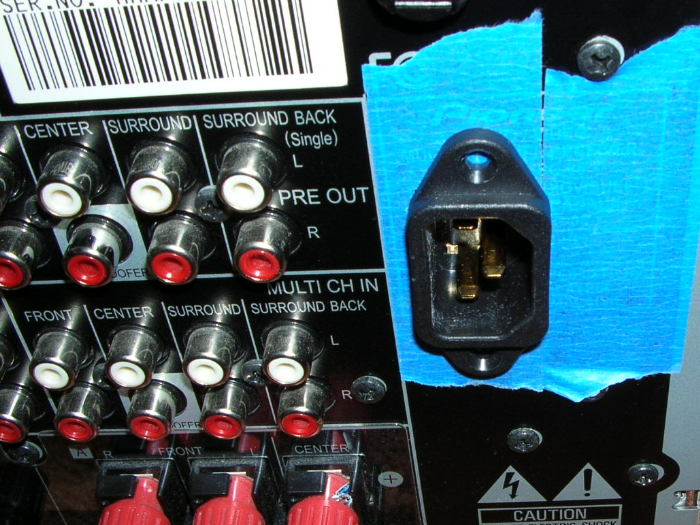
I placed painter's tape on the section I was going to install the inlet. There is no easy way to trace the shape of the inlet because of the tabs sticking out and the fact that it's not a perfect rectangle. It was easier to measure with a ruler and create a template using a piece of cardboard.
-
That way I could keep trimming until the inlet fit into the hole in the cardboard.

-
-
Then took the inlet to the hardware store. I have to thank nbrowser and F1nut for letting me know you are supposed to use machine screws, not sheet metal screws. Bought screws, washers, lock washers, and nuts. The inlet holes on mine are meant to be used with countersunk head screws.
Drilled a hole inside the outline to insert the nibbler. When drilling, be mindful of what is behind the sheet metal. When that bit pokes through, the drill can easily push that bit far past the hole. So don't end up puncturing something inside. I also pushed a small cloth down inside the open space of the AVR to try and catch any shavings. You are going to need a tool called a metal nibbler. Also referred to as a nibbling tool. They can be bought new on eBay/Amazon for about $15 shipped for the least expensive ones. They sell used on eBay for <$12. Some people inherit tools from family members and have no idea what they are and decide to sell them, so they may list them by the info written or engraved on the tool. The only info on mine is "Adel Tool Co." So if you are looking for a good deal, don't only search for the words "nibbler" and "nibbling", but search for "Adel Tool Co." under "Tools". Someone looking specifically for a "nibbler" will never find it listed as such. There are a few different manufacturers you can search for, just Google it. I bought mine for $1.04 + $4.72 shipping and it cuts through sheet metal like it was butter.
-
I never thought it would be that easy. You insert the square cutting bit through the hole you drilled and there is a little groove the sheet metal fits into and then you just squeeze and it cuts off a small notch. Cutting straight lines are a breeze. Just line up the left side of the tool with the line and just follow the line, taking out one small notch at a time. Cutting up to a line is a little more tricky because it's difficult to see where the blade is going to hit. What is even more difficult is if you have to take less than a full notch, you have to insert the sheet metal into the groove and then back it out slightly...and take an educated guess. Since my cord is so stiff and heavy, I wanted the inlet to fit as tightly as possible, so I took my time. It was a perfect fit. I had to slide 1/4 of an inch at a time and it slowly fit into the hole. Fully inserted into the hole, it fit so tight you couldn't even get it to wiggle slightly.
-
Once in place I marked the screw hole and then removed the inlet. Drilling into the aluminum was easy. I was worried about bit slippage (pulling the trigger and having the drill bit slide) But the tape kept it in place long enough to create a small divit for the bit to rest in. I drilled a pilot hole first using a smaller bit, then drilled through using the proper size. You want to use a variable speed drill so you can start off slowly.
Time to solder. For most people, if they have any experience soldering, it's probably soldering water pipes. This is completely different. You don't have to apply flux to the solder joint beforehand. The solder I used has activated rosin core flux. And you're going to be using a solder iron, not a torch. Doug and headrott both recommended using Cardas Quad Eutectic Solder, it's easy to use. I ordered my inlet from Doug. I had sent him a cable to modify, which I had already paid for and he was going to be shipping it back to me in a flat rate box, so he included the inlet so I wouldn't have to pay another shipping charge. He also supplied me with a sample of Cardas Quad Eutectic Solder. Enough to install two dozen inlets, as well as some heat shrink tubing, both free of charge. You know, we (professional IEC inlet installers) look out for one another. Doug and headrott, both gave me instruction on how to create a proper solder joint. You don't want to just melt the solder with the iron. The wire and the part you are soldering must be hot enough to melt the solder, so you have a good connection. It's best to tin the wire and connector first. Melt a little on the iron, then touch that to the connection. This helps transfer heat to what you are soldering. Once the wire and the connector are hot enough, the solder will melt into them. It doesn't take much. Doug suggested you plug an IEC end of a power cord into the connector to keep the heat from melting the housing where the pins go through. Oh, he also said to make sure the other end of the cable is not plugged into the wall!! :cheesygrin: If you are going to use heat shrink tubing, don't forget to slide it back onto the wire before making the connection. Don't keep it too close to the solder joint because the heat from the solder iron can start to shrink the tubing.
That solder is some strong stuff. Once I put some on the stripped part of the wires before soldering the joint, it became hard as a rock. I placed the wire through the hole on the inlet tab and used two needle nose pliers to put a curve into the wire so it would contact both sides of the inlet to create more surface contact. So I had a solder joint on both side of the inlet. I yanked and tugged and pulled...that joint is never coming loose. Then slid the heat shrink tubing over the joint and heated it carefully with a lighter for just a second at a time. The ground was not used for my application.
-
Then slid the sleeve that was originally on the end, back onto the wire. Inserted the wire through the hole and pushed the inlet into place. Started to install the screws and immediately realized I had an issue. There was no way I was going to be able to put washers and a nut onto that bottom screw. My fingers weren't long enough. The inlet was blocking that bottom screw. A negative result, due to the vertical alignment. Back to the hardware store I went and got a two inch long screw for the bottom. That way, the screw stuck out further than the inlet. It still wasn't easy. I had to tape the washer to the tip of a screw driver to get it onto the bottom screw. Then the lock washer and finally the nut. I had to spin the screw while trying to align the nut and got it to start threading. I could barely get the tip of my middle finger to touch the nut and was able to tighten it down. Success.

-
Plugged the connection back in (inside the unit), replaced the top, and started hooking things back up.

-
The power cable aligned perfectly with the new inlet.

-
I now have the confidence to do this again. In fact, writing the narration for this thread was more difficult than the project itself. I've already decided what my next project is going to be. I'm going to install an IEC inlet in my mustache and beard trimmer to use with another Pangea PC. I'm going to have the best looking ten day long beard in town. Watch out ladies. High-five!

-
You're killing me Hermitism. I'm really wanting to do this, but the part about cutting the cord on a perfectly good unit really has me scared. Just don't know if I trust myself.Things work out best for those who make the best of the way things work out.-John Wooden
-
It's funny as when I owned the SC-07, I planned on doing this very upgrade but I was going to place the outlet in the factory location with some modifications.Dan
My personal quest is to save to world of bad audio, one thread at a time. -
You're killing me Hermitism. I'm really wanting to do this, but the part about cutting the cord on a perfectly good unit really has me scared. Just don't know if I trust myself.
Oh you're definitely going to tighten up a few notches when you make that cut! Just do what I did and take a big shot of Pepto-Bismol.
Results: Keep in mind, I'm using an AVR and not separates and that I'm already using a power conditioner. I was skeptical about this project. I figured if I'm already using a power conditioner, how much will a power cord help? I should point out that I'm not one of these people that can apply one square inch of Dynamat to a component and then list off five things that improved from one small piece of deadener. My ears just aren't capable. Call it lack of experience or just ears that aren't as sensitive as some. I'll say this...I hear a difference. It not drastic. I already had what I considered a low noise floor from better cables, acoustic treatments, a better PC on my source, and a power conditioner. It might be more quiet now, I can't say for sure. When I upgraded the cable on my blu-ray player, I noticed a difference, but I didn't have a power conditioner yet. But where I do hear a difference from this project is in the bass. I wouldn't say it's a warmer sound. I wouldn't say I have increased bass. What I would say is the bass sounds more solid. Tighter bass maybe??? Is that the same thing? So now you guys get to explain to me how a power cord could affect that. If it was due to metals having different sound signatures, then wouldn't that change the tone of the music, but not make the bass sound more solid? -
Oh, I left a part out. How to make the connections. What wire goes to what inlet tab. If memory serves, the left prong of a plug which is the wider prong is the neutral and the right smaller prong is the hot. Don't hold me to that, but it doesn't matter the way I did it. I had a black and a white wire to work with inside the AVR. The white went to the left wider prong, black to smaller one on the original cord.
I then used a cheap Radio Shack small battery tester that I had. I plugged the inlet into the Pangea cable and created a circuit using a 9 volt battery and the tester, connecting the positive lead of the tester to the positive battery connection. Touched the negative battery connection to the left wider prong of the cord. Then took the negative lead of the tester and checked which inlet tab created a 9 volt circuit. Then connected it the same way as the original cord. -
Congrats on a successful operation.
Maybe I missed it, but did you plug the original hole? If not, there are plastic hole plugs available. I think Parts Express sells them.Political Correctness'.........defined
"A doctrine fostered by a delusional, illogical minority and rabidly promoted by an unscrupulous mainstream media, which holds forth the proposition that it is entirely possible to pick up a t-u-r-d by the clean end."
President of Club Polk -
Really looking forward to this mod on the beard trimmer, I love threads like this and enjoyed the read.
-
Congrats on a successful operation.
Maybe I missed it, but did you plug the original hole? If not, there are plastic hole plugs available. I think Parts Express sells them.
Thanks, and thanks for the help.
Yes, I used the original plug that held the original cable. I just cut the cable on both sides of the plug. No one will ever see it. I created a monster. Good job Hermit, looks awesome. I need to go to town on my Marantz and do the same.
You know, if you do that, I've got a stock power cable from a SC-05 I can sell you. The SC models are highly praised in this forum. Just ask anyone. So the original cable must be a real prize. -
-
polkfarmboy wrote: »Really looking forward to this mod on the beard trimmer, I love threads like this and enjoyed the read.
I may do it to my manscaper first. -
Herm, You need to get a grip!Home Theater
Onkyo PR-SC5508 Sharp LC-70LE847U
Emotiva XPA-5 Emotiva XPA-2 Emotiva UPA-2
Front RTi-A9 Wide RTi-A7 Center CSi-A6 Surround FXi-A6 Rear RTi-A3 Sub 2x PSW505
Sony BDP-S790 Dishnetwork Hopper/Joey Logitech Harmony One Apple TV
Two Channel
Oppo 105D BAT VK-500 w/BatPack SDA SRS 2.3 Dreadnought Squeezebox Touch Apple TV -
Yes, I used the original plug that held the original cable. I just cut the cable on both sides of the plug. No one will ever see it.
Ugh! I'd send you one for free, but the only size I have right now is for a 3/8" hole.Political Correctness'.........defined
"A doctrine fostered by a delusional, illogical minority and rabidly promoted by an unscrupulous mainstream media, which holds forth the proposition that it is entirely possible to pick up a t-u-r-d by the clean end."
President of Club Polk -
Nice job Hermitism! Looks great! Now go trim your beard!!


Taken from a recent Audioholics reply regarding "Club Polk" and Polk speakers:
"I'm yet to hear a Polk speaker that merits more than a sentence and 60 seconds discussion."
My response is: If you need 60 seconds to respond in one sentence, you probably should't be evaluating Polk speakers.....
"Green leaves reveal the heart spoken Khatru"- Jon Anderson
"Have A Little Faith! And Everything You'll Face, Will Jump From Out Right On Into Place! Yeah! Take A Little Time! And Everything You'll Find, Will Move From Gloom Right On Into Shine!"- Arthur Lee -
Thanks everyone for the help.Ugh! I'd send you one for free, but the only size I have right now is for a 3/8" hole.
With all honesty, it doesn't bother me. Thanks for the offer though. I sense that you're not feeling the love for my plug job. It'll never be seen, and it is a reminder of how small that cord used to be. Sort of like keeping a picture of your ugliest girlfriend in a desk drawer. No matter how bad things get with your current girlfriend, you can always pull out that picture and say, "At least see doesn't look like that!"
I should have asked the guy I bought that Pangea cable from how long it was used. Did he hook it up, not hear a difference and resell it, or did he use it for a couple year and decide to upgrade? I'm happy with the results, for what everything cost. If I had bought that same cable at the MSRP, The results wouldn't change, but I think I'd be less pleased. I like big results, little money. I don't know what else I can do. I had two things I wanted to upgrade. I did one, and upgraded my center channel. The second, is upgrading to a sub that gets lower. That will be awhile and it will be a local CL item, probably.
Me sleep now. -
Sort of like keeping a picture of your ugliest girlfriend in a desk drawer. No matter how bad things get with your current girlfriend, you can always pull out that picture and say, "At least see doesn't look like that!"
I've never dated an ugly woman, a few **** tho.Political Correctness'.........defined
"A doctrine fostered by a delusional, illogical minority and rabidly promoted by an unscrupulous mainstream media, which holds forth the proposition that it is entirely possible to pick up a t-u-r-d by the clean end."
President of Club Polk -
For other readers, notice in the very first photo, a square in a square symbol right next to the 120V 60Hz 330W label? That means the unit was designed to the Class II Appliance Safety Code. With Class II Appliance Safety Code units, the Safety Ground/Protective Earth wire IS NOT connected to the chassis.
-
I've been waiting all day to be able to listen more to this thing. Any amount of "street cred" I've earned here will probably be lost at the mention of the word "MP3". My library struck a deal with a site called Freegal, and you are allowed to download a certain number of MP3's per week for free. I like it because I'm sick and tired of going out and buying a new CD only to find one good song on it. So I download what I'm interested in and if I find a good album, THEN I'll go purchase the CD. A twenty second sample at Amazon isn't always enough to judge a song. I just plugged in my thumb drive into my AVR and now I'm really hearing a difference. The bass is still what is the most noticeable, but now I am hearing a lower noise floor. It just makes everything sound more detailed. I wasn't really noticing a difference in the noise floor when playing CD's, they already sounded good. So would that be the internal DAC that is showing an improvement? Or some other part? And does the mean that my power conditioner wasn't cleaning everything out of the line? Or can you pick up noise in the short distance between the conditioner and the component?
-
Gotta love the library for investigating new music. Next time you're there, check out a fistful of CDs. Ask to speak to the librarian in charge of purchasing music to give him/her a few tips as to what bands/types of music their patrons (you!) are interested in.
Nice thread, by the way.Jay
SDA 2BTL * McCormack DNA 0.5 amp * Oppo BDP-93 * Modded Adcom GDA-600 DAC * Rythmik F8 (x2)
Micro Seiki DQ-50 * Mitsubishi LT-30 * Hagerman Cornet 2 Phono
Preamp rotation: Krell KSL (SCompRacer recapped) * Manley Shrimp * PS Audio 5.0