Curly Maple End Caps and Side Strips For The SDA SRS
Options

DarqueKnight
Posts: 6,765
The drab, common looking oak end caps and side strips of my SDA SRS's were replaced with curly (tiger) maple end caps and side strips. Total cost was $334 inclusive of shipping and mounting hardware.
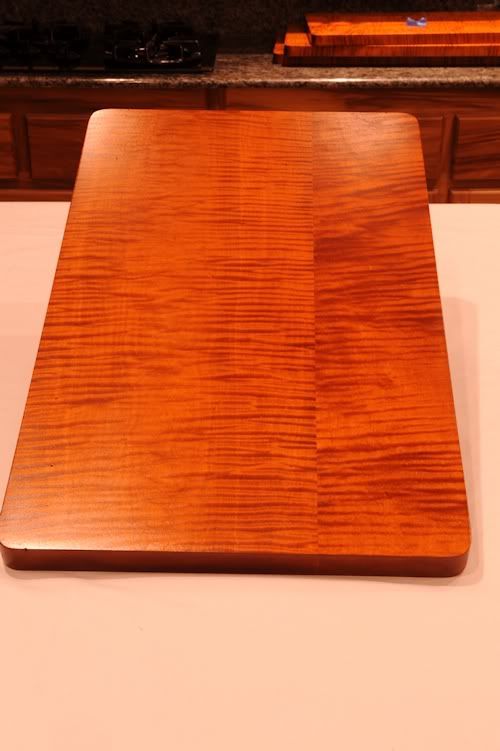
Figure 1. Curly maple end caps awaiting installation.
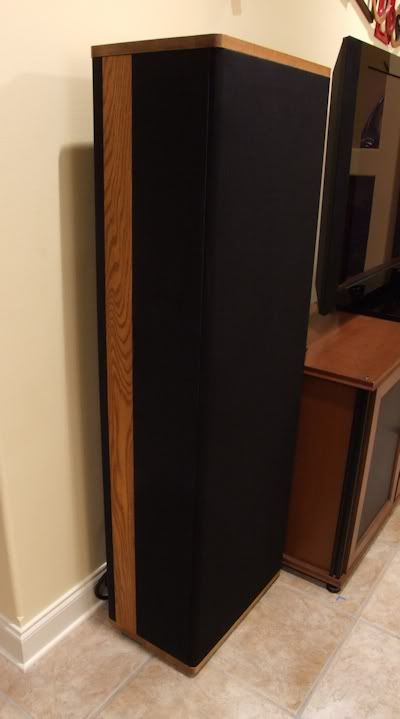
Figure 2. I have never been a fan of any type of oak finish.
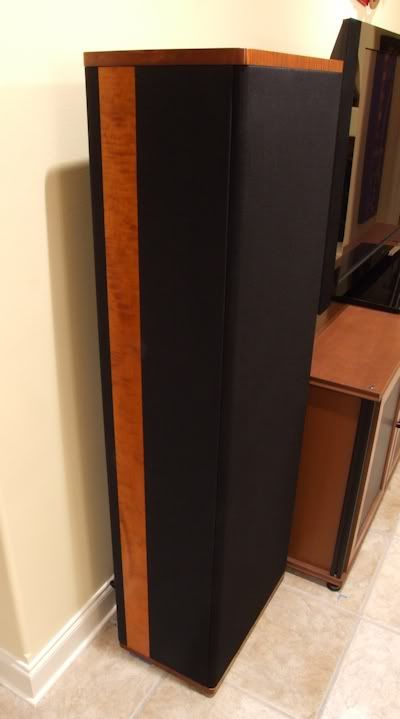
Figure 3. Exotic curly maple is a more appropriate finish for a vintage flagship loudspeaker.
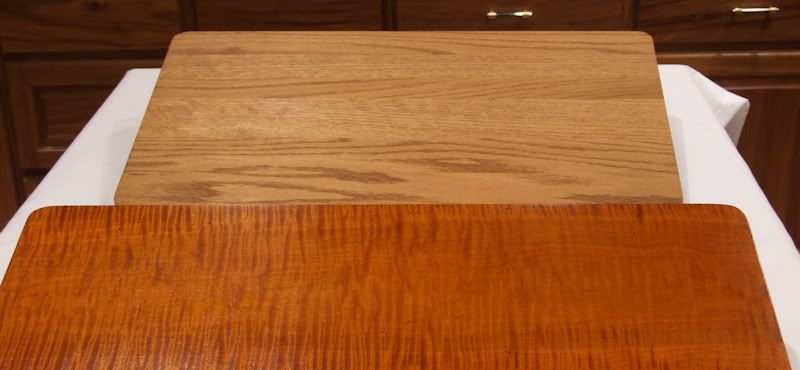
Figure 4. Curly maple cap and the oak cap it replaced.
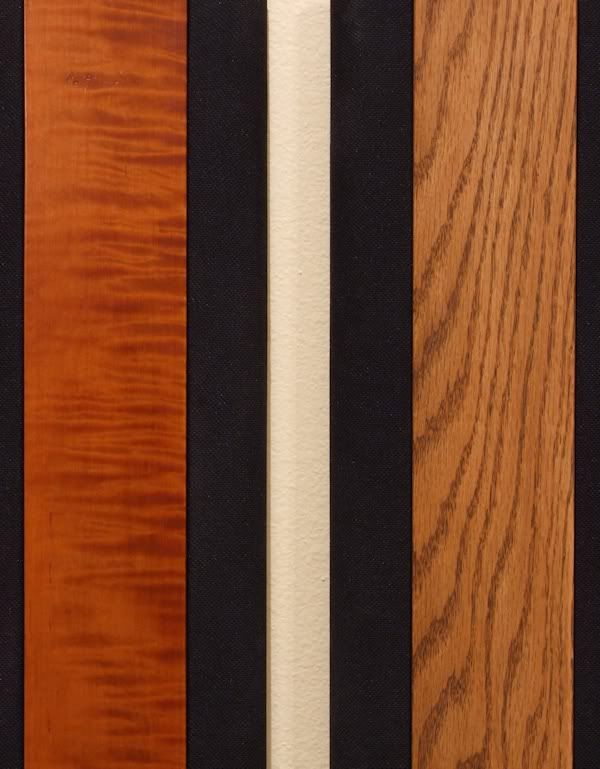
Figure 5. Curly maple and original oak side strip.
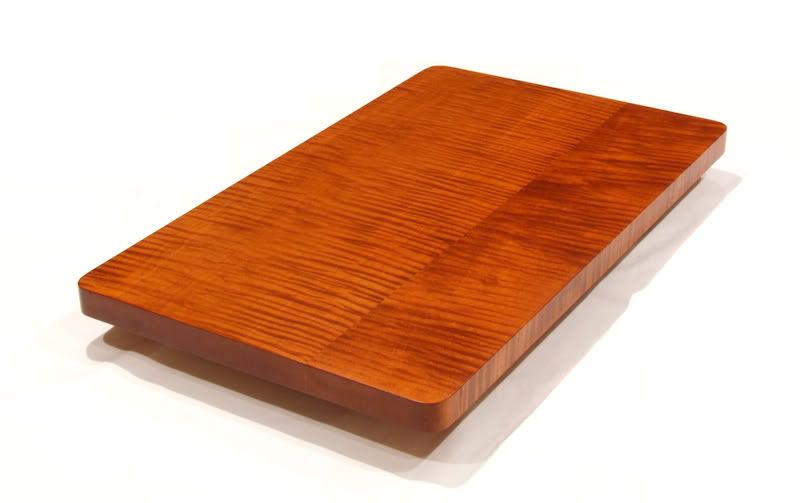
Figure 6. The exotic tiger strip figuring of the curly maple end caps is a much better compliment to the other
wood finishes in my home.
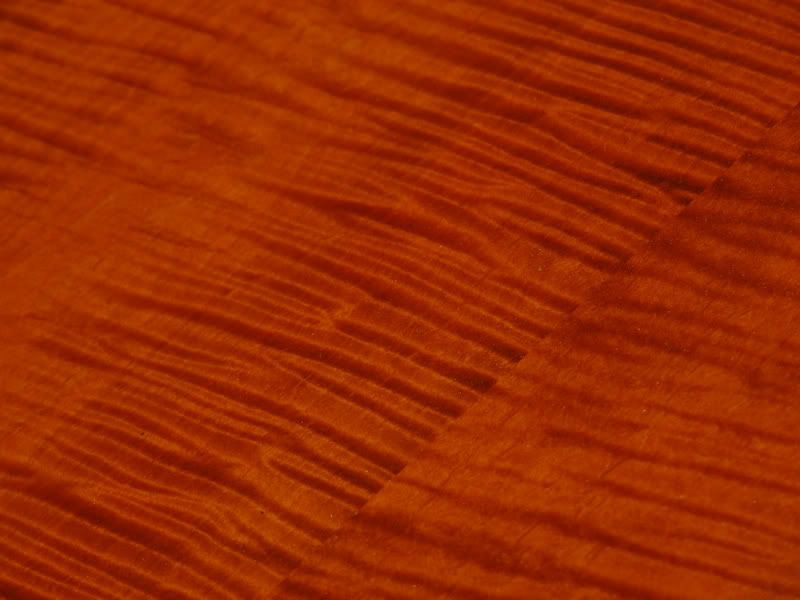
Figure 7. Even in this low resolution picture, the iridescent, three-dimensional appearance of the curly
figuring is easily seen.
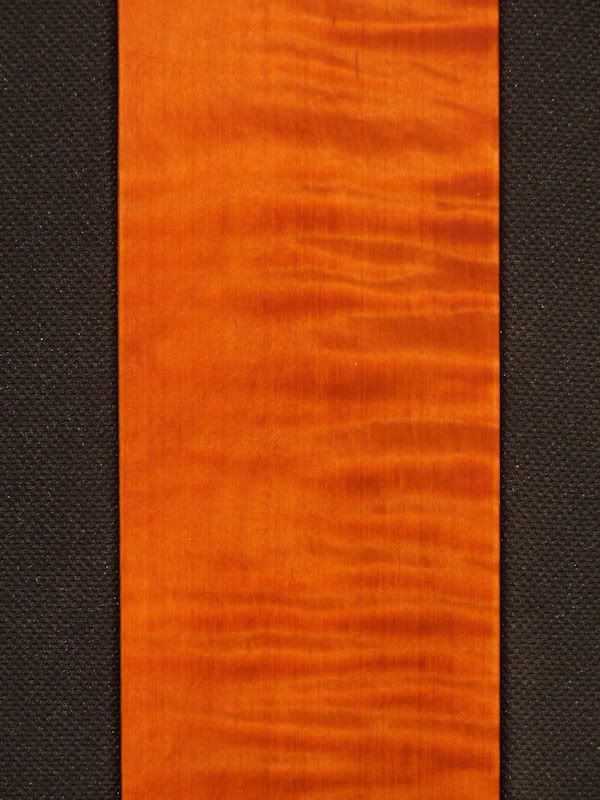
Figure 8. Closeup of side strip figuring.
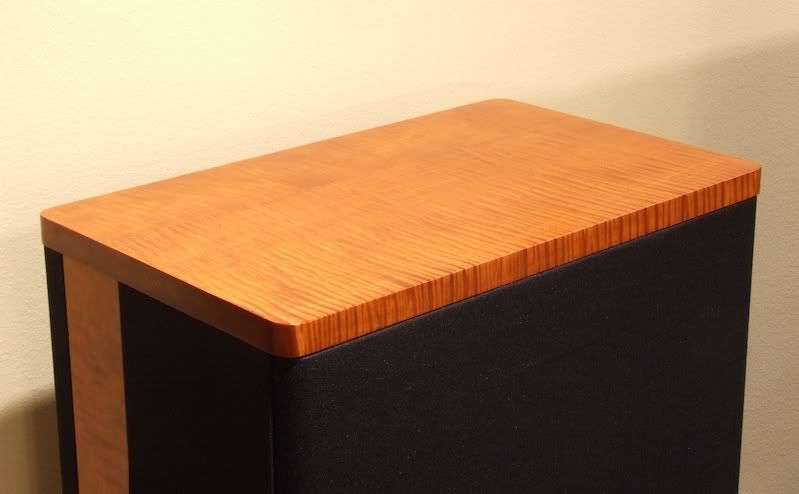
Figure 9. Front/top/side view after installation.
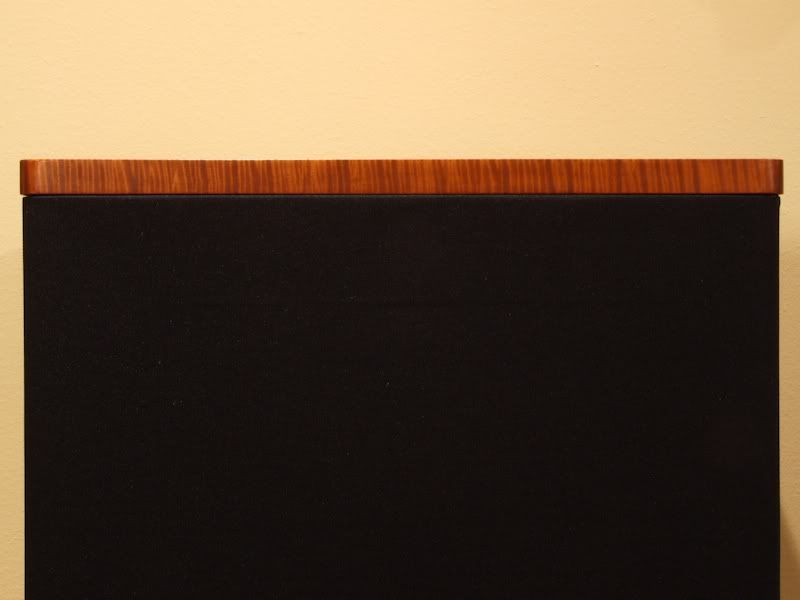
Figure 10. "Tiger" striping along front edge.
Installation Notes
The mounting hardware from the original caps was reused. The following tools and additional hardware were used:
1. 1/4 inch drill bit for hanger bolt holes.
2. 3/8 inch drill bit for insert nuts for slider feet.
3. 9/64 inch hex bit for driver screws.
4. 6mm hex bit for insert nuts.
5. Ratchet wrench and 9/16 inch socket for hex nuts used for hanger bolt installation.
6. Ruler graded in 16th's of an inch.
7. T-square for making straight lines hole-to-hole and from cap edge to hole.
8. Regular hammer with claw-end for pulling side strip finishing nails.
9. #2 Phillips screwdriver for side strip wood screws.
10. 11 #8 5/8 inch flat head Phillips wood screws.
11. 10 extra 5/16 inch inside diameter (9/16 inch outside diameter) hex nuts for hanger bolts (cost: $0.50).
12. Electric drill.
13. Blue tape to mark the stopping depth on the drill bits.
14. Flat blade screwdriver or similar tool for prying off side panels.
As an aid to reinstalling the hangar bolts, two of the extra 9/16 inch hex nuts were screwed in place to provide the ratchet socket something to grab. In one case, I overtightened the hangar bolt and the bottom hex nut seized the bolt. It had to be cut off with a Dremel cutting wheel. An alternate, but tedious, method of reinstalling the hangar bolts is to grab the unthreaded center portion of the bolt with a pair of pliers and turn, turn, turn. I marked the penetration depth on each hangar bolt with a Sharpie prior to removal.
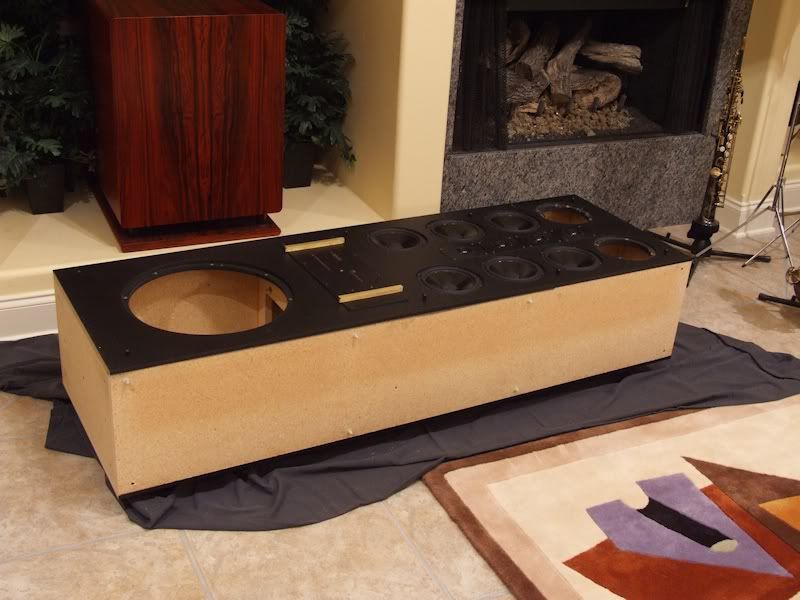
Figure 11. Naked SDA SRS...lying down. Each end is resting on books to prevent bending the protruding
binding posts.
The trelocks (plastic fasteners) of the SDA SRS's side panels gripped much tighter than those of my SDS SRS 1.2TL's. They didn't easily pop off with the insertion of a flat blade screwdriver between the panel and cabinet. They had to be pried off, while taking care not to mar the cabinet edges.
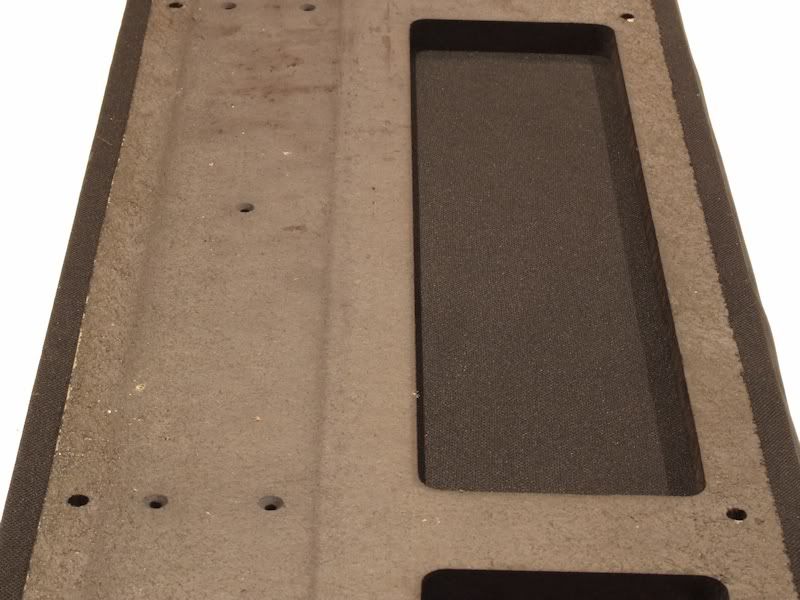
Figure 12. There are eleven pre-drilled countersunk holes behind the side panel oak strips.
The solid oak side strips were held in place with twelve 5/8" long finishing nails. In addition to this, the left speaker's side strips were also glued down. The right speaker's side strips were nailed down with no glue. The left strip was removed with some difficulty because of the glue. The right strip was easily pried off with a small flat blade screwdriver. The nails were easily removed with the claw end of a hammer.
I used 5/8 inch #8 flat head Phillips wood screws in the existing countersunk holes to secure the maple strips to the side panels.
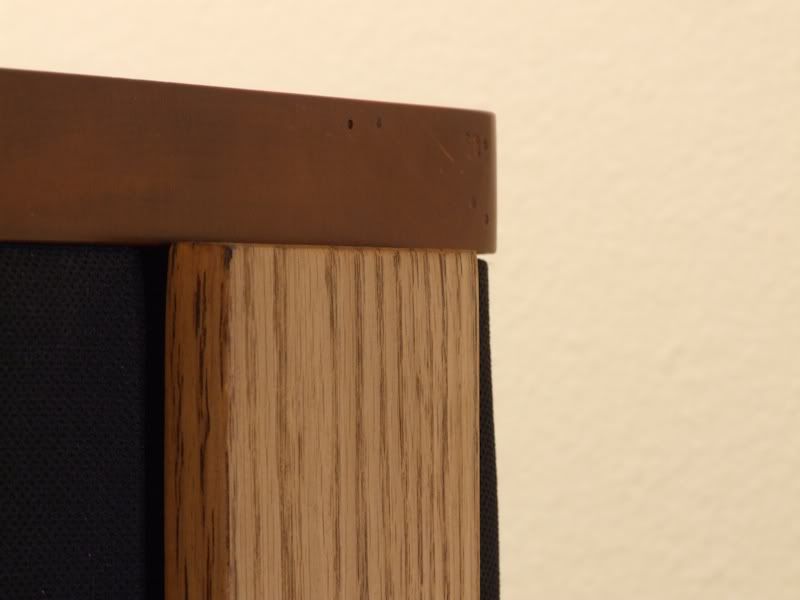
Figure 13. I found out the original side strips were too long...or the cabinet was too short.
The top caps are made from laminated solid oak boards. Now I know why the top caps cracked along one of the lamination seams. When I reinstalled the side panels of the left speaker, the top cap would not sit flush. The new maple side strip was extending slightly above the top of the cabinet. I measured the maple strips and they were exactly the same length as the original oak strips: 61-1/2 inches. However, the side panels and cabinet sides were 61-7/16 inches long, which meant the original oak strips and the new maple strips were 1/16th inch too long...or more correctly, the cabinets were 1/16th inch too short. The stress caused by the caps being bolted down in the front and rear over the protruding side strips caused them to crack along one of the lamination seams.
Trimming off 1/16th inch was a quick and easy fix, but I wonder if Polk ever caught the SRS cabinet height error. Cracked top and bottom SRS end caps have been reported with some regularity with the SDA SRS. The specified height of the SDA SRS, SDA SRS 1.2 and SDA SRS 1.2TL is 63-1/2 inches. Subtracting 1 inch for each of the end caps leaves a cabinet height of 61-1/2 inches. The cabinets and side strips of my SDA SRS 1.2TL's are 61-1/2 inches long.
Future Work
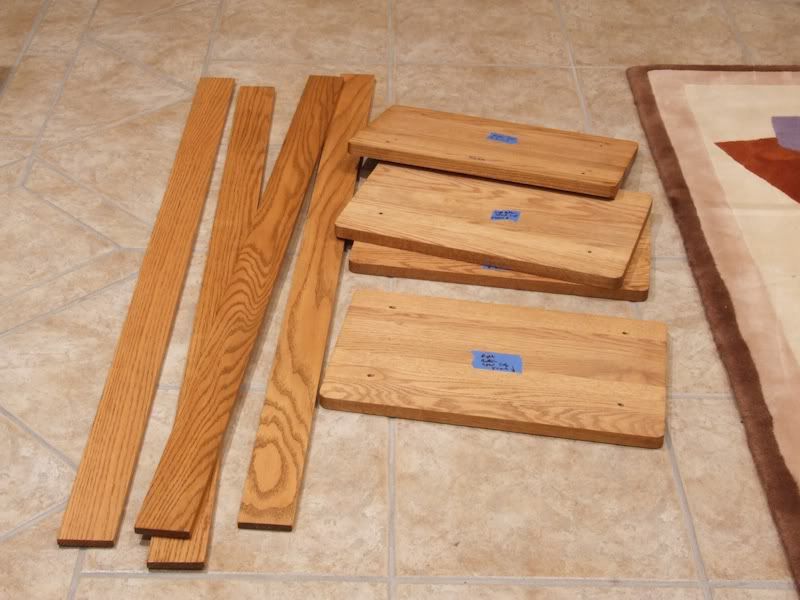
Figure 14. Original SRS oak trim ready for new service as fireplace fuel.
I was leaning toward having the wood trim of my SDA SRS 1.2TL's covered in gloss black, but after seeing how these pieces turned out, I am considering another type of figured wood for that project.
Acknowledgement
Thanks to Jeff (musky1963) for making these pieces.
Figure 1. Curly maple end caps awaiting installation.
Figure 2. I have never been a fan of any type of oak finish.
Figure 3. Exotic curly maple is a more appropriate finish for a vintage flagship loudspeaker.
Figure 4. Curly maple cap and the oak cap it replaced.
Figure 5. Curly maple and original oak side strip.
Figure 6. The exotic tiger strip figuring of the curly maple end caps is a much better compliment to the other
wood finishes in my home.
Figure 7. Even in this low resolution picture, the iridescent, three-dimensional appearance of the curly
figuring is easily seen.
Figure 8. Closeup of side strip figuring.
Figure 9. Front/top/side view after installation.
Figure 10. "Tiger" striping along front edge.
Installation Notes
The mounting hardware from the original caps was reused. The following tools and additional hardware were used:
1. 1/4 inch drill bit for hanger bolt holes.
2. 3/8 inch drill bit for insert nuts for slider feet.
3. 9/64 inch hex bit for driver screws.
4. 6mm hex bit for insert nuts.
5. Ratchet wrench and 9/16 inch socket for hex nuts used for hanger bolt installation.
6. Ruler graded in 16th's of an inch.
7. T-square for making straight lines hole-to-hole and from cap edge to hole.
8. Regular hammer with claw-end for pulling side strip finishing nails.
9. #2 Phillips screwdriver for side strip wood screws.
10. 11 #8 5/8 inch flat head Phillips wood screws.
11. 10 extra 5/16 inch inside diameter (9/16 inch outside diameter) hex nuts for hanger bolts (cost: $0.50).
12. Electric drill.
13. Blue tape to mark the stopping depth on the drill bits.
14. Flat blade screwdriver or similar tool for prying off side panels.
As an aid to reinstalling the hangar bolts, two of the extra 9/16 inch hex nuts were screwed in place to provide the ratchet socket something to grab. In one case, I overtightened the hangar bolt and the bottom hex nut seized the bolt. It had to be cut off with a Dremel cutting wheel. An alternate, but tedious, method of reinstalling the hangar bolts is to grab the unthreaded center portion of the bolt with a pair of pliers and turn, turn, turn. I marked the penetration depth on each hangar bolt with a Sharpie prior to removal.
Figure 11. Naked SDA SRS...lying down. Each end is resting on books to prevent bending the protruding
binding posts.
The trelocks (plastic fasteners) of the SDA SRS's side panels gripped much tighter than those of my SDS SRS 1.2TL's. They didn't easily pop off with the insertion of a flat blade screwdriver between the panel and cabinet. They had to be pried off, while taking care not to mar the cabinet edges.
Figure 12. There are eleven pre-drilled countersunk holes behind the side panel oak strips.
The solid oak side strips were held in place with twelve 5/8" long finishing nails. In addition to this, the left speaker's side strips were also glued down. The right speaker's side strips were nailed down with no glue. The left strip was removed with some difficulty because of the glue. The right strip was easily pried off with a small flat blade screwdriver. The nails were easily removed with the claw end of a hammer.
I used 5/8 inch #8 flat head Phillips wood screws in the existing countersunk holes to secure the maple strips to the side panels.
Figure 13. I found out the original side strips were too long...or the cabinet was too short.
The top caps are made from laminated solid oak boards. Now I know why the top caps cracked along one of the lamination seams. When I reinstalled the side panels of the left speaker, the top cap would not sit flush. The new maple side strip was extending slightly above the top of the cabinet. I measured the maple strips and they were exactly the same length as the original oak strips: 61-1/2 inches. However, the side panels and cabinet sides were 61-7/16 inches long, which meant the original oak strips and the new maple strips were 1/16th inch too long...or more correctly, the cabinets were 1/16th inch too short. The stress caused by the caps being bolted down in the front and rear over the protruding side strips caused them to crack along one of the lamination seams.
Trimming off 1/16th inch was a quick and easy fix, but I wonder if Polk ever caught the SRS cabinet height error. Cracked top and bottom SRS end caps have been reported with some regularity with the SDA SRS. The specified height of the SDA SRS, SDA SRS 1.2 and SDA SRS 1.2TL is 63-1/2 inches. Subtracting 1 inch for each of the end caps leaves a cabinet height of 61-1/2 inches. The cabinets and side strips of my SDA SRS 1.2TL's are 61-1/2 inches long.
Future Work
Figure 14. Original SRS oak trim ready for new service as fireplace fuel.
I was leaning toward having the wood trim of my SDA SRS 1.2TL's covered in gloss black, but after seeing how these pieces turned out, I am considering another type of figured wood for that project.
Acknowledgement
Thanks to Jeff (musky1963) for making these pieces.
Proud and loyal citizen of the Digital Domain and Solid State Country!
Post edited by DarqueKnight on
Comments
-
Very nice. Adds a lot of class to a classic.Monitor 60 SeriesII
Pioneer VSX-821
DSW PRO 550wi
Squeezebox Touch -
Wow. Those are beautiful.2 ChannelTurntable - VPI Classic 2/Ortofon 2M BlueAmplification - Rogue Audio Cronus Magnum II, Parks Audio Budgie PhonoSpeakers - GoldenEar Triton 17.2 Home TheaterDenon AVR-X3300W; Rotel RMB-1066; Klipsch RP-280F's, Klipsch RP-450C, Polk FXi3's, Polk RC60i; Dual SVS PB 2000's; BenQ HT2050; Elite Screens 120"Man CaveTurntable - Pro-Ject 2.9 Wood/Grado GoldAmplification - Dared SL2000a, McCormack DNA 0.5 DeluxeCD: Cambridge AudioSpeakers - Wharfedale Linton 85th Anniversary; LSiM 703; SDA 2A
-
Outstanding Professor!Review Site_ (((AudioPursuit)))
Founder/Publisher Affordable$$Audio 2006-13.
Former Staff Member TONEAudio
2 Ch. System
Amplifiers: Parasound Halo P6 pre, Vista Audio i34, Peachtree amp500, Adcom GFP-565 GFA-535ii, 545ii, 555ii
Digital: SimAudio HAD230 DAC, iMac 20in/Amarra,
Speakers: Paradigm Performa F75, Magnepan .7, Totem Model 1's, ACI Emerald XL, Celestion Si Stands. Totem Dreamcatcher sub
Analog: Technics SL-J2 w/Pickering 3000D, SimAudio LP5.3 phono pre
Cable/Wires: Cardas, AudioArt, Shunyata Venom 3 -
More pics please."He who fights with monsters should look to it that he himself does not become a monster. And when you gaze long into an abyss the abyss also gazes into you." Friedrich Nietzsche
-
For as much effort as you've put into the sonic performance of your monoliths, it's nice to see them dressed up so nicely. Just beautiful.Jay
SDA 2BTL * McCormack DNA 0.5 amp * Oppo BDP-93 * Modded Adcom GDA-600 DAC * Rythmik F8 (x2)
Micro Seiki DQ-50 * Mitsubishi LT-30 * Hagerman Cornet 2 Phono
Preamp rotation: Krell KSL (SCompRacer recapped) * Manley Shrimp * PS Audio 5.0 -
They turned out beautifully.
Really adds the little extra touch of class to otherwise fantastic speakers. -
Your 1.2TL's look very nice Ray. I used the tedious plier turning method on the hangar bolts.

Greg
Taken from a recent Audioholics reply regarding "Club Polk" and Polk speakers:
"I'm yet to hear a Polk speaker that merits more than a sentence and 60 seconds discussion."
My response is: If you need 60 seconds to respond in one sentence, you probably should't be evaluating Polk speakers.....
"Green leaves reveal the heart spoken Khatru"- Jon Anderson
"Have A Little Faith! And Everything You'll Face, Will Jump From Out Right On Into Place! Yeah! Take A Little Time! And Everything You'll Find, Will Move From Gloom Right On Into Shine!"- Arthur Lee -
Those are gorgeous. More pics x2.
Jeff does some stunning wood work. I have a soft spot for wood work as I used to do a lot when I was younger. -
Wow!
VERY nice work indeed!Onkyo TX-SR804 receiver
Parasound 5250
LSI 15's
LSI C
LSI FX's
PSW1000 Sub
OPPO 93
Sony CDP-C315 CD
Monster AC line cond
Audioquest, Blue Jeans & Monster wires/connects
40" Sony Bravia XBR6 -
WOW Very nice job especially for someone who's always saying "when I am more dedicated to audio than I am now".
I just had a crazy thought, If you took the old end caps and glued and screwed the tops to the bottoms with some spikes they would make perfect stands for my 1C studios:idea:. I still need to get my 1C's up a couple inch's and spike them but I really don't want to be drilling holes in the 1C cabs for spikes.“The two most important days in your life are the day you are born and the day you find out why.” ~ Mark Twain -
Pretty wood. I know some custom gun makers that would be bummed to know that primo piece of Maple got sliced for speakers.
-
Your 1.2TL's look very nice Ray.
These are the SRS's in my home theater system. The 1.2TL's in my two channel system are still clad in the obnoxious oak.WOW Very nice job especially for someone who's always saying "when I am more dedicated to audio than I am now".
It scares me to think what my life might be like once I decide to get serious about this hobby.I just had a crazy thought, If you took the old end caps and glued and screwed the tops to the bottoms with some spikes they would make perfect stands for my 1C studios:idea:. I still need to get my 1C's up a couple inch's and spike them but I really don't want to be drilling holes in the 1C cabs for spikes.
When I took the group picture of the original oak pieces (fig. 14 in post #1), I was looking forward to setting them on fire and watching them burn for all the aesthetic torment I've endured over the years. However, I think I can get some use out of them. I have not decide whether I want my 1.2TL's to be trimmed in mysterious gloss piano black, ferocious Ferrari red, or exotic figured wood. The SRS end caps and side strips are the same size as the 1.2TL caps and strips. So....I could have one set of oak covered in gloss black, the other oak set covered in gloss red and have a third set made in figured wood.More pics please.More pics x2.
OK, here you go:
Figure 15. Left angle shot of SDA SRS's in home theater system.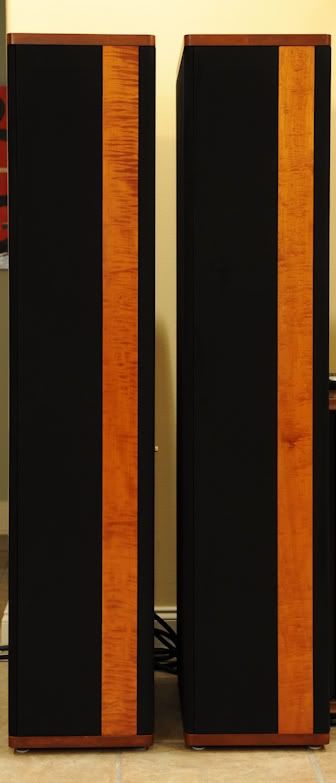
Figure 16. SRS right sides.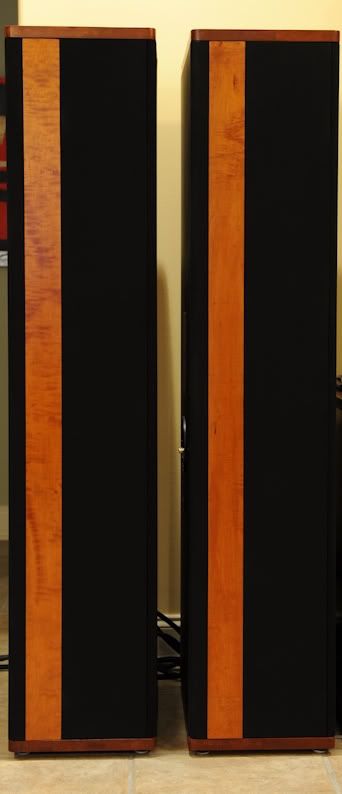
Figure 17. SRS left sides.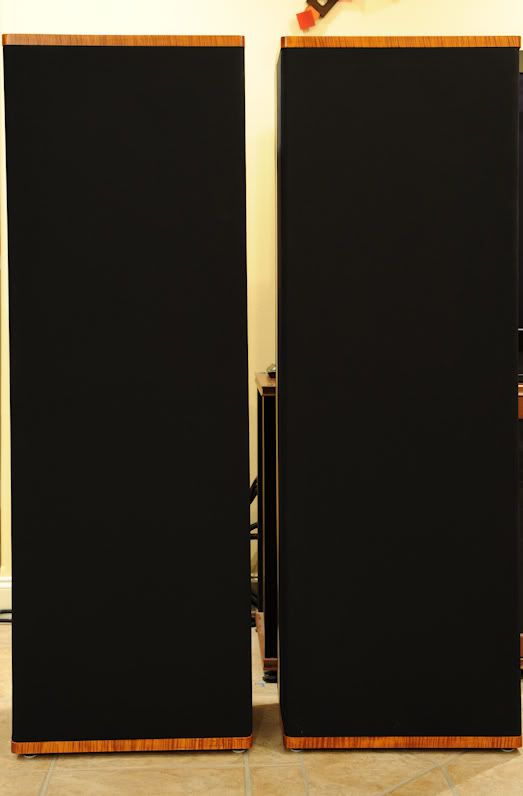
Figure 18. SRS Front sides.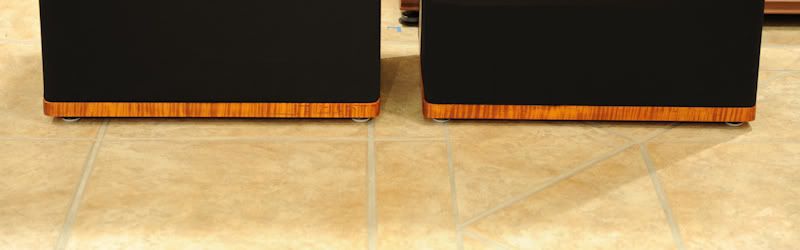
Figure 19. SRS bottom end cap front sides closeup.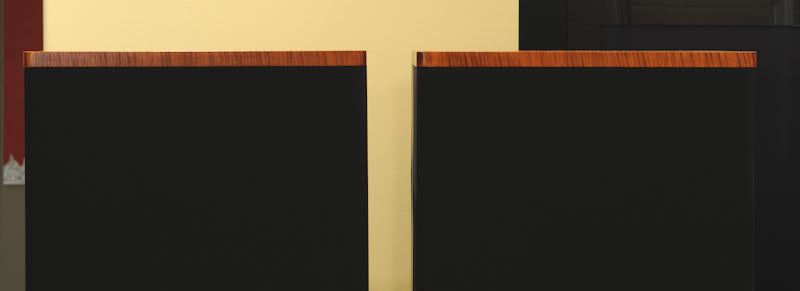
Figure 20. SRS top end cap front sides closeup.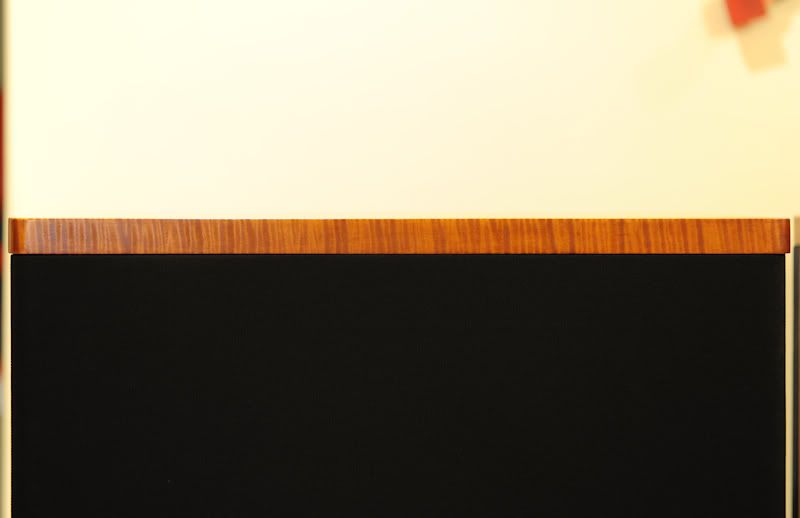
Figure 21. SRS left top end cap front side closeup.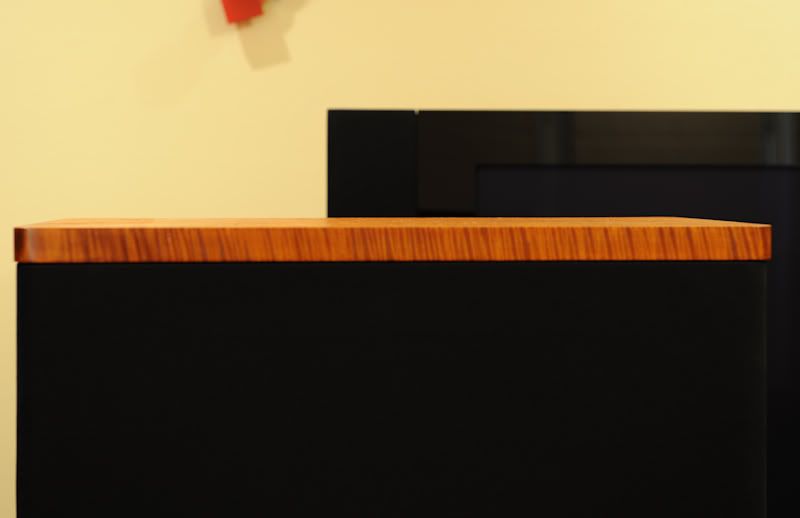
Figure 22. SRS right top end cap front side closeup.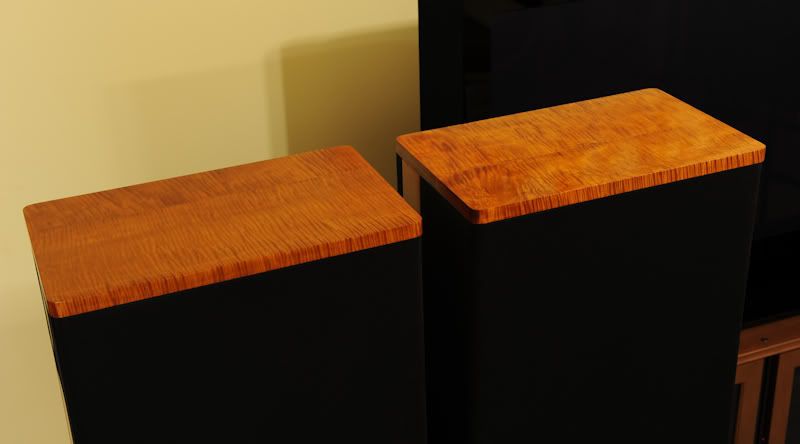
Figure 23. View of both top caps from above.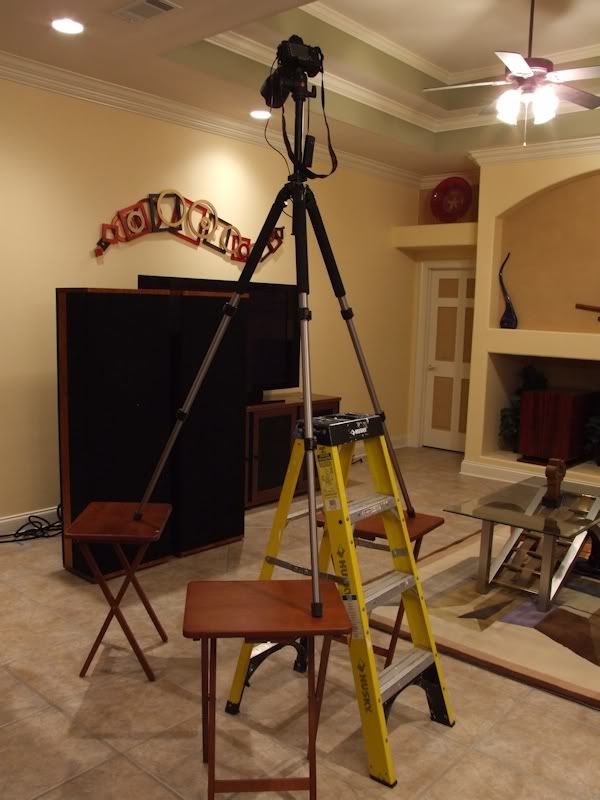
Figure 24. The things I go through just to get a shot.
In the future, when I'm more dedicated to audio than I am now, I'm going to get a pair of real, big deal high end speakers already clad in an exotic finish. For the money you've spent modifying all your SDA's, you could have already had a pair of real, big deal high end speakers. Proud and loyal citizen of the Digital Domain and Solid State Country!
 -
Very nice Ray!"He who fights with monsters should look to it that he himself does not become a monster. And when you gaze long into an abyss the abyss also gazes into you." Friedrich Nietzsche
-
Excellent, I have always thought Oak looks like something you should use to make packing crates with.Radio Station W7ITC
-
Ray, What is the thickness of the side trim pieces?2-channel Yaqin B2-T Pre, Emotiva XPA-2 Gen 2, Marantz SA8005, Pro-Ject RPM-10 Turntable, Denon DP-59L Pro-Ject Phono Box DS3B, Polk Audio Legend L800's, AudioQuest Cable throughout.
-
One-half inch.Proud and loyal citizen of the Digital Domain and Solid State Country!