Steel Retaining Rings For SDA Drivers And Passive Radiators
Options

DarqueKnight
Posts: 6,765
Introduction
This article discusses the procedure used to install stainless steel driver and passive radiator retaining rings on my SDA SRS 1.2TL speakers and the initial listening evaluations after installation.
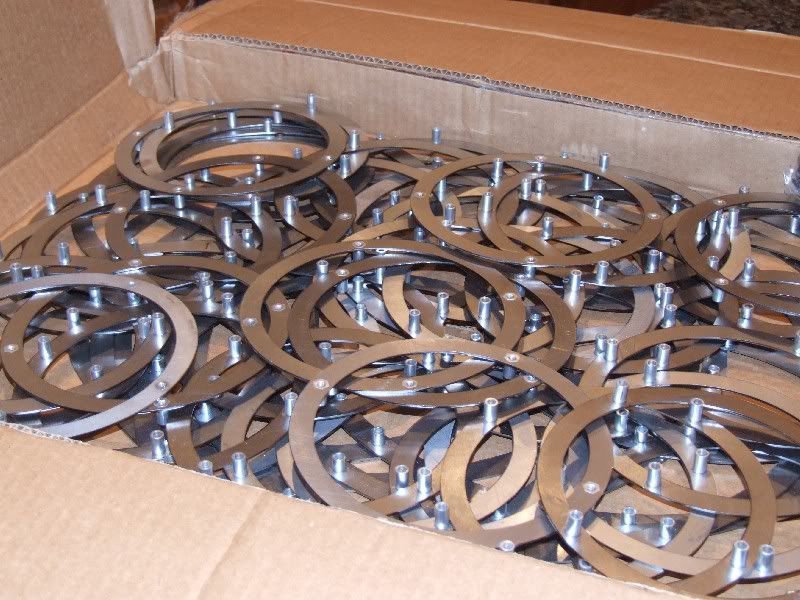
Figure 1. A package from the ringmaster: driver and passive radiator retaining rings for five sets of SDA's.

Figure 2. Real, big-deal, steel rings and drilling templates...laser cut to exact specifications. I feel sorry for SDA owners who are not Club
Polk members. Such Good Perks.
Tools
1. 9/64" hex bit for the stock and new 8-32 socket head cap screws used on the 6-1/2" drivers and crossover plate.
2. 5/32" hex bit for the stock retaining nuts for the socket head cap screws.
3. 3/32" hex bit for the new buttonhead hex socket screws used on the passive radiators.
4. #1 Phillips screwdriver for the stock passive radiator wood screws.
5. Four 2" C-clamps. Two were used to hold the drilling template for the drivers and four were used to hold the drilling template for the passive radiators.
6. Flashlight for inspecting cabinet interior prior to and after vacuuming and for peering into drilled holes in cases of slight misalignment.
7. Cordless drill with a leveling indicator light to help maintain a straight, level cut.
8. Cordless power screwdriver.
9. Manual socket screwdriver.
10. 9/32" drill bit. This size drill bit is the same size as the diameter of the retaining ring screw posts. This means that I had to use the drill bit to route out the holes a little after drilling. If I had used a larger drill bit, I would incurred the risk of damaging the template holes.
11. Tyson DC-14 animal vacuum cleaner with circular brush attachment.
12. Staple gun for securing polyfill damping material to cabinet side.
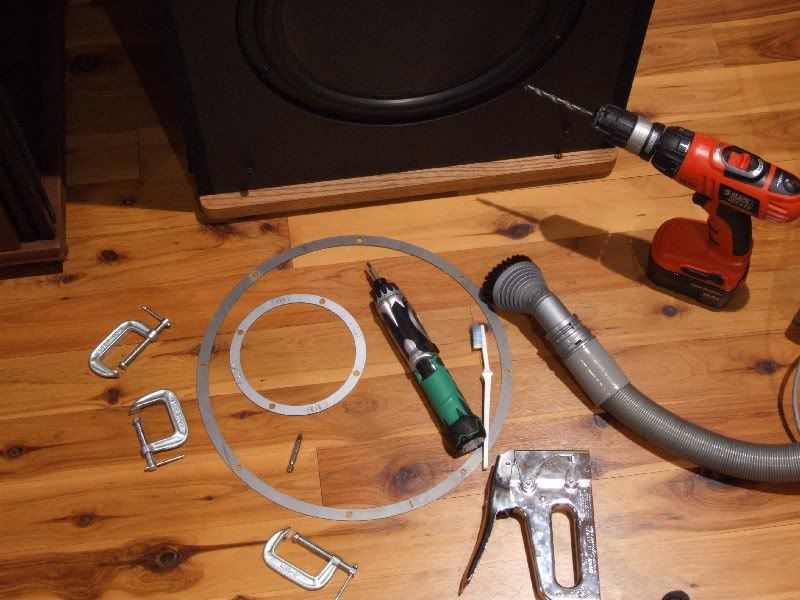
Figure 3. All set to go in one more time.
Installation Procedure
The right speaker was done first and then compared to the left. Each speaker took 2-1/2 hours to complete. It was well worth the time, effort and cost.
I did not use hot glue to further secure the rings to the inside of the cabinet. The rings fit snug and I did not think glue was necessary. Plus, if I ever needed to remove the rings, glue would have made removal difficult.
1. Speaker cables were disconnected. Turning off the amplifier works just as well.
2. Drivers, passive radiator, crossover plate/circuit board, internal wiring, polyfill batting was removed. The binding post wiring was covered in plastic wrap and the end of the binding post wiring harness connector was covered with tape.
3A. I started drilling at the bottom of the cabinet and worked my way up. That way, I did not have a big pile of sawdust accumulating below me as I worked my way down. I could have put something in place to catch the sawdust, but it was much easier to just vacuum the cabinet after the drilling was done.
3B. The passive radiator template was aligned so that the existing screw holes were in the center of each template holes and secured with four 2" C-clamps. It just so happened that the passive radiator screw holes on both speakers perfectly lined up in the centers of the template holes. This was not usually the case with the driver screw holes in both speakers.
3C. The wood (MDF) is relatively soft, therefore a lot of drilling speed and pressure was not required. You want to maintain a slow, steady, straight and level cut through the wood so that the holes will be true with the retaining ring posts. The leveling indicator light on the drill was a big help in keeping my cuts straight.
3D. After the holes were drilled, they were slightly enlarged by passing the drill bit over the inside only one time.
3E. The holes and area around the holes were brushed and vacuumed.
4A. The passive radiator retaining ring has two opposing slots cut out in order to make bending for insertion easier. The ring was easily bent back into flat shape once it was inside the cabinet.
4B. The passive radiator ring posts were a snug fit, but were perfectly aligned with the cabinet holes and easily popped into place.
5A. Next I moved up to the lower driver holes. The 6-1/2" driver template was carefully aligned with the existing four holes, secured with two C-clamps, then holes drilled with the same slow, steady procedure stated in step 3C.
5B. The template was removed and the holes were slightly enlarged by passing the drill bit over the inside only one time. Driver rings were inserted through the crossover plate opening.
In only a few cases did the existing holes perfectly align in the center of the template holes. Usually, three ring posts would be perfectly aligned with three holes. I used a flashlight to peer into the misaligned hole to see where I needed to make a cutting adjustment. The adjustment was always minor, after which the ring could be pressed into place. In a few cases, the center of the existing holes matched perfectly with the template and no adjustment was necessary after the initial hole enlargement.
5C. After each driver's holes were drilled and enlarged, the holes and area around the holes were brushed and vacuumed.
6. After all rings were installed, the cabinet interior and exterior was vacuumed three times with the circular brush attachment.
7. The column of polyfill batting behind the right speaker's stereo drivers had slid down six inches. The column of polyfill batting behind the left speaker's dimensional drivers had slid down six inches. The other two polyfill columns were still in place after 20 years. During reassembly, all polyfill columns were secured to their adjoining speaker side with one 3/8" staple.
8A. The right speaker was reassembled a listening evaluation was done. After the listening evaluation, the left speaker's rings were eagerly installed.:)
8B. The socket head cap screws (SHCS) can be used to secure the passive radiator. However, the head diameter of the buttonhead hex screw (BHS) is almost the same as the head diameter of the stock Phillips wood screw. The SCHS head diameter is approximately 75% of the diameter of the stock Phillips screw. I used the BHS's to secure the passive radiators to their rings.
8C. WARNING: Since you will be securing the driver and passive radiator baskets to metal, and you are now relieved of the concern for stripping out the wood threads, you must be mindful that you must still use care when tightening the screws...especially if you are using Mortite driver seals. Remember that the driver and passive radiator baskets are made of relatively soft metal. Over tightening could cause the metal screw heads to punch through the basket rim holes. I tightened just past the point where the turning resistance significantly increased.
I used a power screwdriver to remove all screws but only used it to reinstall strews halfway down. The rest of the way was hand tightened with a regular socket screwdriver. I hand tightened a couple of turns per screw in a sequential, diagonally-opposing pattern to minimize stress on the basket rim and to assure a level seating on the cabinet face.
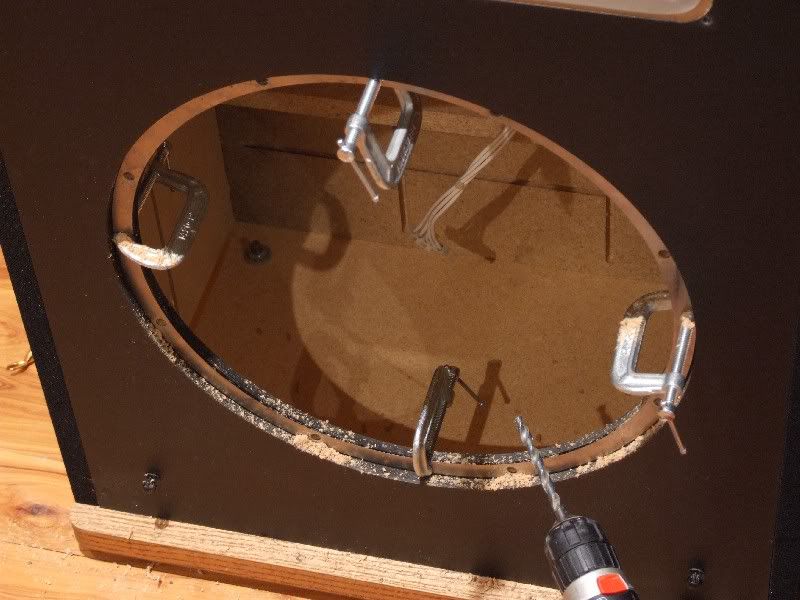
Figure 4. Such good drilling. I wish I could say the same of British Petroleum.
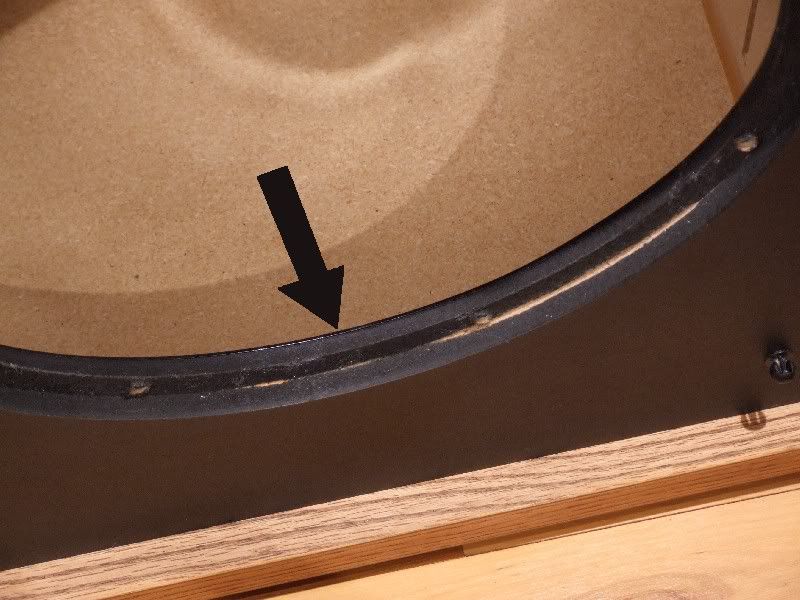
Figure 5. The gleaming ridge behind the passive radiator opening is the newly installed retaining ring. How many of you have toothpicks
stuffed in your passive radiator screw holes due to stripped threads in the wood?
This article discusses the procedure used to install stainless steel driver and passive radiator retaining rings on my SDA SRS 1.2TL speakers and the initial listening evaluations after installation.
Figure 1. A package from the ringmaster: driver and passive radiator retaining rings for five sets of SDA's.
Figure 2. Real, big-deal, steel rings and drilling templates...laser cut to exact specifications. I feel sorry for SDA owners who are not Club
Polk members. Such Good Perks.
Tools
1. 9/64" hex bit for the stock and new 8-32 socket head cap screws used on the 6-1/2" drivers and crossover plate.
2. 5/32" hex bit for the stock retaining nuts for the socket head cap screws.
3. 3/32" hex bit for the new buttonhead hex socket screws used on the passive radiators.
4. #1 Phillips screwdriver for the stock passive radiator wood screws.
5. Four 2" C-clamps. Two were used to hold the drilling template for the drivers and four were used to hold the drilling template for the passive radiators.
6. Flashlight for inspecting cabinet interior prior to and after vacuuming and for peering into drilled holes in cases of slight misalignment.
7. Cordless drill with a leveling indicator light to help maintain a straight, level cut.
8. Cordless power screwdriver.
9. Manual socket screwdriver.
10. 9/32" drill bit. This size drill bit is the same size as the diameter of the retaining ring screw posts. This means that I had to use the drill bit to route out the holes a little after drilling. If I had used a larger drill bit, I would incurred the risk of damaging the template holes.
11. Tyson DC-14 animal vacuum cleaner with circular brush attachment.
12. Staple gun for securing polyfill damping material to cabinet side.
Figure 3. All set to go in one more time.
Installation Procedure
The right speaker was done first and then compared to the left. Each speaker took 2-1/2 hours to complete. It was well worth the time, effort and cost.
I did not use hot glue to further secure the rings to the inside of the cabinet. The rings fit snug and I did not think glue was necessary. Plus, if I ever needed to remove the rings, glue would have made removal difficult.
1. Speaker cables were disconnected. Turning off the amplifier works just as well.
2. Drivers, passive radiator, crossover plate/circuit board, internal wiring, polyfill batting was removed. The binding post wiring was covered in plastic wrap and the end of the binding post wiring harness connector was covered with tape.
3A. I started drilling at the bottom of the cabinet and worked my way up. That way, I did not have a big pile of sawdust accumulating below me as I worked my way down. I could have put something in place to catch the sawdust, but it was much easier to just vacuum the cabinet after the drilling was done.
3B. The passive radiator template was aligned so that the existing screw holes were in the center of each template holes and secured with four 2" C-clamps. It just so happened that the passive radiator screw holes on both speakers perfectly lined up in the centers of the template holes. This was not usually the case with the driver screw holes in both speakers.
3C. The wood (MDF) is relatively soft, therefore a lot of drilling speed and pressure was not required. You want to maintain a slow, steady, straight and level cut through the wood so that the holes will be true with the retaining ring posts. The leveling indicator light on the drill was a big help in keeping my cuts straight.
3D. After the holes were drilled, they were slightly enlarged by passing the drill bit over the inside only one time.
3E. The holes and area around the holes were brushed and vacuumed.
4A. The passive radiator retaining ring has two opposing slots cut out in order to make bending for insertion easier. The ring was easily bent back into flat shape once it was inside the cabinet.
4B. The passive radiator ring posts were a snug fit, but were perfectly aligned with the cabinet holes and easily popped into place.
5A. Next I moved up to the lower driver holes. The 6-1/2" driver template was carefully aligned with the existing four holes, secured with two C-clamps, then holes drilled with the same slow, steady procedure stated in step 3C.
5B. The template was removed and the holes were slightly enlarged by passing the drill bit over the inside only one time. Driver rings were inserted through the crossover plate opening.
In only a few cases did the existing holes perfectly align in the center of the template holes. Usually, three ring posts would be perfectly aligned with three holes. I used a flashlight to peer into the misaligned hole to see where I needed to make a cutting adjustment. The adjustment was always minor, after which the ring could be pressed into place. In a few cases, the center of the existing holes matched perfectly with the template and no adjustment was necessary after the initial hole enlargement.
5C. After each driver's holes were drilled and enlarged, the holes and area around the holes were brushed and vacuumed.
6. After all rings were installed, the cabinet interior and exterior was vacuumed three times with the circular brush attachment.
7. The column of polyfill batting behind the right speaker's stereo drivers had slid down six inches. The column of polyfill batting behind the left speaker's dimensional drivers had slid down six inches. The other two polyfill columns were still in place after 20 years. During reassembly, all polyfill columns were secured to their adjoining speaker side with one 3/8" staple.
8A. The right speaker was reassembled a listening evaluation was done. After the listening evaluation, the left speaker's rings were eagerly installed.:)
8B. The socket head cap screws (SHCS) can be used to secure the passive radiator. However, the head diameter of the buttonhead hex screw (BHS) is almost the same as the head diameter of the stock Phillips wood screw. The SCHS head diameter is approximately 75% of the diameter of the stock Phillips screw. I used the BHS's to secure the passive radiators to their rings.
8C. WARNING: Since you will be securing the driver and passive radiator baskets to metal, and you are now relieved of the concern for stripping out the wood threads, you must be mindful that you must still use care when tightening the screws...especially if you are using Mortite driver seals. Remember that the driver and passive radiator baskets are made of relatively soft metal. Over tightening could cause the metal screw heads to punch through the basket rim holes. I tightened just past the point where the turning resistance significantly increased.
I used a power screwdriver to remove all screws but only used it to reinstall strews halfway down. The rest of the way was hand tightened with a regular socket screwdriver. I hand tightened a couple of turns per screw in a sequential, diagonally-opposing pattern to minimize stress on the basket rim and to assure a level seating on the cabinet face.
Figure 4. Such good drilling. I wish I could say the same of British Petroleum.
Figure 5. The gleaming ridge behind the passive radiator opening is the newly installed retaining ring. How many of you have toothpicks
stuffed in your passive radiator screw holes due to stripped threads in the wood?
Proud and loyal citizen of the Digital Domain and Solid State Country!
Post edited by DarqueKnight on
Comments
-
Listening Evaluation
The ring installations resulted in greater clarity, presence, apparent sound level, and bass macro details, bass micro details and bass impact.
1. After the right speaker was completed, the left speaker sounded veiled by comparison...as if a thin sheet was over it. This was evident when mono material was playing and even more evident when stereo material was playing.
2. At the seating position, the right side of the sound stage sounded louder, heavier and clearer. Standing two feet in front of each speaker, there was more tactile sensation coming from the bass notes of the right speaker.
3. The sound stage dimensions did not change. However, images at the far right became more clear, detailed and weighty.
After the initial listening evaluation, I was eager to achieve Such Good Sound from the left, but I curbed my enthusiasm and worked slowly and carefully. After the left speaker was completed, I heard:
4. New bass details in familiar recordings, particularly tight, articulate micro growls.
5. More overall clarity.
6. More weight, detail and presence in vocals.
7. More sustain and natural decay in piano notes.
8. Enhanced three-dimensionality and more image weight at the sides and rear of the sound stage.
It is always amazing when I hear how much musical information was being lost due to vibration at the driver/cabinet interface...and this was in speakers that had extensive cabinet and driver vibration abatement modifications. Indeed, the cabinets themselves were re-designed by the manufacturer to minimize vibration and detail robbing resonance.
Experience indicates that a component needs to break in again after significant vibration abatement is installed. I expect further performance enhancements as the speaker system readjusts to its new mechanical environment.
Quality and Customer Care
I placed my order on 6/16/10 and received it on 6/22/10. The construction quality, consistency and precision, thoughtfulness of design and materials quality are top notch. The sonic benefits in my system far exceed the investment in time, effort and cost.
Thanks Larry.
Those interested in purchasing SDA retaining rings should contact forum member "TOOLFORLIFEFAN" (Larry).
Additional information can be found in this thread.
The Mysterious Monoliths continually get better with age! Now almost 21 years old,
they sound orders of magnitude better than they did when they were first manufactured.Proud and loyal citizen of the Digital Domain and Solid State Country! -
Thanks Ray! Awesome write up . . . you just took the fear out of me installing the rings in my 1.2TLs. As you always state, "the right tools for the right job!" I'm going to have to invest in some of the tools you've noted here.
Larry, you just made it to the Big Leagues! -
Great write up................as usual. It's in the details and you've provided ample details to get the job right the first time. It's mucho appreciated.
H9"Appreciation of audio is a completely subjective human experience. Measurements can provide a measure of insight, but are no substitute for human judgment. Why are we looking to reduce a subjective experience to objective criteria anyway? The subtleties of music and audio reproduction are for those who appreciate it. Differentiation by numbers is for those who do not".--Nelson Pass Pass Labs XA25 | EE Avant Pre | Holo Audio Cyan 2 Dac | MIT Shotgun S1 | Puritan Audio PSM136 Pwr Condtioner & Classic PC's | Legend L600 | Roon Nucleus 1 w/LPS - Tubes add soul! -
Thanks for the writeup DK! I look forward to installing mine. Did you paint or powdercoat them?
Gordon
edit: I love the "Ringmaster" moniker!2 Channel -
Martin Logan Spire, 2 JL Audio F112 subs
McIntosh C1000 Controller with Tube pre amp, 2 MC501 amplifiers, MD1K Transport & DAC, MR-88 Tuner
WireWorld Eclipse 6.0 speaker wire and jumpers, Eclipse 5^2 Squared Balanced IC's. Silver Eclipse PCs (5)
Symposium Rollerblocks 2+ (16)Black Diamond Racing Mk 3 pits (8) -
Thanks for the write up Ray, This is the one I was waiting for.....
-
Did you paint or powdercoat them?
No, I didn't do any refinishing of the rings. Are some people doing this? If so, why?
Edit
I see in Figure 5 that the passive radiator ring looks black. This is due to shadow cast on the ring.Proud and loyal citizen of the Digital Domain and Solid State Country! -
Was thinking about Black oxidation as corrosion protection. Should keep them nice looking after another 20 years.HT/2 CH
McIntosh MX120, MC500, MC206, MEN220
polkaudio SDA SRS 1.2TL, XO, Inductor, Tweeter, Larry's rings, WBT Binding posts, Moretite and Dynamat mod. Built by Mollie Jones 27:th of February 1991, CS350-LS XO mod, LS-f/x, DSW MicroPro 4000
MIT Shotgun S3.3 Bi-wire SC, Shotgun S3.3 SC, Shotgun S3.3 Proline IC, Shotgun S3.3 IC, Shotgun S3.3 Sub cable, AVT 1 Optical IC, EXP 3 Speaker interconnect. -
If your getting moisture in your cabinets to cause these to rust, you got bigger problems...IMHO.. and if your that worried about it get one of those little packs of desiccant and tape/staple it to the inside of your speaker..
-
TOOLFORLIFEFAN wrote: »If your getting moisture in your cabinets to cause these to rust, you got bigger problems...IMHO.. and if your that worried about it get one of those little packs of desiccant and tape/staple it to the inside of your speaker..
We have high humidity here in Shanghai during the summer so bare metal is not to recommend. I just have to look at some of my tools in the garage . Silicagel could be an option but I heard it gives you less definition in the midrange.
  HT/2 CH
McIntosh MX120, MC500, MC206, MEN220
polkaudio SDA SRS 1.2TL, XO, Inductor, Tweeter, Larry's rings, WBT Binding posts, Moretite and Dynamat mod. Built by Mollie Jones 27:th of February 1991, CS350-LS XO mod, LS-f/x, DSW MicroPro 4000
MIT Shotgun S3.3 Bi-wire SC, Shotgun S3.3 SC, Shotgun S3.3 Proline IC, Shotgun S3.3 IC, Shotgun S3.3 Sub cable, AVT 1 Optical IC, EXP 3 Speaker interconnect. -
Excellent write-up as usual DarqueKnight;another happy customer for Larry! Sounds like I got lucky, all my template holes lined up exactly over the existing screw holes."The secret of happiness is freedom. The secret of freedom is courage." Thucydides
-
Thank you Raife for the write-up and listening evaluation. Excellent as usual. I noticed you put the drill template on the inside of the cabinet when you drilled. What was the reason you did it that way rather than having it on the outside? I can understand that the ring itself would be on the inside, but was there another reason?
Greg
Taken from a recent Audioholics reply regarding "Club Polk" and Polk speakers:
"I'm yet to hear a Polk speaker that merits more than a sentence and 60 seconds discussion."
My response is: If you need 60 seconds to respond in one sentence, you probably should't be evaluating Polk speakers.....
"Green leaves reveal the heart spoken Khatru"- Jon Anderson
"Have A Little Faith! And Everything You'll Face, Will Jump From Out Right On Into Place! Yeah! Take A Little Time! And Everything You'll Find, Will Move From Gloom Right On Into Shine!"- Arthur Lee -
Thank you Raife for the write-up and listening evaluation. Excellent as usual. I noticed you put the drill template on the inside of the cabinet when you drilled. What was the reason you did it that way rather than having it on the outside? I can understand that the ring itself would be on the inside, but was there another reason?
Greg
He has the drill template on the outside.:p -
Oooops! He does. I though it was the wood.:o After looking at it closer, I realize it is metal. If I would have thought about it, I would have realized that the wood is black, not light brown in color like the caps. Thanks for correcting my oversight Larry.
Greg
Taken from a recent Audioholics reply regarding "Club Polk" and Polk speakers:
"I'm yet to hear a Polk speaker that merits more than a sentence and 60 seconds discussion."
My response is: If you need 60 seconds to respond in one sentence, you probably should't be evaluating Polk speakers.....
"Green leaves reveal the heart spoken Khatru"- Jon Anderson
"Have A Little Faith! And Everything You'll Face, Will Jump From Out Right On Into Place! Yeah! Take A Little Time! And Everything You'll Find, Will Move From Gloom Right On Into Shine!"- Arthur Lee -
Are these available from Polk CS? How much are they? Thanks DKHT: SRT's.....Pioneer SC95, Oppo 105D; ps4; Mitsubishi 1080p 82" DLP; DirecTV
2 ch: SRS 1.2tl's.....Odyssey Stratos monos, Dynaco PAS pre w/Mods, Arcam DV-135, Music Hall MMF 5, AQ wires
Bedroom: SRS 3.1tl's, RTA 8T (phantom center), Pioneer sc-lx701, Mitsubishi 1080p 82" DLP, DirecTV, ps3
Car: SR 6500's.....Planet Audio HVT752 tube hybrid amps (2), Alpine dvd-a double din HU, two 12" Kicker's -
dacoupedeville wrote: »Are these available from Polk CS? How much are they? Thanks DK
No, these are being made by a forum member TOOLFORLIFEFAN. -
http://www.polkaudio.com/forums/showthread.php?t=102478
here is a link to the DIY discussion on these rings. Some really need video of them actually being produced towards the end of the thread. -
Nice review DK. Can't wait to get mine installed.
-
DarqueKnight wrote: »Introduction
This article discusses the procedure used to install stainless steel driver and passive radiator retaining rings on my SDA SRS 1.2TL speakers and the initial listening evaluations after installation.
One question...Are the rings stainless?? I didn't think they were Pio Elete Pro 520
Panamax 5400-EX
Sunfire TGP 5
Micro Seiki DD-40 - Lyra-Dorian and Denon DL-160
PS Audio GCPH phono pre
Sunfire CG 200 X 5
Sunfire CG Sig 405 X 5
OPPO BDP-83 SE
SDA SRS 1.2TL Sonicaps and Mills
Ctr CS1000p
Sur - FX1000 x 4
SUB - SVS PB2-Plus
Workkout room:
Sony Bravia XBR- 32-Inch 1080p
Onkyo TX-DS898
GFA 555
Yamaha DVD-S1800BL/SACD
Ft - SDA 1C
Not being used:
RTi 38's -4
RT55i's - 2
RT25i's -2, using other 2 in shop
LSI 15's
CSi40
PSW 404 -
One question...Are the rings stainless?? I didn't think they were
Pickled in oil HRS (Hot rolled steel) Stainless Steel would be very expensive The price of Stainless is Very High right now. also putting hardware in SS never seems to set right. we flash tack the hardware in with a tig welder after we press them in just to keep them from coming loose on the jobs we do. -
TOOLFORLIFEFAN wrote: »Pickled in oil HRS (Hot rolled steel) Stainless Steel would be very expensive The price of Stainless is Very High right now. also putting hardware in SS never seems to set right. we flash tack the hardware in with a tig welder after we press them in just to keep them from coming loose on the jobs we do.
That's what I thought..Great work and can't wait to get the time to install.Pio Elete Pro 520
Panamax 5400-EX
Sunfire TGP 5
Micro Seiki DD-40 - Lyra-Dorian and Denon DL-160
PS Audio GCPH phono pre
Sunfire CG 200 X 5
Sunfire CG Sig 405 X 5
OPPO BDP-83 SE
SDA SRS 1.2TL Sonicaps and Mills
Ctr CS1000p
Sur - FX1000 x 4
SUB - SVS PB2-Plus
Workkout room:
Sony Bravia XBR- 32-Inch 1080p
Onkyo TX-DS898
GFA 555
Yamaha DVD-S1800BL/SACD
Ft - SDA 1C
Not being used:
RTi 38's -4
RT55i's - 2
RT25i's -2, using other 2 in shop
LSI 15's
CSi40
PSW 404 -
One question...Are the rings stainless?? I didn't think they were
They are clearly not. I had stainless steel kitchen appliances freshly on my mind when I started writing this.:)Proud and loyal citizen of the Digital Domain and Solid State Country! -
Very informative installation post sir,,thank you,,,,especially for the pictures,, perhaps I'll join the "fellowship" this weekend.:)JC approves....he told me so. (F-1 nut)
-
I understand that some may prefer to perform this modification while the speaker cabinets are lying flat. Before doing so, I ask that you consider the following:
For me, laying the speakers on the floor and then having to kneel over them while trying to hold the drill steady would have been very awkward since I was concerned with making a straight cut. If someone prefers to lay the cabinets flat, I would advise laying them on a surface that puts them at waist height.
Keeping the cabinets upright allowed me to keep my body upright and it allowed me to keep my wrists straight and to keep the drill bit perpendicular to, and close to, the the center of my upper body. This facilitated better control over the drill. Most people tend to have better hand/eye coordination when looking ahead than when looking down.
I started drilling while sitting on the floor, then kneeling, then standing.Proud and loyal citizen of the Digital Domain and Solid State Country! -
TOOLFORLIFEFAN wrote: »If your getting moisture in your cabinets to cause these to rust, you got bigger problems...IMHO.. and if your that worried about it get one of those little packs of desiccant and tape/staple it to the inside of your speaker..
The only reason I'm going to paint mine is because I live in the Pacific Northwest were people don't tan they rust (and just about everything else):rolleyes:
BTW Great write up DK this will help a lot“The two most important days in your life are the day you are born and the day you find out why.” ~ Mark Twain -
Nice detailed write up of the install. Very helpful and informative.
I wonder if the 15" passive will work on my 15" Klipsch K-33 woofer???
Anyone have some to match up?
Thank you. -
A link to who is selling them might help if you're happy with the results. The brackets are an excellent idea, a worthy upgrade and I prefer a 3M SV-497AJM vaccuum for my projects....maybe that should be your next upgrade DK.CTC BBQ Amplifier, Sonic Frontiers Line3 Pre-Amplifier and Wadia 581 SACD player. Speakers? Always changing but for now, Mission Argonauts I picked up for $50 bucks, mint.
-
Good idea.
Please edit post #2 and add the following after "Thanks Larry":
Those interested in purchasing SDA retaining rings should contact forum member "TOOLFORLIFEFAN" (Larry).
Additional information can be found in this thread.
Thanks Mark.Proud and loyal citizen of the Digital Domain and Solid State Country! -
Thanks for the great tutorial and evaluation. I just got my rings yesterday, and will be installing them when the upgrades are done. This thread will really help.
DougSunfire Theater Grand IV
Sunfire Cinema Grand Signature
SRS 2.1TL
SDA 2BTL's
CSiA6
FXiA4
FXiA6
SDA 2A's
Monitor 10A's
http://www.douglasconnection.com -
Very nice write up Ray, as usual. I can't wait to get my hands on some for my 2A's.:)The nirvana inducer-
APC H10 Power Conditioner
Marantz UD5005 universal player
Parasound Halo P5 preamp
Parasound HCA-1200II power amp
PolkAudio LSi9's/PolkAudio SDA 2A's/PolkAudio Monitor 7A's
Audioquest Speaker Cables and IC's -
Well I just completed this mod on my SDA-1C's. All went really well.
Thanks DK for the review and many thanks to Larry for the idea.
Going to listen for a while to see if I gained any sound quality improvements.:cool: