The Adcom GDA 600 modification thread
Options
Comments
-
In the mod I performed,all od the film caps were replaced with sonicap GenI,, IIRC the 680p caps were reolaced with the MTX polystyrene,also purchased from the sonicap folks.JC approves....he told me so. (F-1 nut)
-
IMO the stock metal films are not limiting performance to any large degree.However if you really want to change them you might consider using Caddock precision films.(MK132 series). Along with the 1.2k 's mentioned you might aswell replace the 1.58k feedback resistors (R509) and R530,531.I'm looking at the schematic and have begun ordering parts. I'm looking at some of the resistors around the opamps, (R523,R524, R525 Right Ch), and R520,R521,R522 Left Ch) all listed as 1.21K.I'm thinking about upgrading these
Polypropylene or polystyrenes.Georges Sonicaps look to be ideal.along with the film caps, maybe to foil or Tantalums?
Yes pin 7 is the output pin for the I/V converter opamp. These resistors and caps form a low pass filter that is then connected to the non inverted input (pin3) of the other opamp which functions as the output buffer.It looks like these are coming out of Pin 7 of Chanel B of each opamp? -
Ok, thank you for the recommendation on the resistors, good stuff!Along with the 1.2k 's mentioned you might aswell replace the 1.58k feedback resistors (R509) and R530,531.
AH! I was thinking this whole time (R507) 681R was the feedback resistor?! Is (R507) critical? I will add (R509) 1.58k to my parts list. I guess C553 too while I'm at it. So, the .01uF at (C530 & C531) can the values of these two be increased? Polarized matched to the - & + rails or non polarized like small WIMAs maybe? Also, the 10uF caps around the PCM63 would it help to increase these to 100uf? Maybe for Pin 1?Yes pin 7 is the output pin for the I/V converter opamp. These resistors and caps form a low pass filter that is then connected to the non inverted input (pin3) of the other opamp which functions as the output buffer.
Ahhhh ok, is this like a Bessel filter? There was another dac, a Muse that used a set up something like this if I remember correctly. This is really a cool little circuit! Thank you again!
-
-
You ask good questions:D. R507 is not critical and along with C561 appear to be a de-emphasis filter.This filter gets switched in by the fet (Q 501)only when a signal with pre- emphasis is detected by the CS8412 input reciever chip.Pre -emphasis was only used in the very early days of CD and relatively few were produced with it.AH! I was thinking this whole time (R507) 681R was the feedback resistor?! Is (R507) critical?
Sure and don't forget R508 and C552 for the other ch.I will add (R509) 1.58k to my parts list. I guess C553 too while I'm at it.
The value is actually .1uf and I recommend adding a 100uf low impedance electrolytic(ie.Panasonic FC series) in parallel with them.You could replace these .1 uf's with good film caps of the same value like WIMA's or Panasonic V series stacked films.So, the .01uF at (C530 & C531) can the values of these two be increased?
You can increase the decoupling caps C505,C506,508,C509 and offset cap C507 to 100uf, but I don't think it will gain you much in the way of performance.Also, the 10uF caps around the PCM63 would it help to increase these to 100uf?
Don't increase the value of the.1 uf (C527) connected to pin 1.Maybe for Pin 1?
Not sure if it's a Bessel or a Butterworth.is this like a Bessel filter?
I don't know the specifics of the design but I remember Muse having a highly regarded DAC back in the mid 90's or so.There was another dac, a Muse
Your welcomeThank you again! -
The voltage regulators arrived today FTGV. Thank you very much!!!
-
george daniel wrote: »Can you post a copy of the schematics? Most ot the tweaks are in the analog path,, thats where the bang/buck pays off-- first thing to do is determine what op amps you have.
I don't have the schematics...but I also don't own either of those currently. They're just some possible upgrades I've considered. I'm gonna need a DAC with HDCD decoding though...and the 600 doesn't have it, or else I'd be considering that.
I'll probably never own a GCD-750...but I was just curious if they could also be modded. I need a CDP with SACD playback though...so the 750 is out.
The GDA-700 may very well be my next DAC...especially if it can be modded in a similar way to the 600. I'll look around and see if I can dig up a copy of the 700's schematics.The nirvana inducer-
APC H10 Power Conditioner
Marantz UD5005 universal player
Parasound Halo P5 preamp
Parasound HCA-1200II power amp
PolkAudio LSi9's/PolkAudio SDA 2A's/PolkAudio Monitor 7A's
Audioquest Speaker Cables and IC's -
Hey comfortablycurt, I think if I read "in-between the lines" I know what you are thinking, as I recently went through this. Let me know if this sounds familiar. So: You think to yourself: It would be really cool to get on board with the HighRez stuff, I need an SACD player. Even-though most of my stuff Redbook. Then you think: Hey the hot set up would be to have a SACD player and an outboard HDCD DAC for my old Redbook stuff right? So what to get, yeah.. there's that Marantz SA 8001 or something, still pulling $5-600 used, and when you compare it to some earlier Redbook players, the build quality isn't all-that impressive. Then there's the SA11,yeah the build quality is there but the price OUCH! So then you think: I could just get a DVD player that does SACD right, use it as a transport into a nice DAC, like lets say, a GDA-700? But then would you really be happy with one of those lifeless 3lb plastic DVD players after looking at the SA11. Nooooo. Then you spend some time actually LISTENING to SACDs, and the handful of titles that might interest you. Yeah... the resolution is there, but is it really more musical? And, those creaky tick tacky buttons on that Cheesey SACD DVD player is leaving you pretty uninspired... So, maybe just a good DAC? Use you old player for a transport and let the SACD thing play out for awhile longer. So... GDA-700 or GDA-600 project, the 700 has HDCD! Yeah, but it drops a bit in processing, the UltraAnalog AES21 is nice but most peeps prefer the PCM63 in the 6 over the BB1702 in the 7 Hmmm. But the 700 has balanced outputs. O.K. but are you ever going to USE balanced outputs? Does your preamp even have balanced inputs? No? Hmmmm. So.. implementing all that balanced stuff in the 700 sure does raise the parts count and complexity and that's never good for sound quality. -mods are more of a hassle too. Hmmm. Then you notice that all those old target and non-remasted CD's from the 80's/90's actually sound better then the latest whizzz-bang over-processed re-re-relesed, re-masters or HDCD. SO.. were does that leave you...? Get a GDA-600 mod it and drive the High-Rez peeps nuts.

-
Great.The voltage regulators arrived today FTGV. Thank you very much!!!
IIRC in the 700 the inverted half of the balanced output is simply accomplished with the addition of a single opamp working as an invertor.But the 700 has balanced outputs...... implementing all that balanced stuff in the 700 sure does raise the parts count and complexity and that's never good for sound quality. -mods are more of a hassle too. -
Just got done with the rest of the mod about an hour ago. Spent the last hour listening at low level....
WOW.
Unbelievable what a difference this mod makes. I am floored.
Heading to bed but more pics and impressions to come.
Thanks George; Thanks Fred.
H9"Appreciation of audio is a completely subjective human experience. Measurements can provide a measure of insight, but are no substitute for human judgment. Why are we looking to reduce a subjective experience to objective criteria anyway? The subtleties of music and audio reproduction are for those who appreciate it. Differentiation by numbers is for those who do not".--Nelson Pass Pass Labs XA25 | EE Avant Pre | Holo Audio Cyan 2 Dac | MIT Shotgun S1 | Puritan Audio PSM136 Pwr Condtioner & Classic PC's | Legend L600 | Roon Nucleus 1 w/LPS - Tubes add soul! -
Great to hear! Post pics when you can!
-
Just got done with the rest of the mod about an hour ago. Spent the last hour listening at low level....
WOW.
Unbelievable what a difference this mod makes. I am floored.
Heading to bed but more pics and impressions to come.
Thanks George; Thanks Fred.
H9
Told ya,:p,,seriously,,congrats Brock,, give it a few days,,for me it was around 100 hours or so for things to really settle in,, thats when the character really shines,,again,, thank you Fred.JC approves....he told me so. (F-1 nut) -
Hey George, dacboy and everyone else who contributed to this great thread....1st of all: thank you!:) I'm going to dive in and do this! I'll be ordering everything Friday..:D
I have a big request from an absolute newbee. I've been through this thread several times. What I need is a Master List of everthing I'll need, parts-wise:p to make this happen. Please include not only the required parts, but also the best soldering iron for a begginer, solder, de-solderer, tools, etc..
I assume Parts Express and Radio Shack are the best stores?
This will help tremendously!
Thanks! Mike -
Hey George, dacboy and everyone else who contributed to this great thread....1st of all: thank you!:) I'm going to dive in and do this! I'll be ordering everything Friday..:D
I have a big request from an absolute newbee. I've been through this thread several times. What I need is a Master List of everthing I'll need, parts-wise:p to make this happen. Please include not only the required parts, but also the best soldering iron for a begginer, solder, de-solderer, tools, etc..
I assume Parts Express and Radio Shack are the best stores?
This will help tremendously!
Thanks! Mike
Mike, I will have a full write up w/photo's and tips to add to what's already here. Perhaps later tonight or tomorrow. Not to discourage anyone, but the parts are small, the board is wave soldered, and you need a very small tipped soldering iron, wick, and even a desolderer.
IMO, this type of work is not for a first timer because the traces in some areas are very tiny, leads are very close together. Also a hand held magnifier so you can make sure you don't bridge any leads, especially on the power supply board.
H9"Appreciation of audio is a completely subjective human experience. Measurements can provide a measure of insight, but are no substitute for human judgment. Why are we looking to reduce a subjective experience to objective criteria anyway? The subtleties of music and audio reproduction are for those who appreciate it. Differentiation by numbers is for those who do not".--Nelson Pass Pass Labs XA25 | EE Avant Pre | Holo Audio Cyan 2 Dac | MIT Shotgun S1 | Puritan Audio PSM136 Pwr Condtioner & Classic PC's | Legend L600 | Roon Nucleus 1 w/LPS - Tubes add soul! -
thanks H9! that's good info. i can hear 'ol clint saying: 'a man's gotta know his limits'...i'm looking forward to seeing what you put together. i wouldn't want to get in too deep:cool:
-
I have a big request from an absolute newbee. I've been through this thread several times. What I need is a Master List of everthing I'll need, parts-wise:p to make this happen. Please include not only the required parts, but also the best soldering iron for a begginer, solder, de-solderer, tools, etc..
Hi Mike! Jump in the water is great! Here is my advice, if you have not soldered before consider this. Look on youtube for vids that will show you how to do through hole soldering. I'm sure there is something out there, then consider taking apart and old radio/electronic clock/ or something with a circuit board ( Goodwill might be good for this ) After you get your supplies (gun & solder) spend a few/many hrs practicing soldering and unsoldering. It takes patience, you get use to how solder flows when its hot, etc, what it looks like when its not. You might even pic up a cheepy cd player and practice on it. Find one that used 5532 op amps, buy some sockets and new 5532s they are cheap ( unsolder and solder) see how it turns out. You want to avoid possible cold solder joints (bad connections) and also learn to used the minimum amount of heat possible , and how to try to keep the heat away from delicate components. A good quality med/high power (easy to handle) magnifying glass heiney9 mentioned is a really good idea. I will also document my parts and progress but I am about 6weeks away from beginning this project. Learn how to read voltages on caps and resistors codes. WATCH out for caps, just because they are disconnected, or you player is unplugged caps will still hold a charge and you can give yourself a good ZAP if you handle them wrong.") Oh, buy a decent quality multi-meter. Something that can measure Capacitance, AC/DC voltage, and has a continuity tester. Figure $40-80, its been a while since I look at these, the shack has them on sale occasionally, start measuring stuff, can you figure out the capacitance on your interconnects or speaker cable? Get some old resistors, measure those to their color codes, test your house voltage, car batter, camera batteries, etc. have fun with it.
Oh, buy a decent quality multi-meter. Something that can measure Capacitance, AC/DC voltage, and has a continuity tester. Figure $40-80, its been a while since I look at these, the shack has them on sale occasionally, start measuring stuff, can you figure out the capacitance on your interconnects or speaker cable? Get some old resistors, measure those to their color codes, test your house voltage, car batter, camera batteries, etc. have fun with it. -
The most expensive part of the mod are the Opamps. Of course if you don't have soldering supplies then that adds to the cost as well. No other equipment is needed other than some basic soldering tools. A small soldering tip.
I recommend solder wick and a desoldering tool like this as well as a vacuum
http://www.radioshack.com/product/index.jsp?productId=2062731&clickid=prod_cs
All 3 of these were used constantly as the holes are very tiny and can be a PITA to clean
The Opamps are Burr Brown OPA627. I bought them from here and you need two of them. Also absolutely get the sockets then not only can you not worry about "smoking" the opamps when soldering but you can roll opamps later if you want to.
Burr Brown OPA627AU
Opamp Socket
Power Supply Parts:
Remember to make sure you orient the caps with proper polarity. The board is laid out very nicely and it's easy to maintain polarity if you pay attention.
Also the smaller caps are a real PITA to remove and the leads are extremely close together and this is where you can have an issue with "bridging" the leads if you are not careful.
Also I would either get the parts I link to or George has left over or recommends. The other problem for the entire modification is the parts are very small and 1) they need to fit in the space 2) the leads need to fit thru the board. The parts I link to will work but the holes have to be 100% clean.
(6) 2200uF 35v caps Nichicon FG from Parts Connexion
C110; C111; C112; C113; C114; C115
(5) 120uF 25v caps Panasonic FC (I got these from George) who got them from Digikey. Couldn't find a suitable value from Parts Connexion
C101; C102; C103; C105; C106
***NOTE you'll need 4 more of these exact value for the Op-amp reserve supply
(2) 470uF 35v caps Panasonic FC (I got these from George) who got them from Digikey. Note I bought some Nichicon's from Parts Connexion and they were way too large to fit.
C100; C104
(2) 22uF 25v caps Nichicon (I got these from George) Parts Connexion
C122; C123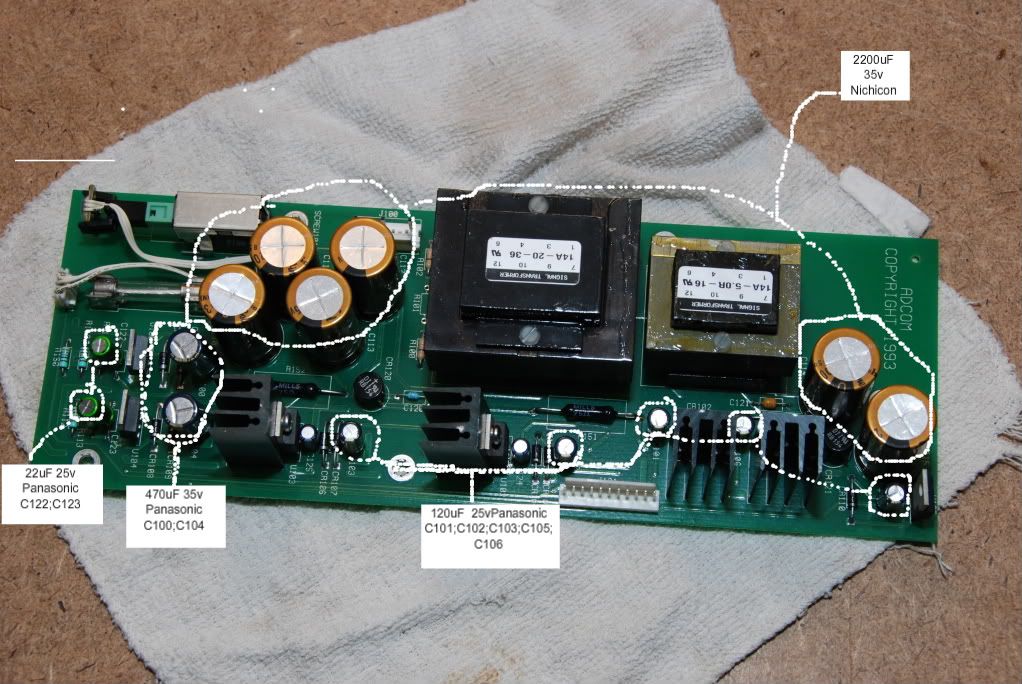
George and others look this over for mistakes, please. This is all for the power supply section. I'll post the analog section tomorrow.............this took over an hour and half to compose.
H9
P.s. C122; C123 in the photo are labeled Panasonic, they are Nichicon, see parts list link"Appreciation of audio is a completely subjective human experience. Measurements can provide a measure of insight, but are no substitute for human judgment. Why are we looking to reduce a subjective experience to objective criteria anyway? The subtleties of music and audio reproduction are for those who appreciate it. Differentiation by numbers is for those who do not".--Nelson Pass Pass Labs XA25 | EE Avant Pre | Holo Audio Cyan 2 Dac | MIT Shotgun S1 | Puritan Audio PSM136 Pwr Condtioner & Classic PC's | Legend L600 | Roon Nucleus 1 w/LPS - Tubes add soul! -
Great post H9, question did you use variac to bring up the unit slowly after reassembly? I'm concerned about the power serge from just plugging it in cold after replacing the big caps in the power supply section.
-
nice work Brock,, I'll look and see what I have left over,,IIRC,it's the 120 uf's,, so no one needs to buy any of those,, just pm me and they are yours for the asking, The variac is a good idea,, however not owning one,,I just powered mine up and everything went well. The piece that I would suggest that you pay particular attention too,"small solder joints,, so carefull with the heat,,removing and replacing,,the de-soldering tool and a wick/solder sucker are mandatory) there is no way that I could have performed this mod without one.Good luck guys,,and Yes,,it sounds that good,:)JC approves....he told me so. (F-1 nut)
-
great stuff dacboy! i actually have a multitester...i adjusted the voltage(?) on my marantz 2270...that got me thinking about more diy stuff
-
thanks H9! that ties it all together:)
-
sda2mike--pm me your addy and I'll get what I have left over to you,,not much,, but a start--george
Brock,,you did a fine job on the board--looks great--btw--i have plenty of the small caps used in the ps--they are free for the postage--george--over and off to work.JC approves....he told me so. (F-1 nut) -
george daniel wrote: »sda2mike--pm me your addy and I'll get what I have left over to you,,not much,, but a start--george
thanks, george! -
On to the analog section. I think these photo's are going to be small but you get the idea.
This is the stock board with the stock parts
Red are poly caps that I replaced w/ Multicaps PPMFX from Parts Connexion each is a different value.
George used Sonicaps from Sonicraft.
you need (2) of each; one for each channel
(2) .022uF 100v (or higher) C560; C561
(2) .0039uF 100v (or higher) C540; C543
(2) .0027uF 100v (or higher) C541; C541
Purple are metal stack film caps (which George kindly provided) two for each channel. These are bypass caps for the Opamps
(4) .1uF 50v C528; C529; C530; C531
Blue are more caps to be replaced around the Opamp. Stock parts are WIMA and may or may not need to be changed. Since I was in there George and Fred suggested REL RTE Polystyrene Film & Foil
(2) 680pF 600v C542; C545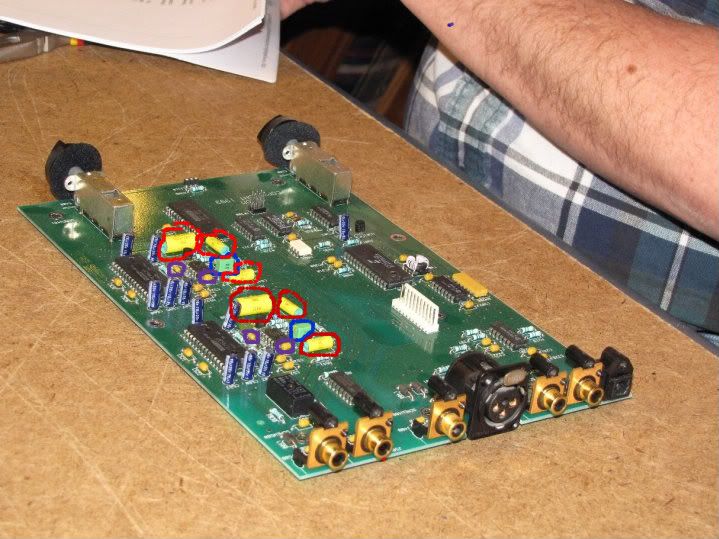
In this photo you can see (to the right) the black REL RTE cap and Brown Metal Stack Film Opamp bypass caps are installed.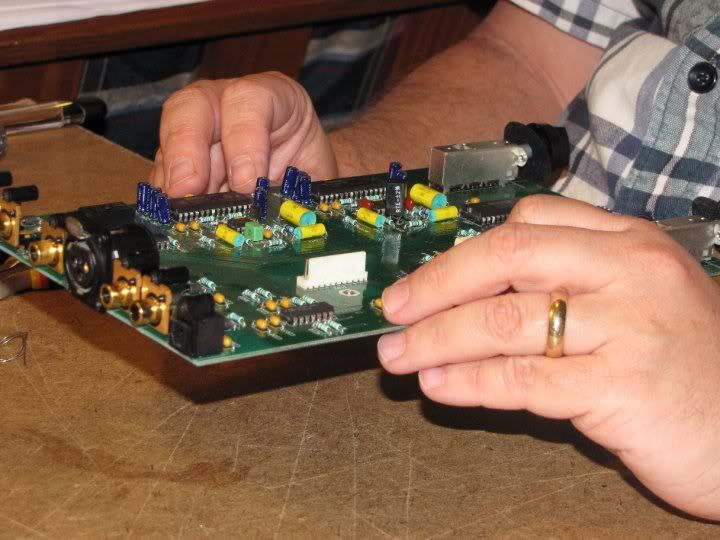
In this photo you can the left side is complete except for the Opamp. You can see the (3) Mulitcaps (white) (2) Darker brown Metal Stack Film caps and the single REL RTE cap right above the Opamp.
The right side is stock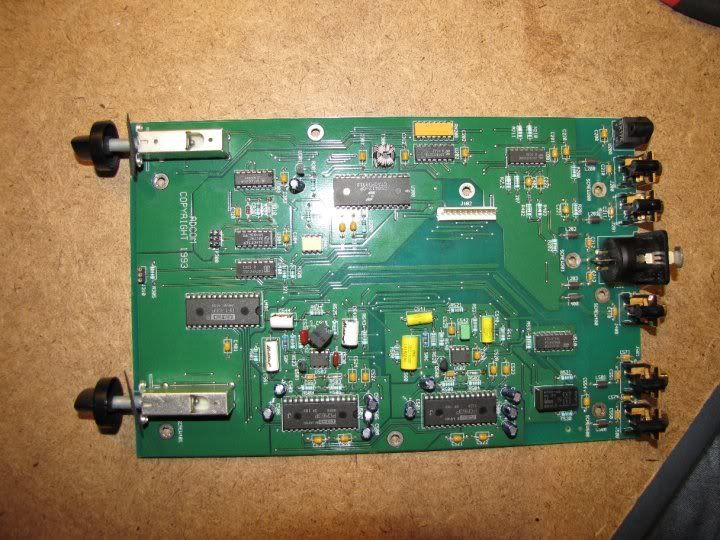
Another angle.
A close-up of the completed channel w/ Opamp inserted in the socket. (3) Multicaps (white), (2) Brown Metal Stack bypass caps, (1) REL Cap Poly Film/Foil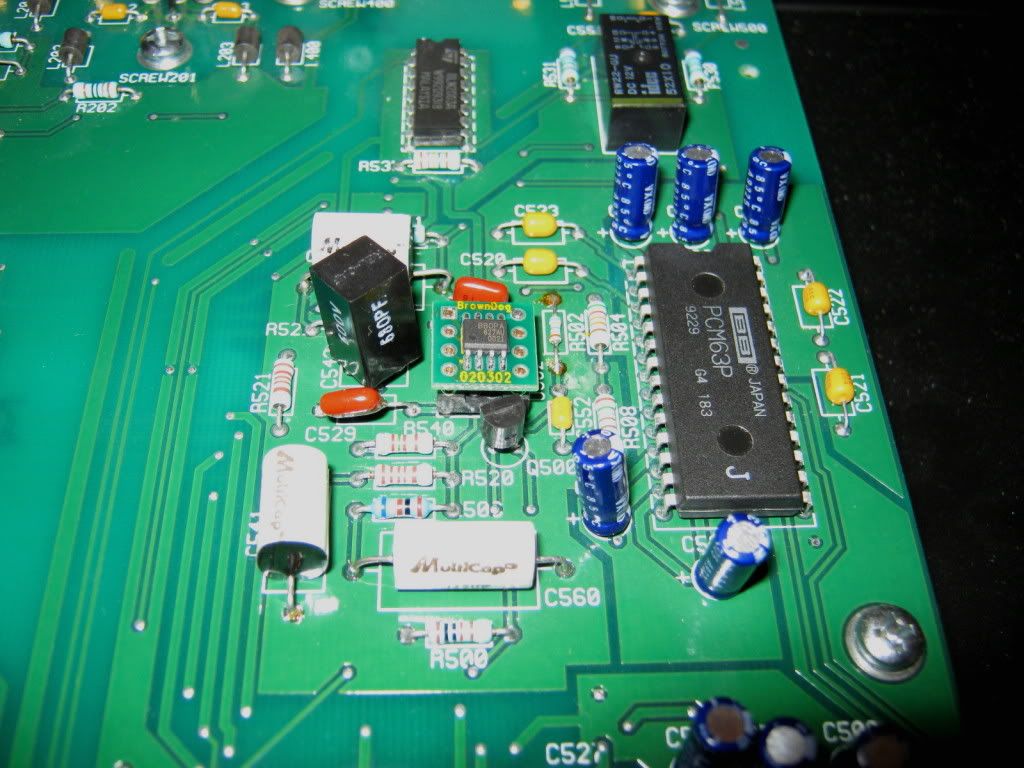
Both channels completed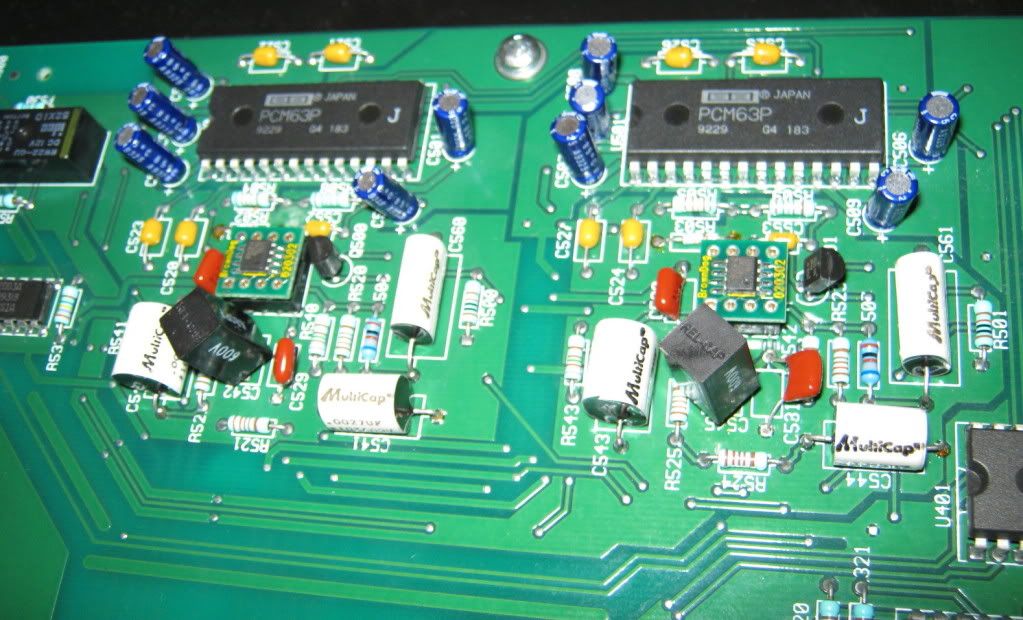
But there is more.....................next the shots of the paralleled bypass caps for the Opamps mounted on the bottom of the board and one other step."Appreciation of audio is a completely subjective human experience. Measurements can provide a measure of insight, but are no substitute for human judgment. Why are we looking to reduce a subjective experience to objective criteria anyway? The subtleties of music and audio reproduction are for those who appreciate it. Differentiation by numbers is for those who do not".--Nelson Pass Pass Labs XA25 | EE Avant Pre | Holo Audio Cyan 2 Dac | MIT Shotgun S1 | Puritan Audio PSM136 Pwr Condtioner & Classic PC's | Legend L600 | Roon Nucleus 1 w/LPS - Tubes add soul! -
George has gone into detail on Fred's recommendation to adding extra filter capacitence to the new Opamps. I've read on-line this is generally a good idea for the OPA627.
This is very important as you MUST make sure the leads never touch anything else on the PCB. It would be very easy to short something you will need 2 caps for each and they will be hooked in parallel. You will need to run a lead to ground (use the same ground as the power supply). I ended up hot gluing the caps to the board to make sure they didn't vibrate or touch anything
Read and Re-Read post #1 in this thread.
Remove the opamps and install the new opamps--careful attention to pin #1 orientation,,in the case of the dogs,,pin 1 corresponds with the "b" in browndog.The adcom opamps were marked with a notch of sorts denoting the pin #1.I would suggest installing the DIP 8 sockets, then you have the ability to roll opamps like tubes,if you prefer. Next you want to install 120uf/25 volt electrolytic caps to serve as local power supply reservoirs. the positive lead from the cap goes to pin 8(opamp) and the negative cap lead to pin 4.Then connect the remaining + and - leads on the caps,and tie them to ground.I ran a wire fron the caps which I mounted on the underside of the board to the ground of the power supply,which is easily distinguished.
Note how the caps are tied together. The lead that are tied together will be attached to the ground wire (see photo 2)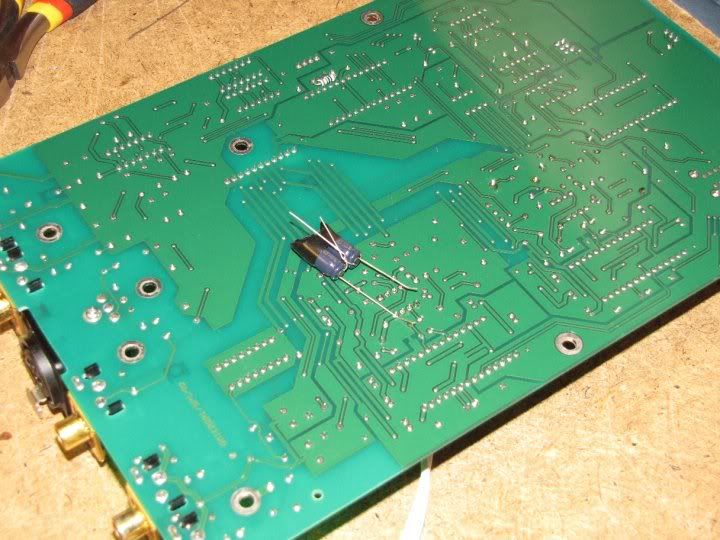
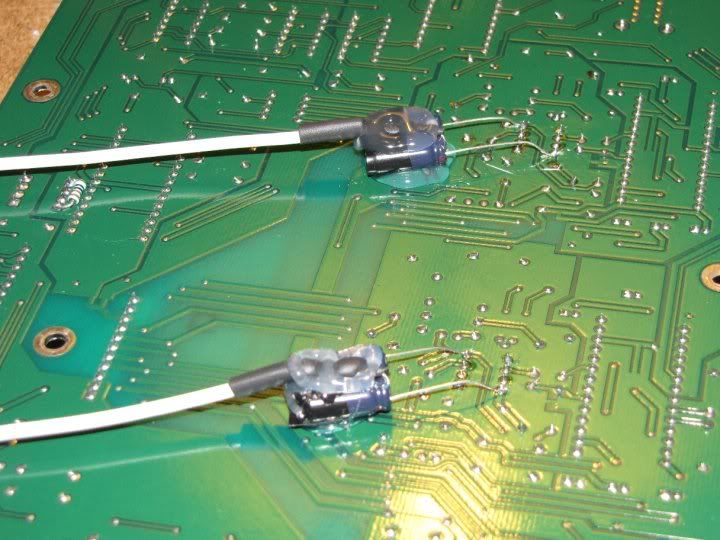
Final step. (see photo)
Remove the Ferrite Inductors at L500; L501 and jump them. I used left over leads from the capacitors
Then remove the tiny light brown caps at C550; C551---do not replace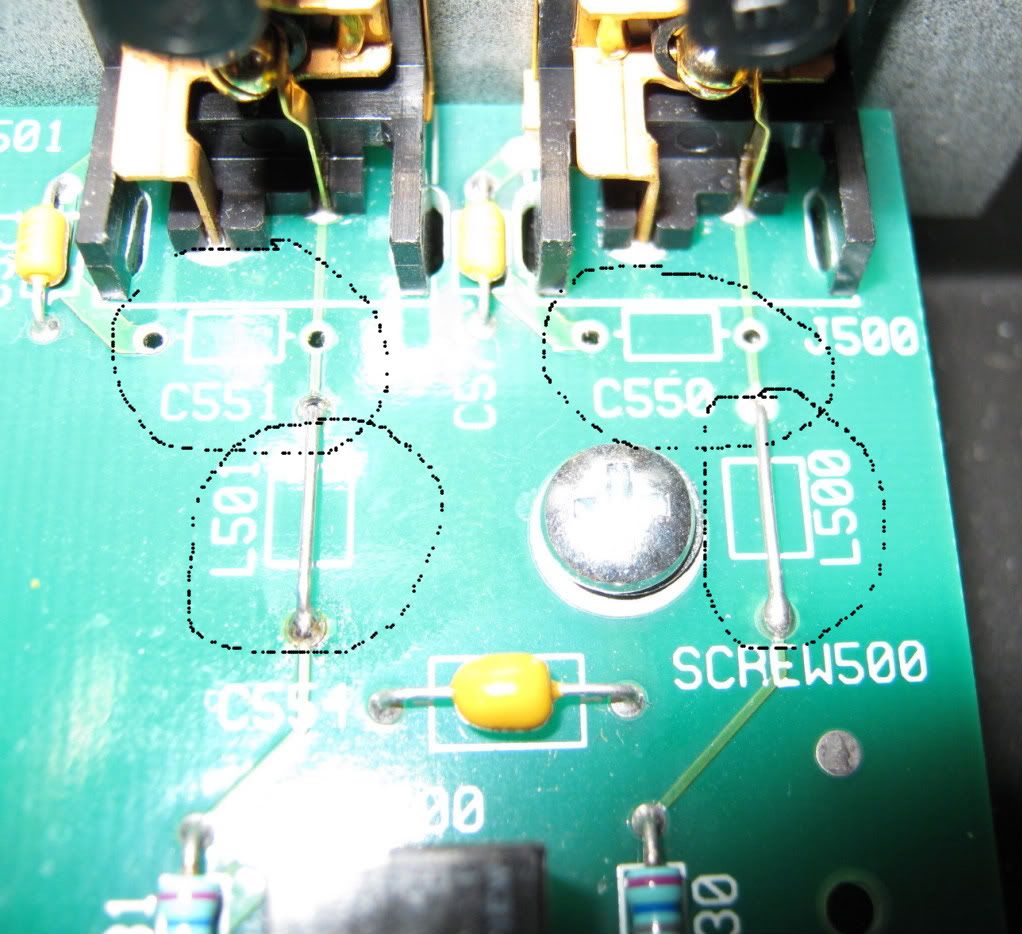
This should be it.
H9"Appreciation of audio is a completely subjective human experience. Measurements can provide a measure of insight, but are no substitute for human judgment. Why are we looking to reduce a subjective experience to objective criteria anyway? The subtleties of music and audio reproduction are for those who appreciate it. Differentiation by numbers is for those who do not".--Nelson Pass Pass Labs XA25 | EE Avant Pre | Holo Audio Cyan 2 Dac | MIT Shotgun S1 | Puritan Audio PSM136 Pwr Condtioner & Classic PC's | Legend L600 | Roon Nucleus 1 w/LPS - Tubes add soul! -
Again I cannot stress enough that this is not for a novice. The parts and the mounting holes are very small and cramped. Getting the solder "sucked" out of the holes and clean is a real PITA. It takes a lot of patience and the proper tools.
I did not do any of the soldering. I left that to my buddy AL212 (aaron). He has the proper irons and tools as well as a bit more "field" practice than I do. I can do basic soldering but this would have been beyond my level. After seeing and helping him do it; I could probably do it again if I had to, but this was a bit tedious.
Also because of the small size of the stock components I would suggest you buy the exact parts either I linked to or George bought because then you know they will fit for sure. You can use Sonicap Gen II in place of the Multicaps. I used Nichicon for the large caps in the Power Supply. Panasonic FC caps can be used as well, but for the smaller value caps the Nichicon's were physically too large so I used the Panasonic FC's. Also the REL RTE's fit nicely.
Thanks again to George and especially to Fred Thompson for giving George all the guidance so others could do the modification.
Have fun.
H9"Appreciation of audio is a completely subjective human experience. Measurements can provide a measure of insight, but are no substitute for human judgment. Why are we looking to reduce a subjective experience to objective criteria anyway? The subtleties of music and audio reproduction are for those who appreciate it. Differentiation by numbers is for those who do not".--Nelson Pass Pass Labs XA25 | EE Avant Pre | Holo Audio Cyan 2 Dac | MIT Shotgun S1 | Puritan Audio PSM136 Pwr Condtioner & Classic PC's | Legend L600 | Roon Nucleus 1 w/LPS - Tubes add soul! -
Congrats gents on succesfully implimenting the mods, it's good to see your efforts have paid off in improved sound quality. I would just like to comment on the 120uf decoupling caps for the opamps.For a neater installation and reduced lead length they could be mounted on the top side with their leads soldered directly to the leads of the .1 uf film caps.C528,529,530,530(being careful to observe correct polarity.)Alternatively the 120ufs could have been installed in the .1uf's positions, then the .1uf's simply soldered to the solder pads underneath.
-
Congrats gents on succesfully implimenting the mods, it's good to see your efforts have paid off in improved sound quality. I would just like to comment on the 120uf decoupling caps for the opamps.For a neater installation and reduced lead length they could be mounted on the top side with their leads soldered directly to the leads of the .1 uf film caps.C528,529,530,530(being careful to observe correct polarity.)Alternatively the 120ufs could have been installed in the .1uf's positions, then the .1uf's simply soldered to the solder pads underneath.
He,he,,Fred,, one day you are just gonna have to show me how to do that one,,I understand what you are saying,, but just cannot apply it,,LOL.Guys,,if you own one of these,,you owe it to yourself to do this mod,,and above all,,,a BIG THANKS to FRED,,,I could have NEVER done this without his help,patience and instruction,,thank you sir,,:cool:;)
george
Brock--thats exactly how I did my underside mod,,right down to the glue.:)JC approves....he told me so. (F-1 nut) -
It seems last night around midnight I could hear things start to settle in. I turned the rig on about 5:00 PM and listened until close to midnight. I have about 12 hours on the new parts and things are starting to settle a bit. Less "hashy" on the top end, better soundstage and perhaps a bit more clarity and balance to my ears.
I'll report back next week after I get some more listening/break-in time. This is a MUST do for this dac..............takes it way up a couple levels. It's not cheap and you probably won't make your money back upon resale. It is a bit of a tedious job, but well worth it, IMO.
You can get a used GDA 600 for $150-200 and I had about $180 in parts ($110 in the Opamps). If you wanted to be more cost conscious you could leave the (6) stock "yellow" polys and the light green WIMA caps (C542;C545) and save about $40 or so.
H9"Appreciation of audio is a completely subjective human experience. Measurements can provide a measure of insight, but are no substitute for human judgment. Why are we looking to reduce a subjective experience to objective criteria anyway? The subtleties of music and audio reproduction are for those who appreciate it. Differentiation by numbers is for those who do not".--Nelson Pass Pass Labs XA25 | EE Avant Pre | Holo Audio Cyan 2 Dac | MIT Shotgun S1 | Puritan Audio PSM136 Pwr Condtioner & Classic PC's | Legend L600 | Roon Nucleus 1 w/LPS - Tubes add soul! -
Hey all! I have a question. In the power supply side, Is there a reason why you did not replace (C124 &C125) with 125uF 25v Panasonic FCs? Also, I see that these caps are listed as 35v and you replaced them with ones rated at 25v? Am I to assume that the voltage is bellow the 35v listed on the OEM caps?
Pics are great!!!