Center Channel Pedestal Build
mufsoman
Posts: 636
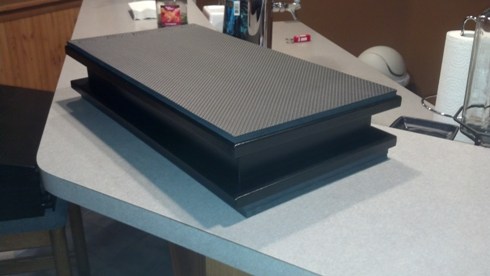
Just wanted to share my center channel pedestal build project that I completed during my Christmas vacation. My CsiA6 has been sitting on wood blocks on top of my equipment cabinet. So I have finally gotten around to building a nice pedestal that provides aesthetics and function. The function is to provide a stable and isolating (resonance/vibration) pedestal.
I started with carefully confirming the exact height and slope needed. I used a string attached to the CsiA6 and ran it at near ear level all the way to the back row seating. Using foam tiles and the current blocks of wood and lots of sitting/reclining in multiple locations, I found the perfect height/location that seems to cover all sitting locations. Then I took the necessary measurements and finalized my design. Attachment not found.Attachment not found.
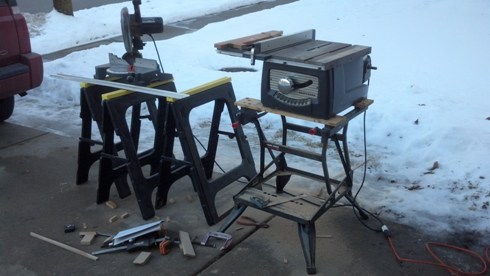
Fortunately, I choose to saw all the pieces last Saturday before the cold and snow hit Chicago area. My driveway set up pic is attached along with a pic of all the final pieces. The angle from the frotn to the back of the pedestal is small, only a 1/4" difference in height (front to back). If you look closely at the side and internal walls, you can seen the slight angle.
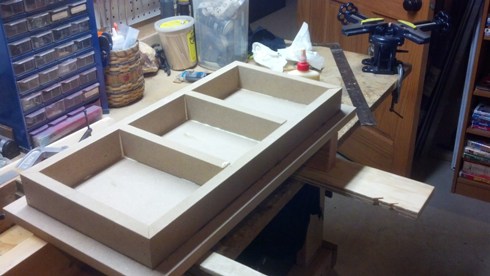
Remainder of the build was completed in my small basement workshop. All pieces were glued and nailed. In order to add vibration dampening, I filled the pedestal with sand before attaching the top surface. Pics show the before and after sand was added. I actually baked the sand in our kitchen oven to quickly ensure it was thoroughly dry before pouring into the base since it was very wet in the bag when purchased. My wife was very tolerant, but thought I was crazy...
Once the top piece was attached, I added shelf edge molding around both the base and top and caulked all corners. Next I primed and then painted with a rich satin black to match the CsiA6.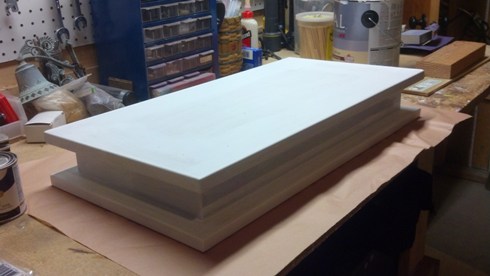
The final component to ensure isolation of the pedestal was to add rubber floor tiles to the top and bottom surfaces. I used two tile thickness on the bottom and one on the top. These were 24" square interlocking tile that are 3/8" thick. I used a very sharp utility knife to trim them to size. A quick spray of contact adhesive stuck them in place. These thicknesses were taken into account for the overall height determined by the string.
Final pedestal is 31 lbs. I perceive the acoustic difference to be minor, but I believe it definately moved the needle in the right direction to help clean up the center channel sound. Aesthetically, it's awesome. This was a fun project and just another tweak to continue to build on my overall home theater experience.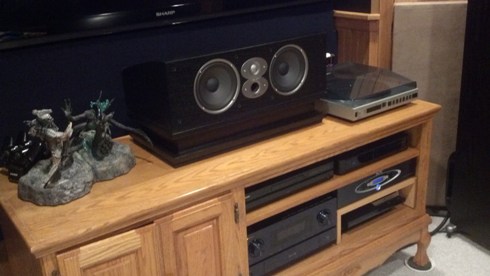
I started with carefully confirming the exact height and slope needed. I used a string attached to the CsiA6 and ran it at near ear level all the way to the back row seating. Using foam tiles and the current blocks of wood and lots of sitting/reclining in multiple locations, I found the perfect height/location that seems to cover all sitting locations. Then I took the necessary measurements and finalized my design. Attachment not found.Attachment not found.
Fortunately, I choose to saw all the pieces last Saturday before the cold and snow hit Chicago area. My driveway set up pic is attached along with a pic of all the final pieces. The angle from the frotn to the back of the pedestal is small, only a 1/4" difference in height (front to back). If you look closely at the side and internal walls, you can seen the slight angle.


Remainder of the build was completed in my small basement workshop. All pieces were glued and nailed. In order to add vibration dampening, I filled the pedestal with sand before attaching the top surface. Pics show the before and after sand was added. I actually baked the sand in our kitchen oven to quickly ensure it was thoroughly dry before pouring into the base since it was very wet in the bag when purchased. My wife was very tolerant, but thought I was crazy...


Once the top piece was attached, I added shelf edge molding around both the base and top and caulked all corners. Next I primed and then painted with a rich satin black to match the CsiA6.

The final component to ensure isolation of the pedestal was to add rubber floor tiles to the top and bottom surfaces. I used two tile thickness on the bottom and one on the top. These were 24" square interlocking tile that are 3/8" thick. I used a very sharp utility knife to trim them to size. A quick spray of contact adhesive stuck them in place. These thicknesses were taken into account for the overall height determined by the string.
Final pedestal is 31 lbs. I perceive the acoustic difference to be minor, but I believe it definately moved the needle in the right direction to help clean up the center channel sound. Aesthetically, it's awesome. This was a fun project and just another tweak to continue to build on my overall home theater experience.


Sony 83A80L TV and Roku Ultra
Denon 3800
Parasound HCA-2205A
SVS Prime towers, center channel and bookshelfs (side surrounds)
Atmos: Mirage Nanosats x 4
Turbo MFW-15 x 2
Panasonic DP-UB820
APC H15
Morrow MA4 & AQ Cobra IC's, AQ Midnight speaker cables
Denon 3800
Parasound HCA-2205A
SVS Prime towers, center channel and bookshelfs (side surrounds)
Atmos: Mirage Nanosats x 4
Turbo MFW-15 x 2
Panasonic DP-UB820
APC H15
Morrow MA4 & AQ Cobra IC's, AQ Midnight speaker cables
Post edited by mufsoman on
Comments
-
For some reason the first two pics didn't attach the same as the others, but are listed at the bottom of the post. Not sure what happened there, but at least they're attached.....Sony 83A80L TV and Roku Ultra
Denon 3800
Parasound HCA-2205A
SVS Prime towers, center channel and bookshelfs (side surrounds)
Atmos: Mirage Nanosats x 4
Turbo MFW-15 x 2
Panasonic DP-UB820
APC H15
Morrow MA4 & AQ Cobra IC's, AQ Midnight speaker cables -
Kewl project.... looks good.
I feel for you doing it in the driveway, in the snow.
Been there, dun that
Glad you got it done before the cold.
I was able to attach the final pic
-
Kcoc321 - how did you load the picture file that it shows the actual pic vs just a file name? I was trying to do that and could not.....Sony 83A80L TV and Roku Ultra
Denon 3800
Parasound HCA-2205A
SVS Prime towers, center channel and bookshelfs (side surrounds)
Atmos: Mirage Nanosats x 4
Turbo MFW-15 x 2
Panasonic DP-UB820
APC H15
Morrow MA4 & AQ Cobra IC's, AQ Midnight speaker cables -
You go into advanced, scroll down to the bottom to "manage attachments", select "add files" pick "upload files" select files, upload them and make sure they are "checked" then click "Insert inline" and then "done"Kcoc321 - how did you load the picture file that it shows the actual pic vs just a file name? I was trying to do that and could not.....
Least it worked for me. Hope it works for you.

