Installing Driver Support Rings on 5B's

heiney9
Posts: 25,432
TOOLFORLIFEFAN (Larry) came up with a great solution for anchoring/securing the drivers in several vintage Polk models, mostly consisting of the SDA series. I had him make me a set for my Polk 5B's in addition to a set for my SDA 1C's. He engineered a series of metal rings that fit behind the driver cut outs inside the cabinets with threaded nipples that go through the current screw holes (after enlarging them a bit) and fit flush with the front baffle.
This way instead of using wood screws to secure the drivers to the baffle you use threaded bolts into the threaded nipples. This sandwiches the driver basket between the particle board baffle and the steel ring behind it. No more stripped out wood holes and a much more solid way to secure the drivers to the baffle.
Tools needed:
3 or 4 - 1" C-Clamps (most important tool)
Power drill
I used a 9/32 wood drill bit
Phillips screw driver
Torx bits
Box knife
Small flashlight
Vacuum cleaner
Small flat blade screw driver to remove the glue (as necessary)
I've had the rings for awhile and just needed to spend the time to install them. Larry provides templates which you simply secure in place with C-Clamps and then drill out the existing screw holes to accommodate the threaded nipples attached to the rings . The 5B's are smaller so I used 1" c-clamps and they worked perfectly. This was also intended to be a trial run before I jumped in and did my SDA 1C's. This turned out to be much simpler than I had thought. One area that some time needs to be spent on and is a bit of a PITA, is removing the glue inside the cabinet.
In both 5B's there were thick globs of glue around in the inside portion of the PR cut out. If you don't remove the excess glue the rings won't sit flush on the inside of the baffle. I used a small flash light sitting inside the cabinet, a box knife and a small flat blade screw driver to cut and chisel out the excess glue.
One other thing of note is for the MW driver and passive radiator you will probably want to use a washer between the bolt head and basket. The bolt heads are only slightly larger than the basket screw holes and if you don't use washers there is a good possibility the bolt head will "punch" through the basket hole. This is not an issue with the tweeters.
Another tip is once you start tightening the bolts, tighten them in a criss-cross pattern and evenly tighten all bolts. If you don't do it this way, it is very easy to distort the driver basket. Also I've found you don't have to tighten the screws down with an iron fist. Just snug them all down.
I had originally used Mortite in place of my disintegrating original gaskets. The Mortite was completely intact and was not messy at all you'll see in the photos it stayed right where it was supposed to be. Mortite works well and without any issues. Highly recommended.
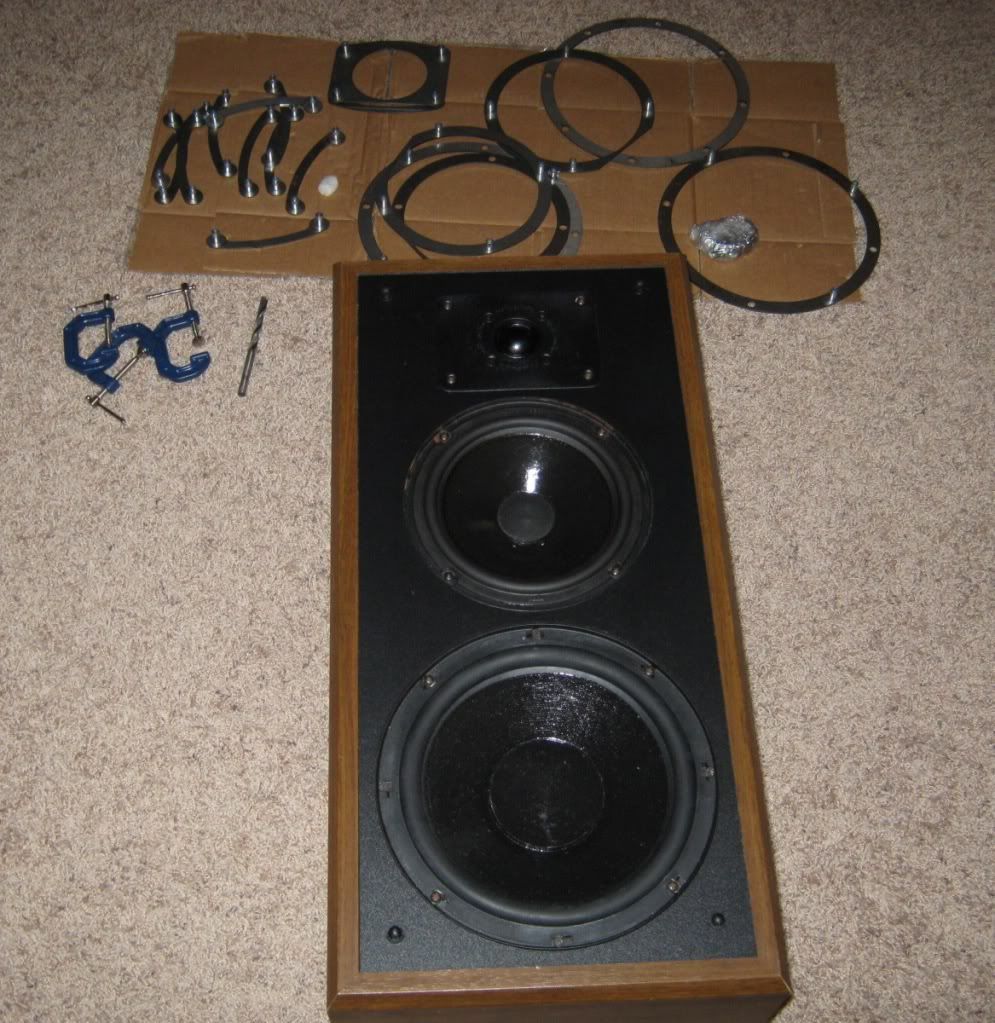
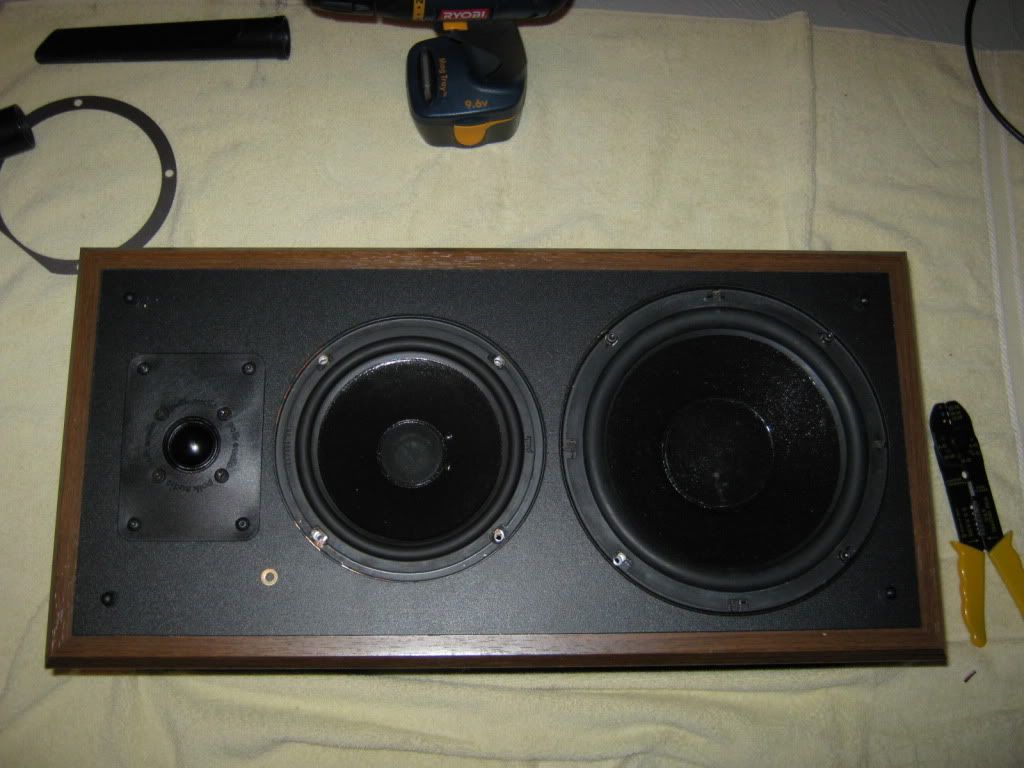
You can see the rings and templates as well as the tweeter brackets (in the upper left)
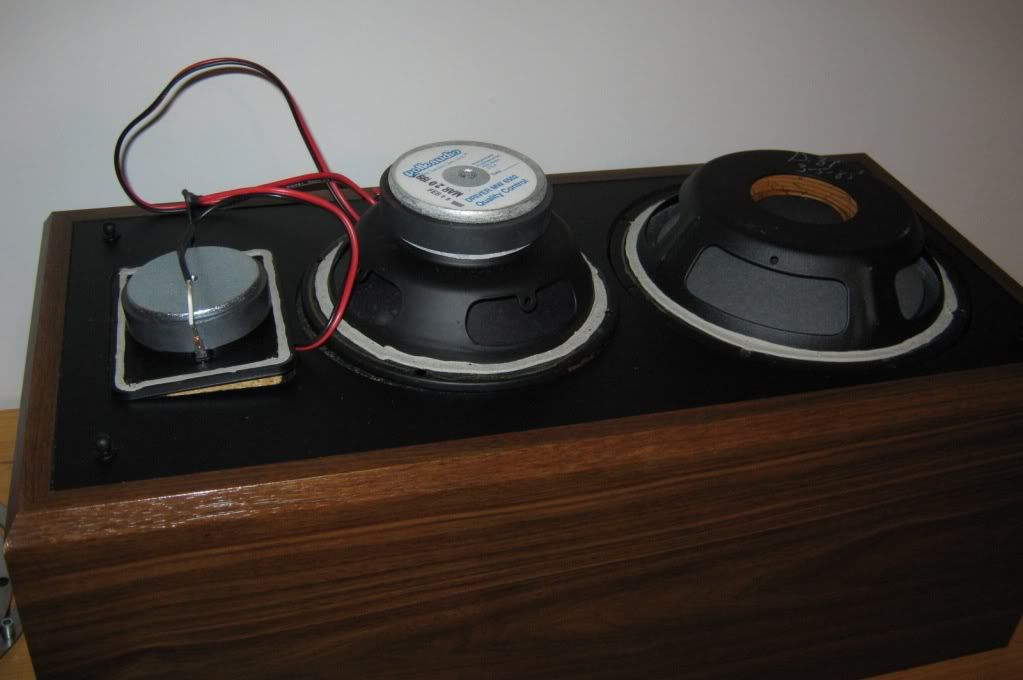
All the drivers pulled and you can see how neat a tidy the Mortite is after about a year. No issues with it sticking or pulling away, etc.
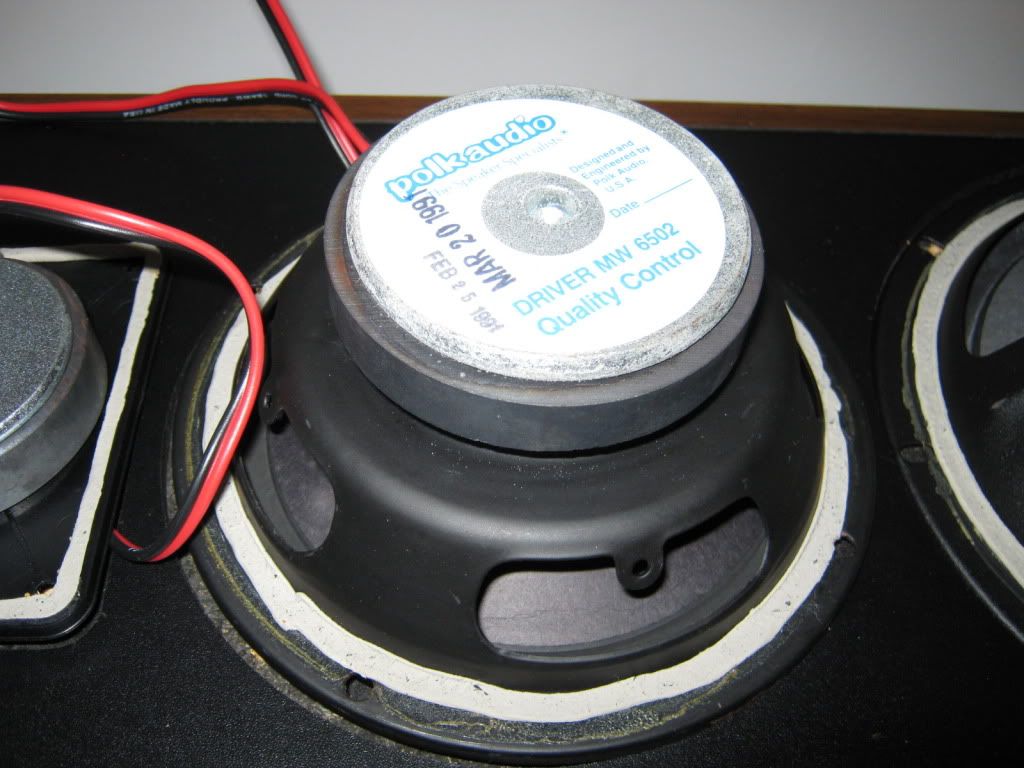
Mortite works as intended.
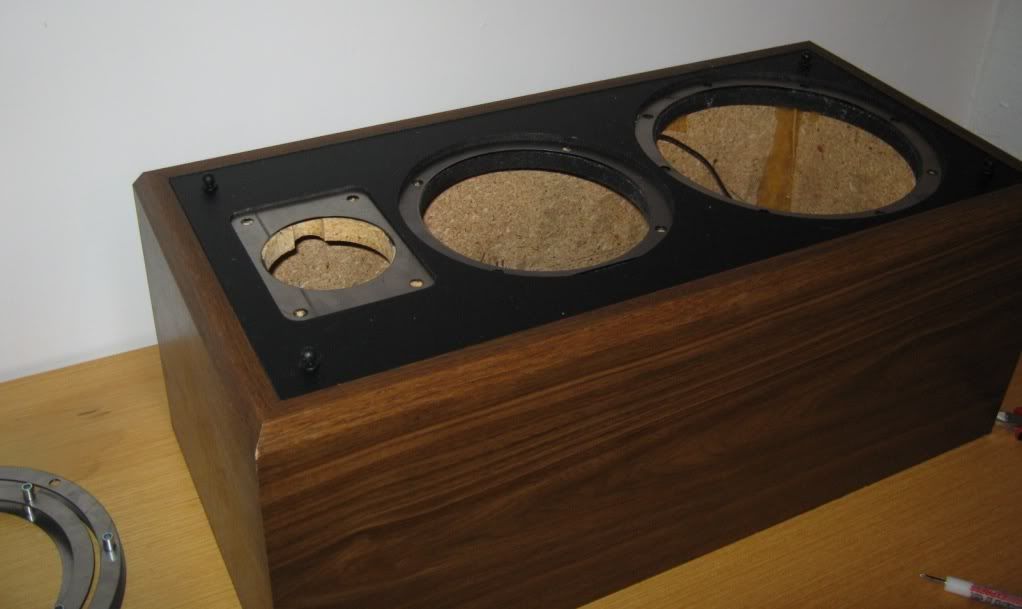
Templates are in place ready to be secured by 1" C-clamps prior to drilling the holes.

Example of the glue issue I mentioned. It's a pain working in such a small area but luckily the glue comes undone pretty easily.

Tweeter bracket in place ready to drill. I drilled out the existing holes for all the drivers.
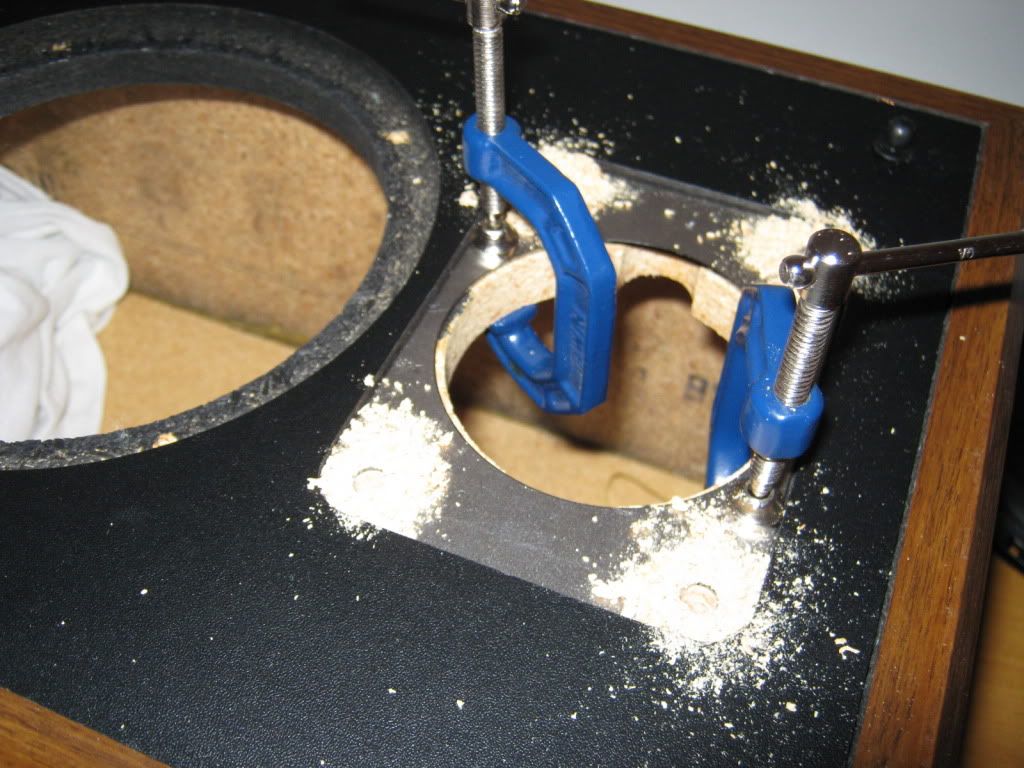

The bracket has a cut out like the template and to keep the tweeter bracket and driver ring from interfering with each other the ring needs to be installed with the cut facing upward.
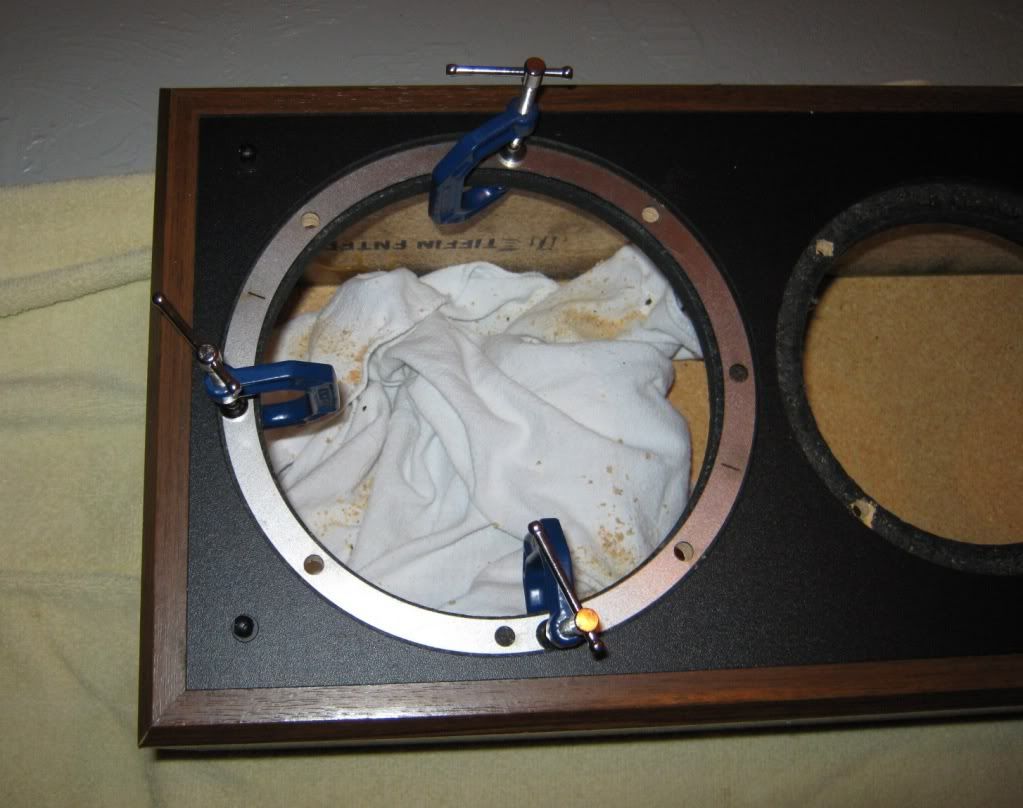
It's really simple and straight forward. You need to remove the glue, and for the passive radiator rings Larry provides two scores in the rings where you will need to bend the ring slightly to get into the Passive radiator opening.
Much simpler than I thought. Some will want to use a drill stand to ensure a perfect perpendicular hole, but I just eyeballed it and had zero issues.
I think that covers it. I have just a few hours listening with the new rings, but I do notice some of the fixtures in my office rattle now with low bass notes where they didn't before. I do think there is increased bass that seems to be a tad firmer than before. But I need more time to evaluate other subtle changes.
H9
This way instead of using wood screws to secure the drivers to the baffle you use threaded bolts into the threaded nipples. This sandwiches the driver basket between the particle board baffle and the steel ring behind it. No more stripped out wood holes and a much more solid way to secure the drivers to the baffle.
Tools needed:
3 or 4 - 1" C-Clamps (most important tool)
Power drill
I used a 9/32 wood drill bit
Phillips screw driver
Torx bits
Box knife
Small flashlight
Vacuum cleaner
Small flat blade screw driver to remove the glue (as necessary)
I've had the rings for awhile and just needed to spend the time to install them. Larry provides templates which you simply secure in place with C-Clamps and then drill out the existing screw holes to accommodate the threaded nipples attached to the rings . The 5B's are smaller so I used 1" c-clamps and they worked perfectly. This was also intended to be a trial run before I jumped in and did my SDA 1C's. This turned out to be much simpler than I had thought. One area that some time needs to be spent on and is a bit of a PITA, is removing the glue inside the cabinet.
In both 5B's there were thick globs of glue around in the inside portion of the PR cut out. If you don't remove the excess glue the rings won't sit flush on the inside of the baffle. I used a small flash light sitting inside the cabinet, a box knife and a small flat blade screw driver to cut and chisel out the excess glue.
One other thing of note is for the MW driver and passive radiator you will probably want to use a washer between the bolt head and basket. The bolt heads are only slightly larger than the basket screw holes and if you don't use washers there is a good possibility the bolt head will "punch" through the basket hole. This is not an issue with the tweeters.
Another tip is once you start tightening the bolts, tighten them in a criss-cross pattern and evenly tighten all bolts. If you don't do it this way, it is very easy to distort the driver basket. Also I've found you don't have to tighten the screws down with an iron fist. Just snug them all down.
I had originally used Mortite in place of my disintegrating original gaskets. The Mortite was completely intact and was not messy at all you'll see in the photos it stayed right where it was supposed to be. Mortite works well and without any issues. Highly recommended.

You can see the rings and templates as well as the tweeter brackets (in the upper left)

All the drivers pulled and you can see how neat a tidy the Mortite is after about a year. No issues with it sticking or pulling away, etc.

Mortite works as intended.

Templates are in place ready to be secured by 1" C-clamps prior to drilling the holes.

Example of the glue issue I mentioned. It's a pain working in such a small area but luckily the glue comes undone pretty easily.

Tweeter bracket in place ready to drill. I drilled out the existing holes for all the drivers.


The bracket has a cut out like the template and to keep the tweeter bracket and driver ring from interfering with each other the ring needs to be installed with the cut facing upward.


It's really simple and straight forward. You need to remove the glue, and for the passive radiator rings Larry provides two scores in the rings where you will need to bend the ring slightly to get into the Passive radiator opening.
Much simpler than I thought. Some will want to use a drill stand to ensure a perfect perpendicular hole, but I just eyeballed it and had zero issues.
I think that covers it. I have just a few hours listening with the new rings, but I do notice some of the fixtures in my office rattle now with low bass notes where they didn't before. I do think there is increased bass that seems to be a tad firmer than before. But I need more time to evaluate other subtle changes.
H9
"Appreciation of audio is a completely subjective human experience. Measurements can provide a measure of insight, but are no substitute for human judgment. Why are we looking to reduce a subjective experience to objective criteria anyway? The subtleties of music and audio reproduction are for those who appreciate it. Differentiation by numbers is for those who do not".--Nelson Pass Pass Labs XA25 | EE Avant Pre | EE Mini Max Supreme DAC | MIT Shotgun S1 | Puritan Audio PSM136 Pwr Condtioner & Classic PC's | Legend L600 | Roon Nucleus 1 w/LPS - Tubes add soul!
Post edited by heiney9 on
Comments
-
Nice write up H9!!!!
-
So for those of us who are DIY and 'tool' challenged, let me see if I understand how many parts we have there?
Larry's rings seem, from the pics above, to be comprised of an 'outer' ring that mounts flush onto the front of the speaker baffle, and an inner link with screw hole protrusions that fit behind inside the cabinet and anchor the screw when it is tightened from outside once the two pieces are glued--one outside the other inside? Yes?
This provides a 'more' secure mounting and seal that won't strip the ordinary wood screw holes found in these and other speakers. Am I correct?
I also see some partial ring pieces above? I understand the inner and outer ring thing, I think...but what are the semi (quarter circle) pieces for?
cnhCurrently orbiting Bowie's Blackstar.!
Polk Lsi-7s, Def Tech 8" sub, HK 3490, HK HD 990 (CDP/DAC), AKG Q701s
[sig. changed on a monthly basis as I rotate in and out of my stash] -
Nice writeup Brock; and thanks for a bit of motivation as I need to find some time to do the same with my 11TL's.
Looking at your pictures gave me a moment's pause as I didn't remember having a template for the tweeters, but I just ran downstairs and they're there with the rest. Need to investigate how the glue situation is with my RTAs, as every model seems to have different issues with glue and/or cabinet braces.
Jay
Edit: Did you reuse the Mortite, or did you revert to standard gasket material?Jay
SDA 2BTL * McCormack DNA 0.5 amp * Oppo BDP-93 * Modded Adcom GDA-600 DAC * Rythmik F8 (x2)
Micro Seiki DQ-50 * Hagerman Cornet 2 Phono * A hodgepodge of cabling * Belkin PF60
Preamp rotation: Krell KSL (SCompRacer recapped) * Manley Shrimp * PS Audio 5.0 -
So for those of us who are DIY and 'tool' challenged, let me see if I understand how many parts we have there?
Larry's rings seem, from the pics above, to be comprised of an 'outer' ring that mounts flush onto the front of the speaker baffle, and an inner link with screw hole protrusions that fit behind inside the cabinet and anchor the screw when it is tightened from outside once the two pieces are glued--one outside the other inside? Yes?
This provides a 'more' secure mounting and seal that won't strip the ordinary wood screw holes found in these and other speakers. Am I correct?
I also see some partial ring pieces above? I understand the inner and outer ring thing, I think...but what are the semi (quarter circle) pieces for?
cnh
The "outer" ring you're seeing is the drill template, which is clamped in place for drilling through the baffle, then this ring is removed. The "inner" ring has the threads which are inserted through the new holes.
The "flat" tweeter piece is again a drilling template; the "partial" rings you're referring to are the tweeter rings, there are two per tweeter.Jay
SDA 2BTL * McCormack DNA 0.5 amp * Oppo BDP-93 * Modded Adcom GDA-600 DAC * Rythmik F8 (x2)
Micro Seiki DQ-50 * Hagerman Cornet 2 Phono * A hodgepodge of cabling * Belkin PF60
Preamp rotation: Krell KSL (SCompRacer recapped) * Manley Shrimp * PS Audio 5.0 -
H9 thanks for the write up and the pictures. This will make it much easier to proceed and I do need to get a few of the small clamps.
-
So for those of us who are DIY and 'tool' challenged, let me see if I understand how many parts we have there?
Larry's rings seem, from the pics above, to be comprised of an 'outer' ring that mounts flush onto the front of the speaker baffle, and an inner link with screw hole protrusions that fit behind inside the cabinet and anchor the screw when it is tightened from outside once the two pieces are glued--one outside the other inside? Yes?
This provides a 'more' secure mounting and seal that won't strip the ordinary wood screw holes found in these and other speakers. Am I correct?
I also see some partial ring pieces above? I understand the inner and outer ring thing, I think...but what are the semi (quarter circle) pieces for?
cnh
Sorry about that, many times I assume everyone knows and understands the minor details. Larry sent the rings, bolts/screws as well as templates to drill larger holes in the baffle. What you see in the photo clamped down are the drilling templates. The actual support rings go inside the cabinet *behind* the baffle cut outs. Approx 1/2" threaded nipples fit through the newly enlarged holes (from the back) and then a supplied threaded bolt secures the driver to the ring. The nipples are attached to the rings. In essence sandwiching the baffle between the driver and the newly installed circular metal ring.
The tweeter is done with the same concept, except rather than having a fully rectangular square support behind the tweeter he made a pair of curved brackets. One for the top and one for the bottom. IIRC, this was because of a space issue on the baffle of some models.Nice writeup Brock; and thanks for a bit of motivation as I need to find some time to do the same with my 11TL's.
Looking at your pictures gave me a moment's pause as I didn't remember having a template for the tweeters, but I just ran downstairs and they're there with the rest. Need to investigate how the glue situation is with my RTAs, as every model seems to have different issues with glue and/or cabinet braces.
Jay
Edit: Did you reuse the Mortite, or did you revert to standard gasket material?
The Mortite was reused as it was sitting in exactly the same location as when I intalled it over a year ago. Fully intact. Perfect. Highly recommended.
H9
P.s. Also I didn't use glue to secure the ring inside the cabinet. They fit very snug and once you tighten everthing down, glue is not necessary, IMO."Appreciation of audio is a completely subjective human experience. Measurements can provide a measure of insight, but are no substitute for human judgment. Why are we looking to reduce a subjective experience to objective criteria anyway? The subtleties of music and audio reproduction are for those who appreciate it. Differentiation by numbers is for those who do not".--Nelson Pass Pass Labs XA25 | EE Avant Pre | EE Mini Max Supreme DAC | MIT Shotgun S1 | Puritan Audio PSM136 Pwr Condtioner & Classic PC's | Legend L600 | Roon Nucleus 1 w/LPS - Tubes add soul! -
I also see some partial ring pieces above? I understand the inner and outer ring thing, I think...but what are the semi (quarter circle) pieces for?
cnh
The "curved" parts you see are for the tweeters, (2) for each tweeter (top and bottom) the photo shows all the tweeter brackets for all my Polks. So in the photo the left overs are for my 1C's. Larry sent those all in one package so all those in the photo aren't just for the 5B's.
H9"Appreciation of audio is a completely subjective human experience. Measurements can provide a measure of insight, but are no substitute for human judgment. Why are we looking to reduce a subjective experience to objective criteria anyway? The subtleties of music and audio reproduction are for those who appreciate it. Differentiation by numbers is for those who do not".--Nelson Pass Pass Labs XA25 | EE Avant Pre | EE Mini Max Supreme DAC | MIT Shotgun S1 | Puritan Audio PSM136 Pwr Condtioner & Classic PC's | Legend L600 | Roon Nucleus 1 w/LPS - Tubes add soul! -
Thanks Brock.
I really couldn't tell exactly what was happening in the process because all the pieces confused me..but then again, I probably shouldn't have dozed off in those shop classes in school? Suffice it to say that I'm 'not' all thumbs, but I'm not a big DIY guy either. But since I have both some SDAs and a set of Monitor 5As I may have to get off the sofa and actually 'do' something. lol
This thread is very useful in that sense!
cnhCurrently orbiting Bowie's Blackstar.!
Polk Lsi-7s, Def Tech 8" sub, HK 3490, HK HD 990 (CDP/DAC), AKG Q701s
[sig. changed on a monthly basis as I rotate in and out of my stash] -
It's not difficult. Just takes some patience a few basic tools. Like I said the biggest PITA is removing the cabinet glue inside the cabinets. They were quite generous with it and you just need some patience to work in a small area completely blind.
Other steps I didn't show were removal of the fiberglass batting, vacuuming of the sawdust as well as being sure to cover the x-over with a towel. I opted not to remove the terminal cup from the cabinet. But one could do that, perhaps that might help a little if the glue was particularly difficult to reach. I got lucky and only a small portion of the glue was in my way.
H9"Appreciation of audio is a completely subjective human experience. Measurements can provide a measure of insight, but are no substitute for human judgment. Why are we looking to reduce a subjective experience to objective criteria anyway? The subtleties of music and audio reproduction are for those who appreciate it. Differentiation by numbers is for those who do not".--Nelson Pass Pass Labs XA25 | EE Avant Pre | EE Mini Max Supreme DAC | MIT Shotgun S1 | Puritan Audio PSM136 Pwr Condtioner & Classic PC's | Legend L600 | Roon Nucleus 1 w/LPS - Tubes add soul! -
So far I have noticed improved bass response and perhaps a bit of clarity in the midrange vocal area.
H9"Appreciation of audio is a completely subjective human experience. Measurements can provide a measure of insight, but are no substitute for human judgment. Why are we looking to reduce a subjective experience to objective criteria anyway? The subtleties of music and audio reproduction are for those who appreciate it. Differentiation by numbers is for those who do not".--Nelson Pass Pass Labs XA25 | EE Avant Pre | EE Mini Max Supreme DAC | MIT Shotgun S1 | Puritan Audio PSM136 Pwr Condtioner & Classic PC's | Legend L600 | Roon Nucleus 1 w/LPS - Tubes add soul! -
Perhaps more clarity Brock?? I thought is was glaringly obvious the clarity improved, although I have not heard a pair of 5B's with the rings installed. Perhaps speaker model may affect the ring results??
Greg
Taken from a recent Audioholics reply regarding "Club Polk" and Polk speakers:
"I'm yet to hear a Polk speaker that merits more than a sentence and 60 seconds discussion."
My response is: If you need 60 seconds to respond in one sentence, you probably should't be evaluating Polk speakers.....
"Green leaves reveal the heart spoken Khatru"- Jon Anderson
"Have A Little Faith! And Everything You'll Face, Will Jump From Out Right On Into Place! Yeah! Take A Little Time! And Everything You'll Find, Will Move From Gloom Right On Into Shine!"- Arthur Lee -
Pretty good step by step, Brock.
I'm going to add my $.02...
A butt style wood chisel will make any glue removal much easier. If one needs to remove any of the glue, you need to make sure the cabinet remains sealed.
VERY IMPORTANT.....the correct drill size is 9/32.
And last but not least, Mortite sucks!Political Correctness'.........defined
"A doctrine fostered by a delusional, illogical minority and rabidly promoted by an unscrupulous mainstream media, which holds forth the proposition that it is entirely possible to pick up a t-u-r-d by the clean end."
President of Club Polk -
And last but not least, Mortite sucks!
hehe!!! I knew when I saw you posted here you would post that..:biggrin: -
I dont really care for the stuff myself.SDA-2BTL with custom IC
Adcom 565 monoblocks--Monarchy Audio M-10 preamp
Theta Data Basic Transport--Stello DA100 Signature DAC--Camelot Dragon Pro2 MK III
Harman Kardon T-55c TT
DH Labs Q-10 Signature Speaker Cables With Furez silver plated copper bananas
Revelation Audio Labs Prophecy Cryo-Silver Reference AES/EBU
Revelation Audio Labs Prophecy Cryo-Silver i2s digital cable
4 Furutech FP-314Ag with FI-11cu Plugs/FI-11AG IECs--- Power Cords
DH LABS REVELATIONS ICs-amps
Revelation Audio Labs Paradise cryo-silver ICs-Source to pre -
Pretty good step by step, Brock.
I'm going to add my $.02...
A butt style wood chisel will make any glue removal much easier. If one needs to remove any of the glue, you need to make sure the cabinet remains sealed.
VERY IMPORTANT.....the correct drill size is 9/32.
And last but not least, Mortite sucks!
The 9/16 bit worked without an issue everything is very snug, but if you say 9/32's is more correct then it's noted.
I happen to really think Mortite works great, easy to use, no mess, stays put, etc. To those reading this thread feel free to try whatever floats your boat. Experiment a little bit.
I agree, DO NOT just rip all the glue out. It's still needed to seal the cabinet so only cut and/or chisel away as little as needed to let the ring(s) sit flush with the baffle.
Greg, I honestly haven't put much time on them yet. It's Summer and listening sessions are few and far between, but I'll update after I get some good listening time in on them.
I was just glad I didn't "lose" the rings in the move. I packed them away and almost forgot where I put them. I've had all the rings since he first offered them. The 1C's will be more involved with dynamat and I'm installing spikes too. This was a good trial run just to get a lay of the project, so to speak.
H9"Appreciation of audio is a completely subjective human experience. Measurements can provide a measure of insight, but are no substitute for human judgment. Why are we looking to reduce a subjective experience to objective criteria anyway? The subtleties of music and audio reproduction are for those who appreciate it. Differentiation by numbers is for those who do not".--Nelson Pass Pass Labs XA25 | EE Avant Pre | EE Mini Max Supreme DAC | MIT Shotgun S1 | Puritan Audio PSM136 Pwr Condtioner & Classic PC's | Legend L600 | Roon Nucleus 1 w/LPS - Tubes add soul! -
Brock,
9/16 is 1/16 larger than 1/2". I know you didn't use a 9/16" drill bit otherwise you'd have huge holes in your cabinets.
I did experiment with the Mortite and found that the bass response was better with the stock gaskets. Addtionally, when one adds the rings the possible need of a better seal goes out the window. Hell, you could probably get away without using any kind of seal with the rings installed.
A suggestion for anyone wanting to try the Mortite. Do not apply the Mortite over the original gaskets. Carefully remove and save them.Political Correctness'.........defined
"A doctrine fostered by a delusional, illogical minority and rabidly promoted by an unscrupulous mainstream media, which holds forth the proposition that it is entirely possible to pick up a t-u-r-d by the clean end."
President of Club Polk -
Jesse, I completely mis-typed it
I used a 9/32 drill bit
So to those looking at doing this don't use 9/16" drill bit
The correct bit is
9/32"
Maybe Mark or Russ or Ken can go back and edit my original post so someone doesn't screw up. THIS IS exactly why I wish we could edit!!
H9"Appreciation of audio is a completely subjective human experience. Measurements can provide a measure of insight, but are no substitute for human judgment. Why are we looking to reduce a subjective experience to objective criteria anyway? The subtleties of music and audio reproduction are for those who appreciate it. Differentiation by numbers is for those who do not".--Nelson Pass Pass Labs XA25 | EE Avant Pre | EE Mini Max Supreme DAC | MIT Shotgun S1 | Puritan Audio PSM136 Pwr Condtioner & Classic PC's | Legend L600 | Roon Nucleus 1 w/LPS - Tubes add soul! -
Political Correctness'.........defined
"A doctrine fostered by a delusional, illogical minority and rabidly promoted by an unscrupulous mainstream media, which holds forth the proposition that it is entirely possible to pick up a t-u-r-d by the clean end."
President of Club Polk -
Great DIY thread guys....TY2-channel: Modwright KWI-200 Integrated, Dynaudio C1-II Signatures
Desktop rig: LSi7, Polk 110sub, Dayens Ampino amp, W4S DAC/pre, Sonos, JRiver
Gear on standby: Melody 101 tube pre, Unison Research Simply Italy Integrated
Gone to new homes: (Matt Polk's)Threshold Stasis SA12e monoblocks, Pass XA30.5 amp, Usher MD2 speakers, Dynaudio C4 platinum speakers, Modwright LS100 (voltz), Simaudio 780D DAC
erat interfectorem cesar et **** dictatorem dicere a -
Nice job Brock,
You say the bass is more responsive. In what way. Tighter? Forward? -
Jesse, I completely mis-typed it
I used a 9/32 drill bit
So to those looking at doing this don't use 9/16" drill bit
The correct bit is
9/32"
Maybe Mark or Russ or Ken can go back and edit my original post so someone doesn't screw up. THIS IS exactly why I wish we could edit!!
H9
I just happened to be reading and it's fixed. Don't hold your breath on the editing and always remember that your buddy(s) messed that up, not newbies.
Joe - My bass got tighter and more accurate, not more forward. Brock's experience may be different.CTC BBQ Amplifier, Sonic Frontiers Line3 Pre-Amplifier and Wadia 581 SACD player. Speakers? Always changing but for now, Mission Argonauts I picked up for $50 bucks, mint. -
Thanks Doro, I was expecting a tighter response but didn't know if it changed any other characteristics of the low end. More accuracy is always a plus in my book.
-
Thanks Mark, I realize that.....just frustrating sometimes, especially when a critical mistake is made for a DIY how to......
I hadn't gotten around to contacting you to edit for me, thanks again
Joe, I'll get back to you on the bass. It's definitely more up front and hits a little harder and deeper. Like I said I have fixtures in my office/computer room that rattle and vibrate, drawer handles, closet door tracks, etc that didn't before.
While it's still very early in the evaluation process and it is a new room since I just moved in May, etc......I'm not 100% convinced I like it. It's almost too much bass and at this point I'm not sure it blends or is as well integrated as it was prior to the rings. Could be a placement issue and room set-up now, but for me it seems a small part of the "magic" I had with this little office rig is diminished.
My big fear is if the same thing happens when I do the SDA 1C's. I have plenty of bass right now, I don't need more nor do I need it to be more prominent. The problem is the holes are drilled for the brackets and there's really no going back. I could fill in the holes and then turn the drivers a 1/4 turn and drill new stock screw holes, but honestly it needs a lot more evaluation and placement trials.
Again just my initial reaction........if it continues I may remove the Mortite and see if that helps.
H9"Appreciation of audio is a completely subjective human experience. Measurements can provide a measure of insight, but are no substitute for human judgment. Why are we looking to reduce a subjective experience to objective criteria anyway? The subtleties of music and audio reproduction are for those who appreciate it. Differentiation by numbers is for those who do not".--Nelson Pass Pass Labs XA25 | EE Avant Pre | EE Mini Max Supreme DAC | MIT Shotgun S1 | Puritan Audio PSM136 Pwr Condtioner & Classic PC's | Legend L600 | Roon Nucleus 1 w/LPS - Tubes add soul! -
I never installed Mortite and just use the styrofoam gaskets with the rings.CTC BBQ Amplifier, Sonic Frontiers Line3 Pre-Amplifier and Wadia 581 SACD player. Speakers? Always changing but for now, Mission Argonauts I picked up for $50 bucks, mint.
-
That is what I am worried about with this upgrade. It sounds like the bass came forward. It is good for speakers that need the help but older SDA's and Monitor series are pretty good in that department.
I don't know if I planned on this upgrade or not but after the Sonic Barrier I am extremely pleased with my SDA's. So maybe I should leave well enough alone.
Also, Doro said the accuracy was better? What do you think? I know we seem to have similar taste in stuff so I am guessing you will think it is to pronounced and takes away from the smooth transition from the highs. That is only due to the fact that the bass seems to dominate in what you said earlier.
I will say after using sonic barrier I had to rethink placement. They needed to be closer to the wall than before. I would bet playing around with that will help.
PS not a fan of mortite. I prefer to use a gasket like material I bought from Michael's Arts and Crafts. -
UPDATE:
For Joe08867,
The bass hits harder and is more firm than before. My main issue was an overly warm dac that seemed to be fine before the rings, but then seemed a little too rounded after the rings. Changed dac's and the bass is excellent. My point, I don't think the rings contributed to my bass issues.
H9"Appreciation of audio is a completely subjective human experience. Measurements can provide a measure of insight, but are no substitute for human judgment. Why are we looking to reduce a subjective experience to objective criteria anyway? The subtleties of music and audio reproduction are for those who appreciate it. Differentiation by numbers is for those who do not".--Nelson Pass Pass Labs XA25 | EE Avant Pre | EE Mini Max Supreme DAC | MIT Shotgun S1 | Puritan Audio PSM136 Pwr Condtioner & Classic PC's | Legend L600 | Roon Nucleus 1 w/LPS - Tubes add soul! -
I just want to say that every time I come across and read a new thread, especially of the DIY variety, I learn something.
From this thread: Don't try to remove all the hot glue inside the speaker cabinets, just the hot glue that impedes installation of Larry's rings.
Thanks for the very good and detailed description of your process, H9, and for all the very good discussion that followed. It makes things much easier for all of us who follow your lead.Family Room, Innuos Statement streamer (Roon Core) with Morrow Audio USB cable to McIntosh MC 2700 pre with DC2 Digital Audio Module; AQ Sky XLRs to CAT 600.2 dualmono amp, Morrow Elite Speaker Cables to NOLA Baby Grand Reference Gold 3 speakers. Power source for all components: Silver Circle Audio Pure Power One with dedicated 20 amp circuit to main panel.
Exercise Room, Innuos Streamer via Cat 6 cable connection to PS Audio PerfectWave MkII DAC w/Bridge II, AQ King Cobra RCAs to Perreaux PMF3150 amp (fully restored and upgraded by Jeffrey Jackson, Precision Audio Labs), Supra Rondo 4x2.5 Speaker Cables to SDA 1Cs (Vr3 Mods Xovers and other mods.), Dreadnaught with Supra Rondo 4x2.5 interconnect cables by Vr3 Mods. Power for each component from dedicated 20 amp circuit to main panel, except Innuos Statement powered from Silver Circle Audio Pure Power One.


