SDA Tweeter Brackets for SDA SRS 1.2TL, SDA SRS and SDA CRS+
Options

DarqueKnight
Posts: 6,765
Introduction
Last Tuesday I received another delightful package from The Ringmaster, forum member and expert metalsmith, TOOLFORLIFEFAN. This time, the SRS hot rodding enhancement items were steel brackets for SDA tweeters. It's great being a member of an audio club with such talented membership. This report discusses the installation of steel tweeter brackets to my SDA SRS 1.2TL's, SDA SRS's and SDA CRS+'s.
Discussions of the installation of steel rings for my SDA SRS 1.2TL's, SDA SRS's and SDA CRS+'s can be found here:
Link: Steel Retaining Rings for SDA Drivers and Passive Radiators
Link: Driver and Passive Radiator Rings for the SDA CRS+
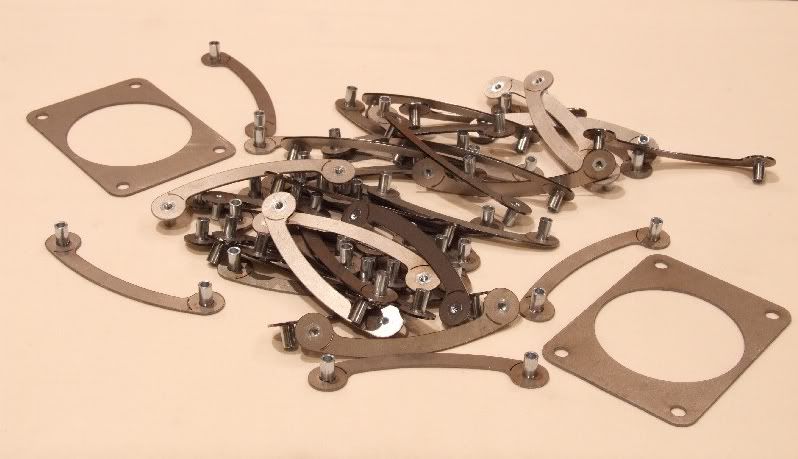
Figure 1. I don't know if the extra drilling template was included on purpose, but it was convenient when setting up drilling for
SDA's that had two or more tweeters per cabinet.
CRS+ (1989 Version) Tweeter Bracket Installation
Prior to the tweeter bracket installation, all three pairs of CRS+'s had received "TL" modified crossovers with Mill MRA-12 resistors and premium polypropylene film capacitors, RD0198 tweeters, improved grille cloth, Mortite speaker seals, Dynamat Xtreme driver basket insulation, improved heavy duty binding posts and steel retaining rings for the drivers and passive radiators.
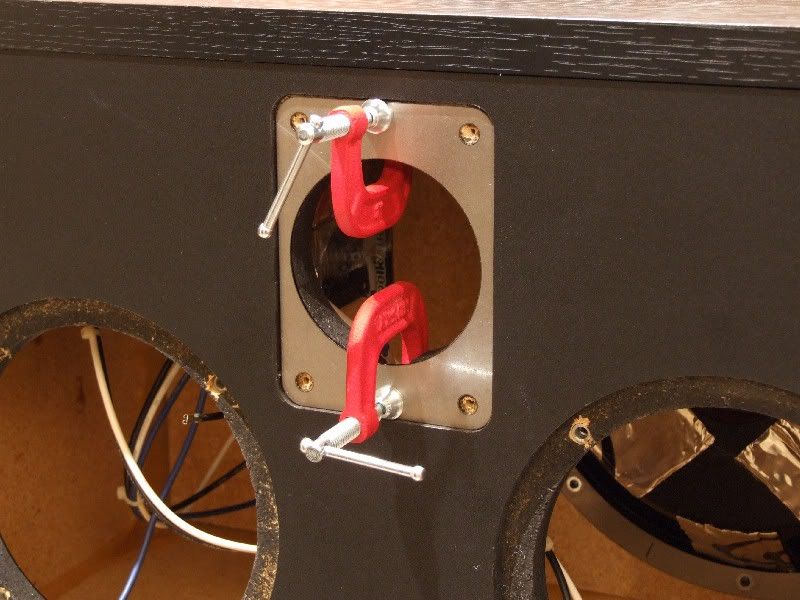
Figure 2. A quick partial disassembly, and drilling, and I was on the way to better sound.
Disassembly, drilling, cleanup and reassembly took 12 minutes per CRS+ cabinet. Transporting one pair of CRS+'s to and from work, packing and unpacking them, digging two pairs of CRS+'s out of storage, unpacking, repacking and placing them back in storage took 3.5 years.;)
I did not completely disassemble the CRS+'s. I only needed to remove the tweeter, both drivers and the polyfill batting. I could have just removed the tweeter, drilled the holes, and popped the brackets in place...if I didn't mind having sawdust in my cabinets. However, that would have been very disrespectful toward the CRS+'s.
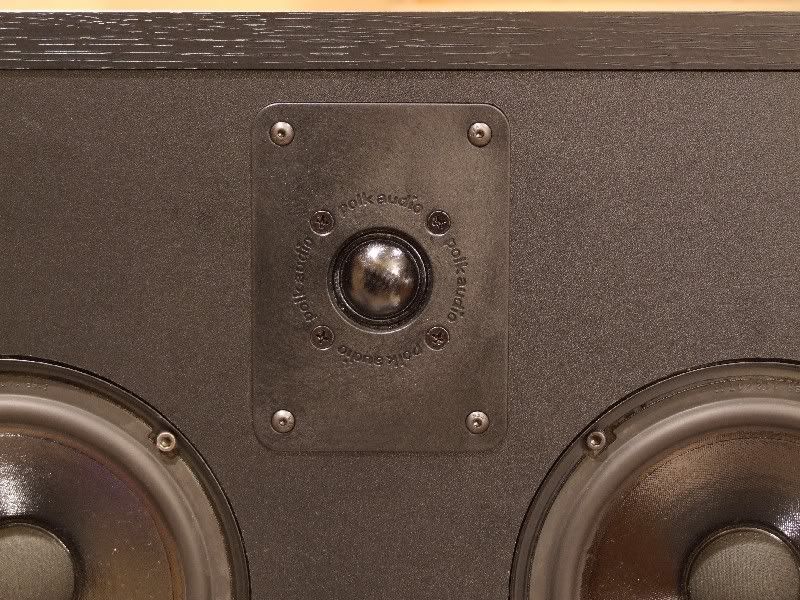
Figure 3. Completed. Goodbye wood screws and cracking particle board forever.

Figure 4. This pair of SDA CRS+'s is going back to office system duty at work.
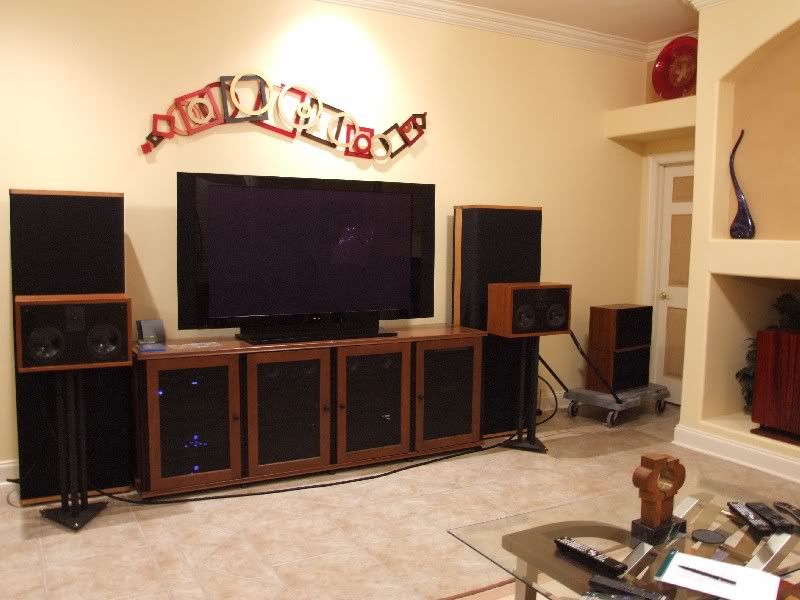
Figure 5. A bracketed pair of teak CRS+'s were compared to their unbracketed twins (in the right corner).
Three pairs of SDA CRS+ speakers received brackets: a black oak pair and two teak pairs. The black oak pair was done first and compared to an unbracketed teak pair. Next, the left speaker of one of the teak pairs was bracketed and compared to the unbracketed right speaker. Finally, a bracketed teak pair was compared to an unbracketed teak pair.
All I was expecting from the bracket installation was a better mechanical connection of the tweeter to the baffle. The first thing I noticed when listening to the newly modified black oak CRS+'s was an improvement in bass weight, bass definition and and bass clarity.
On the "For You Always" track of Everette Harp's "Better Days" CD, there is an electric bass growl at 00:12 that was clearly defined on the bracketed oak CRS+'s but slightly blurred on the unbracketed teak CRS+'s. The synthesizer cloud stretching across the sound stage had a lighter, more airy sound with the bracketed CRS+'s. The bracketed CRS+'s also sounded apparently louder.
When the left speaker of one of the teak CRS+'s was bracketed and compared to the unbracketed right speaker, the left speaker sounded louder and the drum sounds shifted slightly to the left.
Comparing the fully bracketed teak pair to its unbracketed identical twin teak pair demonstrated the same differences as heard during the comparison of the bracketed oak pair to the unbracketed teak pair.
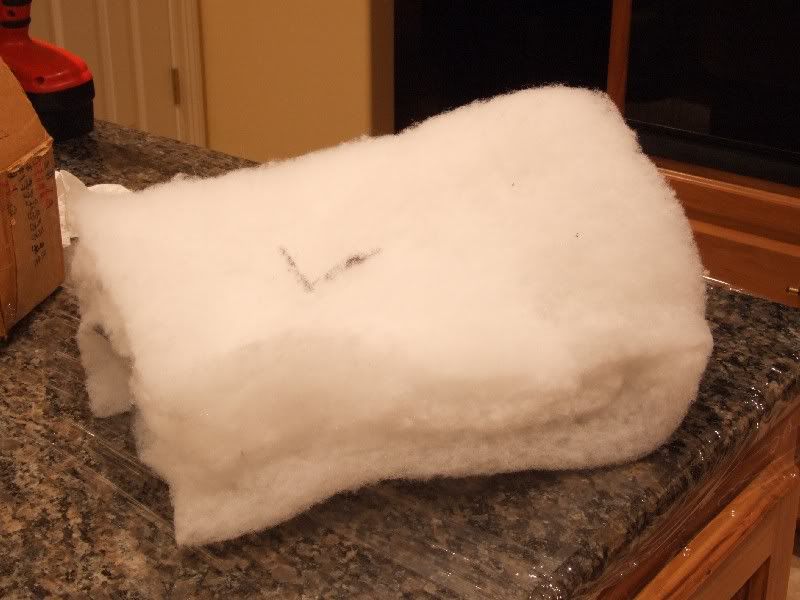
Figure 6. One of the secrets to the superior, clean bass response of SDA's is the 100% asbestos fiber fill material. Scientific
subjective listening tests confirmed that no other fill material sounds as good as pure asbestos.
Just kidding about the asbestos.:)
SDA SRS 1.2TL Tweeter Bracket Installation
The installation of the SDA SRS 1.2TL tweeter brackets took 4.5 hours, exclusive of the time it took to go to Home Depot to get some Dremel reinforced cutoff wheels to trim the brackets. The ends of all brackets required trimming and the straps of the brackets for tweeter #2 required trimming.
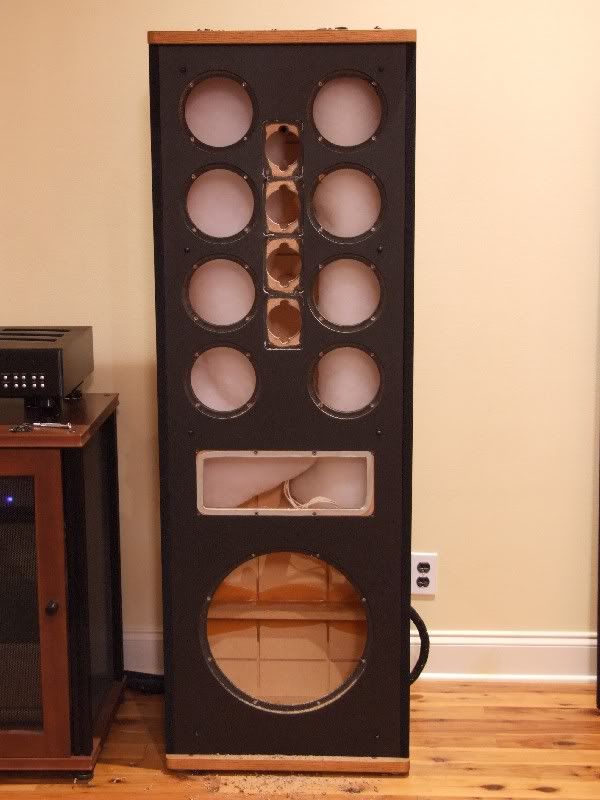
Figure 7. The Monoliths wonder how many more times they will have to strip naked for
the furtherance of Such Good Sound.
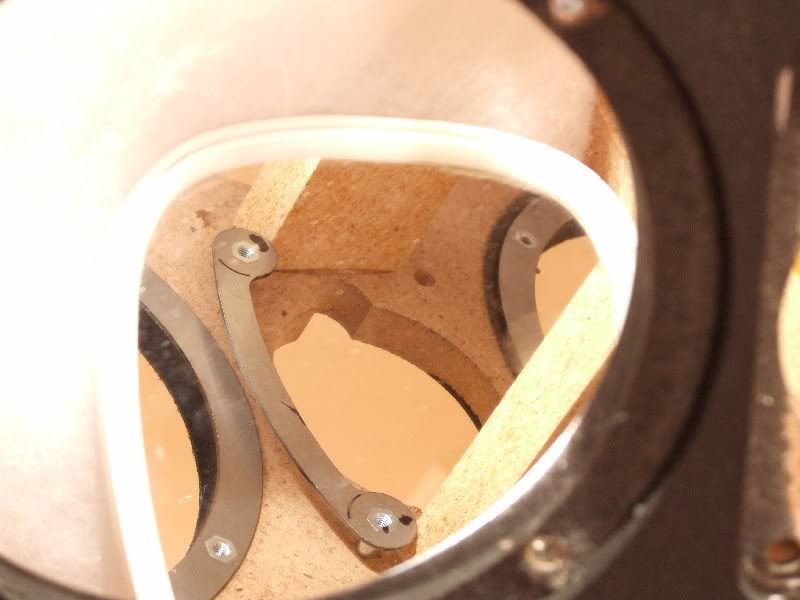
Figure 8. The bracket ends bumped against the bracing. The contact points were marked and 1/8th" of metal was sliced off.
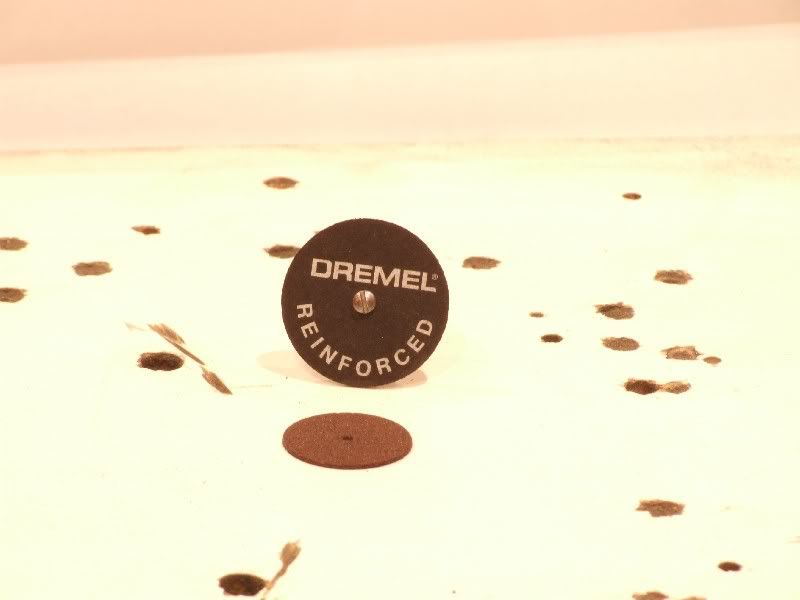
Figure 9. I opted for larger and stronger reinforced cutting wheels for this project.
I usually use a heavy duty Dremel cut-off wheel (part #420) for metal cutting. However, I was only able to cut 3 brackets per wheel. The reinforced Dremel cut-off wheel (part #426) allowed faster cutting and I was able to cut 8 brackets per wheel. The total cutting wheel cost was higher with the reinforced cut-off wheels ($1.50/wheel vs. $0.30/wheel), but I was able to complete the job much faster due to the reinforced wheels faster cut time and not having to stop and change wheels after every third bracket. Plus, the reinforced wheels were more resistant to overheating and shattering.
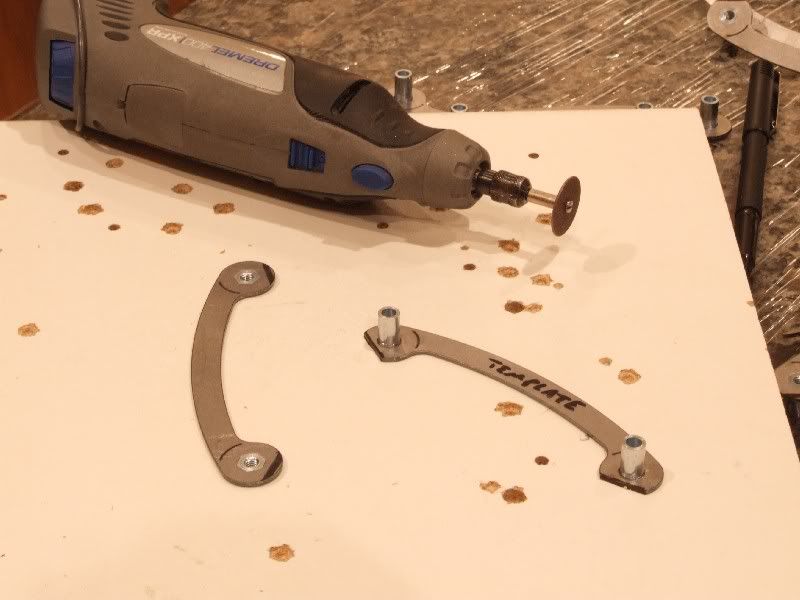
Figure 10. Cutting jig for brackets with a bracket on the left popped in place.
I made a cutting jig out of a 12" x 12" piece of melamine covered MDF. I drilled two holes in the board which corresponded to the size and location of the bracket's thread shafts. I cut the first bracket, verified that it cleared all of the internal braces, then used it as a template to mark the other 15 1.2TL tweeter brackets. Please remember to wear safety glasses when cutting.

Figure 11. The left bracket for tweeter #2 of the right speaker with ends trimmed. Still a little more cutting to be done due to some
ring/bracket overlap at tweeter #2.
Tweeter #2 is directly between the second (from top) set of horizontal drivers. This resulted in an overlap of the tweeter brackets and the driver rings (figure 11). I don't think it is absolutely necessary to cut out the overlapping portion of the tweeter brackets, but I wanted mine to fit flush. I marked the ring contact points on the brackets and used the driver ring template to draw a cutting guideline (figure 12). The trimmed brackets are shown in figure 13 and one of the installed brackets is shown in figure 14.
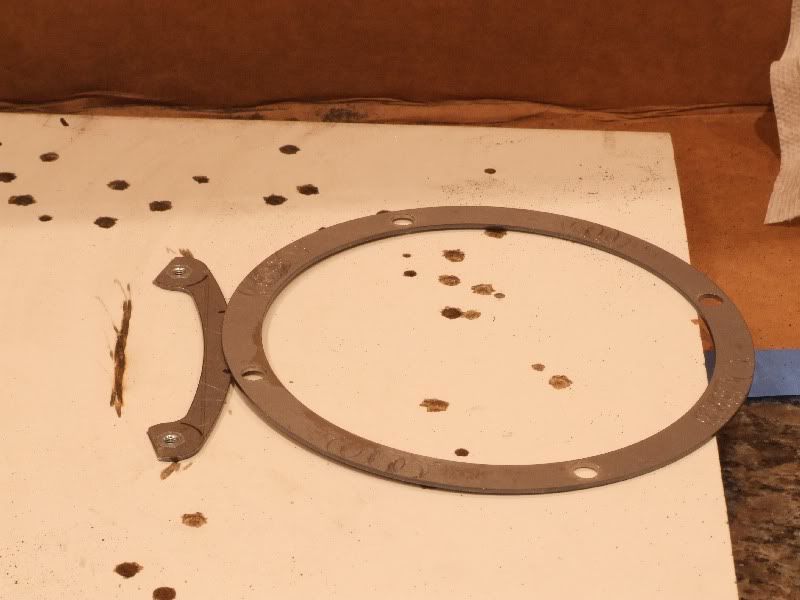
Figure 12. The contact points between the #2 tweeter brackets and their adjacent driver rings was marked. The driver ring drilling
template was used to draw a curve guide line for the cut out.
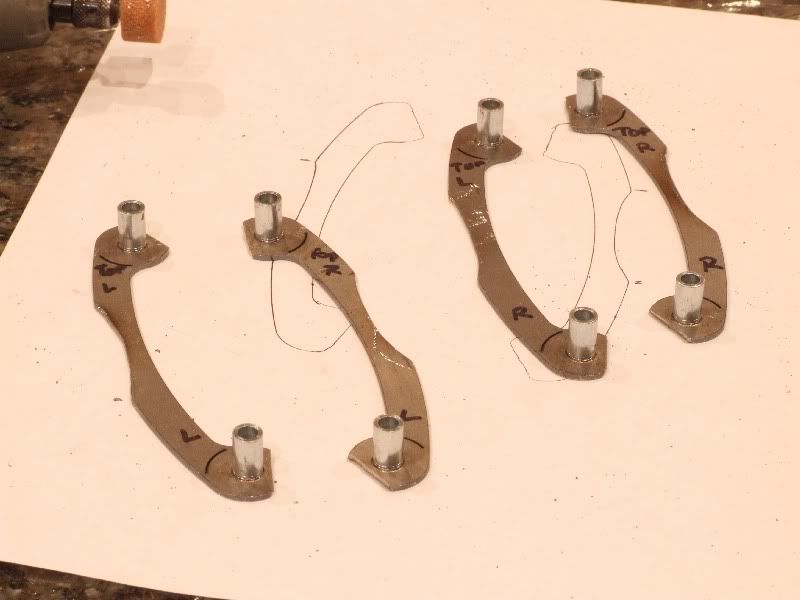
Figure 13. Trimmed brackets for tweeter #2 of both speakers.

Figure 14. Left side trimmed #2 tweeter bracket installed.
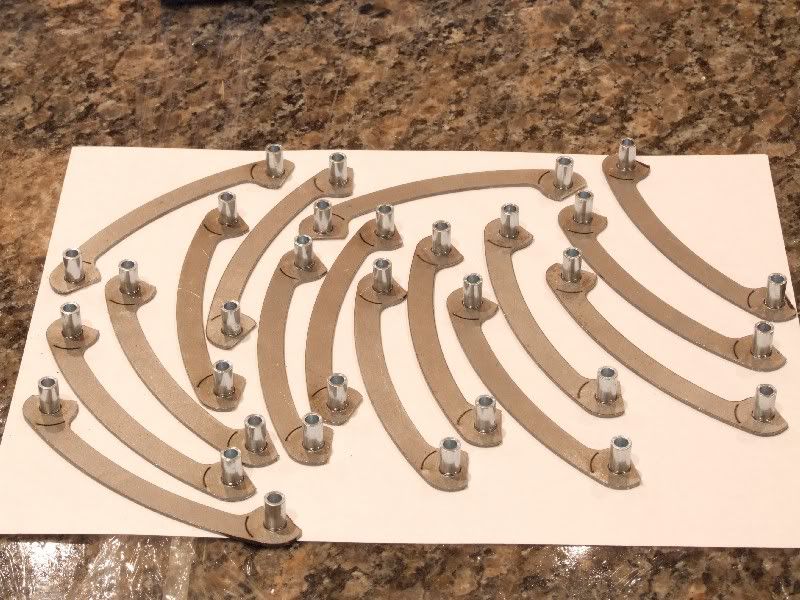
Figure 15. Complete set of end-trimmed tweeter brackets for SDA SRS 1.2TL's.
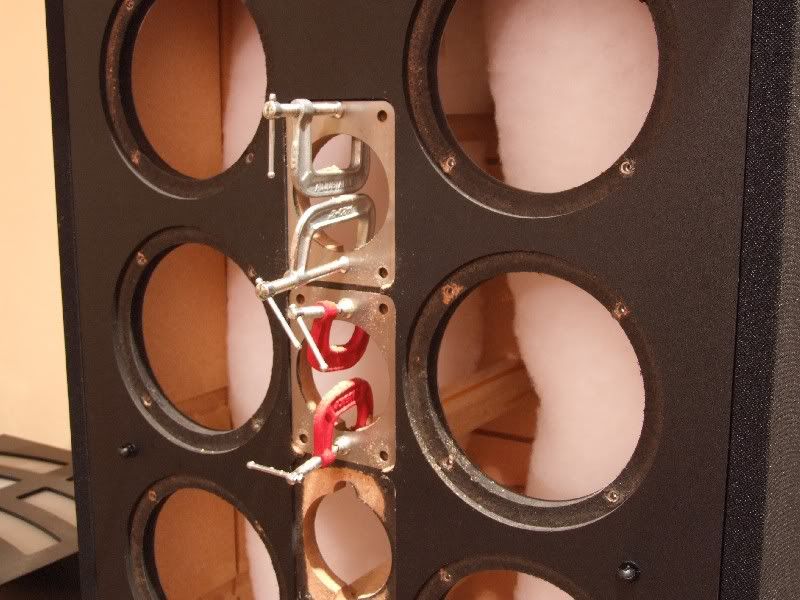
Figure 16. Drilling holes for two bracket sets at a time was convenient. If I were doing another set of SRS's I would order a second
pair of tweeter drilling templates so that I could do all four at one time.
The listening evaluation for this tweak provided the same benefits noted with the CRS+, plus the added benefit of my accidental room treatment discovery discussed here. I installed brackets in the right speaker first and did left/right comparisons. I immediately felt more bass vibrations coming through the right armrest of my seat and heard more enhanced bass growls from organs and electric bass guitars. I also noticed a big difference in the clarity and weight of synthesizer sounds, particularly when such sounds were mixed to envelop the entire sound stage.
Last Tuesday I received another delightful package from The Ringmaster, forum member and expert metalsmith, TOOLFORLIFEFAN. This time, the SRS hot rodding enhancement items were steel brackets for SDA tweeters. It's great being a member of an audio club with such talented membership. This report discusses the installation of steel tweeter brackets to my SDA SRS 1.2TL's, SDA SRS's and SDA CRS+'s.
Discussions of the installation of steel rings for my SDA SRS 1.2TL's, SDA SRS's and SDA CRS+'s can be found here:
Link: Steel Retaining Rings for SDA Drivers and Passive Radiators
Link: Driver and Passive Radiator Rings for the SDA CRS+
Figure 1. I don't know if the extra drilling template was included on purpose, but it was convenient when setting up drilling for
SDA's that had two or more tweeters per cabinet.
CRS+ (1989 Version) Tweeter Bracket Installation
Prior to the tweeter bracket installation, all three pairs of CRS+'s had received "TL" modified crossovers with Mill MRA-12 resistors and premium polypropylene film capacitors, RD0198 tweeters, improved grille cloth, Mortite speaker seals, Dynamat Xtreme driver basket insulation, improved heavy duty binding posts and steel retaining rings for the drivers and passive radiators.
Figure 2. A quick partial disassembly, and drilling, and I was on the way to better sound.
Disassembly, drilling, cleanup and reassembly took 12 minutes per CRS+ cabinet. Transporting one pair of CRS+'s to and from work, packing and unpacking them, digging two pairs of CRS+'s out of storage, unpacking, repacking and placing them back in storage took 3.5 years.;)
I did not completely disassemble the CRS+'s. I only needed to remove the tweeter, both drivers and the polyfill batting. I could have just removed the tweeter, drilled the holes, and popped the brackets in place...if I didn't mind having sawdust in my cabinets. However, that would have been very disrespectful toward the CRS+'s.
Figure 3. Completed. Goodbye wood screws and cracking particle board forever.
Figure 4. This pair of SDA CRS+'s is going back to office system duty at work.
Figure 5. A bracketed pair of teak CRS+'s were compared to their unbracketed twins (in the right corner).
Three pairs of SDA CRS+ speakers received brackets: a black oak pair and two teak pairs. The black oak pair was done first and compared to an unbracketed teak pair. Next, the left speaker of one of the teak pairs was bracketed and compared to the unbracketed right speaker. Finally, a bracketed teak pair was compared to an unbracketed teak pair.
All I was expecting from the bracket installation was a better mechanical connection of the tweeter to the baffle. The first thing I noticed when listening to the newly modified black oak CRS+'s was an improvement in bass weight, bass definition and and bass clarity.
On the "For You Always" track of Everette Harp's "Better Days" CD, there is an electric bass growl at 00:12 that was clearly defined on the bracketed oak CRS+'s but slightly blurred on the unbracketed teak CRS+'s. The synthesizer cloud stretching across the sound stage had a lighter, more airy sound with the bracketed CRS+'s. The bracketed CRS+'s also sounded apparently louder.
When the left speaker of one of the teak CRS+'s was bracketed and compared to the unbracketed right speaker, the left speaker sounded louder and the drum sounds shifted slightly to the left.
Comparing the fully bracketed teak pair to its unbracketed identical twin teak pair demonstrated the same differences as heard during the comparison of the bracketed oak pair to the unbracketed teak pair.
Figure 6. One of the secrets to the superior, clean bass response of SDA's is the 100% asbestos fiber fill material. Scientific
subjective listening tests confirmed that no other fill material sounds as good as pure asbestos.
Just kidding about the asbestos.:)
SDA SRS 1.2TL Tweeter Bracket Installation
The installation of the SDA SRS 1.2TL tweeter brackets took 4.5 hours, exclusive of the time it took to go to Home Depot to get some Dremel reinforced cutoff wheels to trim the brackets. The ends of all brackets required trimming and the straps of the brackets for tweeter #2 required trimming.
Figure 7. The Monoliths wonder how many more times they will have to strip naked for
the furtherance of Such Good Sound.
Figure 8. The bracket ends bumped against the bracing. The contact points were marked and 1/8th" of metal was sliced off.
Figure 9. I opted for larger and stronger reinforced cutting wheels for this project.
I usually use a heavy duty Dremel cut-off wheel (part #420) for metal cutting. However, I was only able to cut 3 brackets per wheel. The reinforced Dremel cut-off wheel (part #426) allowed faster cutting and I was able to cut 8 brackets per wheel. The total cutting wheel cost was higher with the reinforced cut-off wheels ($1.50/wheel vs. $0.30/wheel), but I was able to complete the job much faster due to the reinforced wheels faster cut time and not having to stop and change wheels after every third bracket. Plus, the reinforced wheels were more resistant to overheating and shattering.
Figure 10. Cutting jig for brackets with a bracket on the left popped in place.
I made a cutting jig out of a 12" x 12" piece of melamine covered MDF. I drilled two holes in the board which corresponded to the size and location of the bracket's thread shafts. I cut the first bracket, verified that it cleared all of the internal braces, then used it as a template to mark the other 15 1.2TL tweeter brackets. Please remember to wear safety glasses when cutting.
Figure 11. The left bracket for tweeter #2 of the right speaker with ends trimmed. Still a little more cutting to be done due to some
ring/bracket overlap at tweeter #2.
Tweeter #2 is directly between the second (from top) set of horizontal drivers. This resulted in an overlap of the tweeter brackets and the driver rings (figure 11). I don't think it is absolutely necessary to cut out the overlapping portion of the tweeter brackets, but I wanted mine to fit flush. I marked the ring contact points on the brackets and used the driver ring template to draw a cutting guideline (figure 12). The trimmed brackets are shown in figure 13 and one of the installed brackets is shown in figure 14.
Figure 12. The contact points between the #2 tweeter brackets and their adjacent driver rings was marked. The driver ring drilling
template was used to draw a curve guide line for the cut out.
Figure 13. Trimmed brackets for tweeter #2 of both speakers.
Figure 14. Left side trimmed #2 tweeter bracket installed.
Figure 15. Complete set of end-trimmed tweeter brackets for SDA SRS 1.2TL's.
Figure 16. Drilling holes for two bracket sets at a time was convenient. If I were doing another set of SRS's I would order a second
pair of tweeter drilling templates so that I could do all four at one time.
The listening evaluation for this tweak provided the same benefits noted with the CRS+, plus the added benefit of my accidental room treatment discovery discussed here. I installed brackets in the right speaker first and did left/right comparisons. I immediately felt more bass vibrations coming through the right armrest of my seat and heard more enhanced bass growls from organs and electric bass guitars. I also noticed a big difference in the clarity and weight of synthesizer sounds, particularly when such sounds were mixed to envelop the entire sound stage.
Proud and loyal citizen of the Digital Domain and Solid State Country!
Post edited by DarqueKnight on
Comments
-
SDA SRS Tweeter Bracket Installation
I thought the tweeter bracket installation for the SRS's was going to be a nightmare because of the extensive internal bracing. It turned out that the bracing only got in the way of the top tweeter's right bracket on each SRS. I also did not need to completely disassemble the speakers. I only removed the tweeters and the lowest row of drivers. The drivers were removed to gain access to a shelf below them that caught the drilling dust (figure 17). The bracket installation for the SRS's took 3 hours.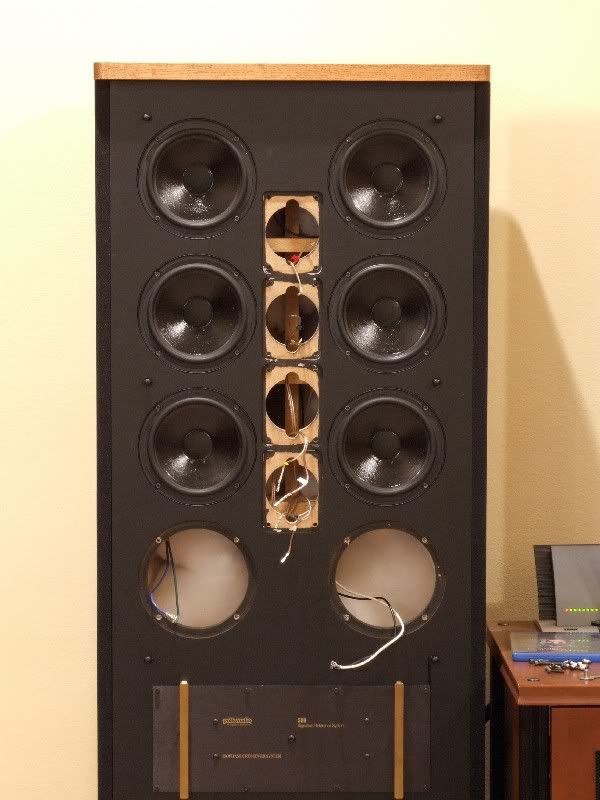
Figure 17. The SRS's only had to get 25% naked for their tweeter bracket install.
If you leave your drivers in place while drilling, cover them to prevent sawdust getting trapped on the driver's sticky cone surface.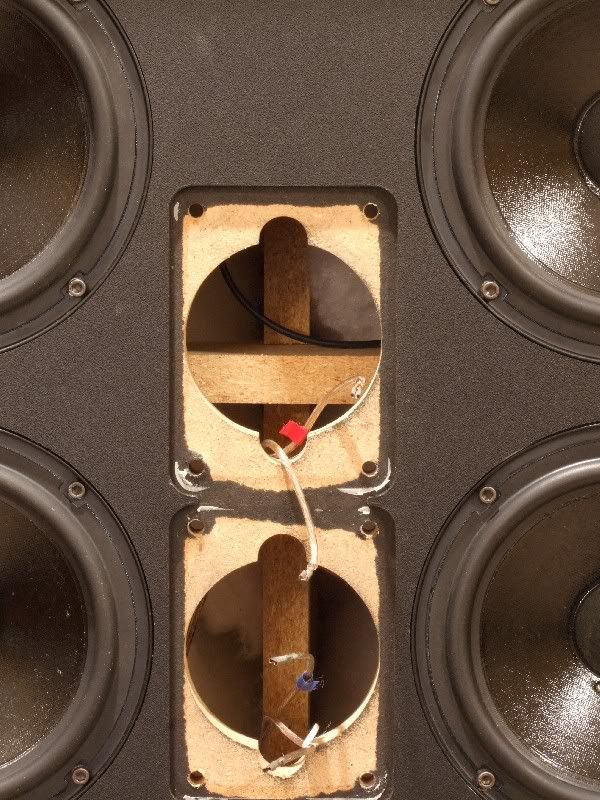
Figure 18. The only brace the got in the way was the one behind tweeter #1on both speakers. It
interfered with the placement of the top right brackets on both speakers.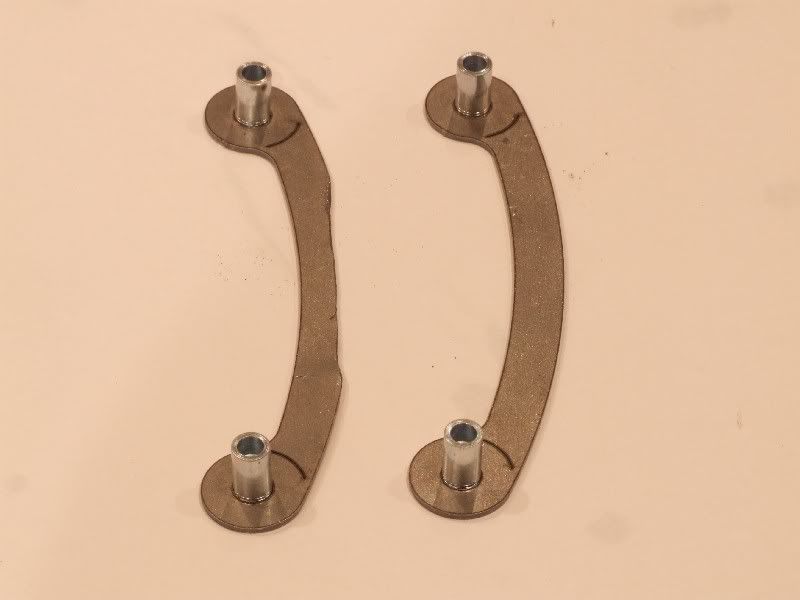
Figure 19. A 1/8th" notch was cut into the top right bracket of both SRS's to clear the brace behind tweeter #1.
Discussion of Results
Enclosure materials for loudspeakers fall into the three general categories of plastic, metal and wood. The ideal loudspeaker enclosure is one that is acoustically inert and that securely holds the drivers and tweeters without flexing. We want an enclosure that does not "ring" or re-radiate sound waves that color the sound coming from the drivers and tweeters.
Plastics which exhibit ideal physical properties for high quality loudspeakers are very expensive. Metal is inexpensive and sturdy, but it rings...like a bell. The ringing can damped, but this adds additional time and expense to manufacturing. Wood products (particle board or medium density fiberboard (MDF)) are inexpensive, easily worked and have good vibration damping qualities, but they do flex and do not hold drivers and tweeters as tightly as hard plastics and metals. Indeed, two common problems with wood baffles is the stripping of screw hole threads and the requirement to periodically re-tighten retaining screws.
A wood baffle coupled with metal retaining rings offers the best of both worlds. Driver or tweeter kinetic energy that was formerly "eaten up" by the flexing and coloration production at the driver or tweeter rim/speaker baffle interface is greatly diminished by maintaining a constant rigid interface among the driver or tweeter rim, retaining screws and metal retaining ring. The retaining metal is not a source of ringing due to being very small in relation to the size of the baffle and due to being held tightly against the baffle. Metal screws secured to metal typically do not require periodic re-tightening.
The tweeter rings made the biggest difference in my SDA SRS 1.2TL's:
1. Enhanced SDA effect,
2. Enhanced bass growls, , bass weight, bass definition and bass clarity,
3. Enhanced tactile sensation,
4. Enhanced high frequency clarity and definition,
5. Enhanced vocal clarity.
We must be cognizant of the fact that the tweeter brackets came into the picture after the following resonance abatement measures:
1. A monoccoque cabinet design specifically aimed at reducing cabinet resonance,
2. Steel retaining rings for the drivers and passive radiators,
3. Mortite speaker seals,
4. Dynamat Xtreme vibration damping foil.
As always, individual results will vary due to the particular SDA speaker, associated equipment, room acoustics, music preferences, etc.Proud and loyal citizen of the Digital Domain and Solid State Country! -
The tweeter plates (the big flat ones) are just for mounting the rear brackets (and drilling through the old wood screw holes), right?polkaudio Monitor 5 Series II
polkaudio SDA-1 (with the SL1000)
TEAC AG-H300 MK III stereo receiver
beyerdynamic DT-880 Premium (600 Ω) headphones
SENNHEISER HD-555 headphones
Little Dot MK IV tube headphone amp
Little Dot DAC_I balanced D/A converter -
Correct.Proud and loyal citizen of the Digital Domain and Solid State Country!
-
Very nice write-up DarqueKnight! Seeing what you had to do makes me glad I just have 2B's! LOL Thanks for your post.Sunfire Theater Grand IV
Sunfire Cinema Grand Signature
SRS 2.1TL
SDA 2BTL's
CSiA6
FXiA4
FXiA6
SDA 2A's
Monitor 10A's
http://www.douglasconnection.com -
helipilotdoug wrote: »Very nice write-up DarqueKnight! Seeing what you had to do makes me glad I just have 2B's! LOL Thanks for your post.
You know that ain't true")
-
TOOLFORLIFEFAN wrote: »You know that ain't true
LOL, Yeah you know it. Those SRS's are almost wood producing, even for a old guy like me. Sunfire Theater Grand IV
Sunfire Cinema Grand Signature
SRS 2.1TL
SDA 2BTL's
CSiA6
FXiA4
FXiA6
SDA 2A's
Monitor 10A's
http://www.douglasconnection.com -
Some of you who already have or are planning to install SDA driver/PR rings and tweeter brackets AND who have, or have access to, a planar magnetic speaker, I would like to you compare the midrange and high frequency clarity of your ringed and bracketed SDA's to the planar speaker.
There are many planar speaker owners, such as myself, who are also SDA owners. We love the imaging and bass slam qualities of SDA's and we love the sweet, clear midrange of planar speakers. It would be great to have a speaker that had all three.
After I installed the rings and brackets AND after I did some behind-the-speakers wall treatments, one of the things I was struck by was the dramatic increase in midrange and high frequency clarity. I thought what I was hearing was as good as what I had heard from some planar magnetic speakers.
I have a pair of Magneplanar MG12's in my master bedroom system that are coupled with a Polk MicroPro 4000 subwoofer. I have always preferred the MG12's crystal clear midrange presentation to that of my 1.2TL's. Now, the midrange clarity of my 1.2TL's is equivalent to that of the MG12's, with the added benefit that the midrange of the 1.2TL's is clear and heavy compared to the clear and lighter-weight presentation of the MG12's
In the future, when I am more dedicated to audio than I am now, I am going to borrow a large pair of planar speakers of comparable size to my 1.2TL's and do a direct comparison.:)helipilotdoug wrote: »Seeing what you had to do makes me glad I just have 2B's!
All the drilling, cutting and grinding was fun because I had efficient tools and I knew I was going to be well rewarded.:)Proud and loyal citizen of the Digital Domain and Solid State Country! -
Lol.CTC BBQ Amplifier, Sonic Frontiers Line3 Pre-Amplifier and Wadia 581 SACD player. Speakers? Always changing but for now, Mission Argonauts I picked up for $50 bucks, mint.
-
All the drilling, cutting and grinding was fun because I had efficient tools and I knew I was going to be well rewarded.:)[/QUOTE]
Fabulous work! Really enjoyed the photos but, as I've said a number of times...too many years of not working with my 'hands' make me cringe when I think of all the tools, time and trouble involved here?
Different people, different talents. It's all good.
I would, it goes without saying, 'love' to hear those--though!
cnhCurrently orbiting Bowie's Blackstar.!
Polk Lsi-7s, Def Tech 8" sub, HK 3490, HK HD 990 (CDP/DAC), AKG Q701s
[sig. changed on a monthly basis as I rotate in and out of my stash] -
I need to get on the Ball here, and I'm the one who made them...LOL
Just think Ray I have Vicariously molested your speakers three times now..LOL -
TOOLFORLIFEFAN wrote: »I need to get on the Ball here, and I'm the one who made them...LOL
Cobbler's kids have no shoes.TOOLFORLIFEFAN wrote: »Just think Ray I have Vicariously molested your speakers three times now..LOL
They seemed to like it.;)Proud and loyal citizen of the Digital Domain and Solid State Country! -
Raife,
I am suprised (in a very positive way) at your findings of the tweeter bracket installation sound improvement results. Like you I was expecting to just have a better way of fastening the tweeter to the cabinet (i.e. no threat of stripping the wood). But I am pleased to hear that along with this, they also give better high end clarity, imaging, and definition.
I have yet to recieve my brackets so I have not heard the results of installing them yet. Based on your findings (which have so far been very accurate to what I hear as well) I cannot wait to install them and hear the results. Thank you for the review and excellent write up.
Greg
Taken from a recent Audioholics reply regarding "Club Polk" and Polk speakers:
"I'm yet to hear a Polk speaker that merits more than a sentence and 60 seconds discussion."
My response is: If you need 60 seconds to respond in one sentence, you probably should't be evaluating Polk speakers.....
"Green leaves reveal the heart spoken Khatru"- Jon Anderson
"Have A Little Faith! And Everything You'll Face, Will Jump From Out Right On Into Place! Yeah! Take A Little Time! And Everything You'll Find, Will Move From Gloom Right On Into Shine!"- Arthur Lee -
Greg,
I have yet to do mine as well, hope to do them this weekend. Your package should be there Thursday.... -
As much as you seem to enjoy "toys", I'm a little surprised you didn't go out and buy a plasma cutter for doing the modifications!!:D
-
gonna be doing this soon to my SDA SRS 2.3TL's.
good info and i know its gonna help me out. THANKS!
im getting the rings from Larry, ordering RD0-198's from Polk, getting the Mortite from Home Depo, grille cloth from speakerworks,com and Dynamat from ebay(not sure how much to get tho) so im just gonna order the mega pack http://cgi.ebay.com/ebaymotors/NEW-Dynamat-Xtreme-Mega-Pack-10465-Sound-Dampening-Kit-_W0QQcmdZViewItemQQitemZ300456449901QQptZCarQ5fAudioQ5fVideo ill find use for the extra somewhere.
anything else im forgetting? still looking for a set of spare crossovers to send to Face/mole' -
) so im just gonna order the mega pack http://cgi.ebay.com/ebaymotors/NEW-Dynamat-Xtreme-Mega-Pack-10465-Sound-Dampening-Kit-_W0QQcmdZViewItemQQitemZ300456449901QQptZCarQ5fAudioQ5fVideo ill find use for the extra somewhere.
Hey Mole', Just to let you know, I've done 8 MW's and 4 PR's on my SDA 2A and B speakers, with 1 sheet of Dynamat, and still have enough left over to do my Monitor 10's. Unless you really need that much Dynamat for other projects, you might consider a smaller pack. Just my $0.02 worth.Sunfire Theater Grand IV
Sunfire Cinema Grand Signature
SRS 2.1TL
SDA 2BTL's
CSiA6
FXiA4
FXiA6
SDA 2A's
Monitor 10A's
http://www.douglasconnection.com -
helipilotdoug wrote: »Hey Mole', Just to let you know, I've done 8 MW's and 4 PR's on my SDA 2A and B speakers, with 1 sheet of Dynamat, and still have enough left over to do my Monitor 10's. Unless you really need that much Dynamat for other projects, you might consider a smaller pack. Just my $0.02 worth.
Same here; used less than one sheet to do 16 MWs and 2 PRs in my 1.2 TLs. I have three sheets left over and have used them to line the innerds of various gear. The underside of the plinth of my TT is next. I may, if I can get the piece of Dynamat perfectly round, is to place it on the underside of my platter.
Get the large pack as there are lots of uses for it. F1nut has used it on things that I wouldn't even dream of with great sucess. PM him and ask him all the uses he's found for it. -
helipilotdoug wrote: »Hey Mole', Just to let you know, I've done 8 MW's and 4 PR's on my SDA 2A and B speakers, with 1 sheet of Dynamat, and still have enough left over to do my Monitor 10's. Unless you really need that much Dynamat for other projects, you might consider a smaller pack. Just my $0.02 worth.
thats it? damn. you just saved me some $$$ then. ill get the medium pack just so i have a few sheets left over. thankshearingimpared wrote: »Same here; used less than one sheet to do 16 MWs and 2 PRs in my 1.2 TLs. I have three sheets left over and have used them to line the innerds of various gear. The underside of the plinth of my TT is next. I may, if I can get the piece of Dynamat perfectly round, is to place it on the underside of my platter.
Get the large pack as there are lots of uses for it. F1nut has used it on things that I wouldn't even dream of with great sucess. PM him and ask him all the uses he's found for it. mole' -
DarkKnight I am new to the forum, about six months of reading and 3 months of being a member. I have spent a lot of time searching old posts and I have to say that your project and review posts are incredible.
I don't know what you do for a living but obviously you are talented enough to have many careers. Why don't companies employ people like yourself to make installation and operation guides that can write in english and have relevant photos or drawings to illustrate the process.
You added a new word to my vocabulary today also:
monocoque: 1 : a type of construction (as of a fuselage) in which the outer skin carries all or a major part of the stresses. Now that's cool.
Keep up the good work. It is appreciated. -
still looking for a set of spare crossovers to send to Face/
You'll still be looking 30 years from now. Send Face the ones out of your speakers.Political Correctness'.........defined
"A doctrine fostered by a delusional, illogical minority and rabidly promoted by an unscrupulous mainstream media, which holds forth the proposition that it is entirely possible to pick up a t-u-r-d by the clean end."
President of Club Polk -
Ok, my $.02 on the tweeter bracket installs.
The install for my 4.1TL's (CRS+) was straight forward, nothing to it. The install for my 2.3TL's was a little more involved. I ran into the same issue Raife had with the cabinet bracing. Instead of cutting or grinding the metal on the tweeter brackets I used a razor sharp butt chisel to remove a small amount of the cabinet brace were it meets the front bezel. I started about 3/4" back on the cabinet brace, on a slight inward angle, moving towards the front bezel. The object is to remove a small triangular shaped area on the cabinet brace allowing the tweeter brackets to be easily installed. The amount of cabinet brace material that is removed is too small to cause a concern and this method is much faster than cutting each tweeter bracket.
~This is important~
You may be tempted, as I was, to torque down on the screws like you did with the driver rings, DO NOT. On the first tweeter install in my 4.1TL's I ended up cracking the plastic tweeter bezel on one corner, just a little, before I realized what had happened. The cracking didn't go all the way thru and I don't think it will have a negative impact, but I'm anal, so a new tweeter will be installed. After that I set the torque on my screw gun to the second from the lowest setting, which is about the same as hand snug with a regular screwdriver. I had no further issues.
After all was said and done, I sat down for a listen. I did not notice any sound improvements from the tweeter bracket install, but I feel better knowing that I will never have to worry about stripping out the screw holes in the front bezel again. That alone is worth the cost and effort.
Once again, a huge thank you to Larry for making this all possible.Political Correctness'.........defined
"A doctrine fostered by a delusional, illogical minority and rabidly promoted by an unscrupulous mainstream media, which holds forth the proposition that it is entirely possible to pick up a t-u-r-d by the clean end."
President of Club Polk -
You'll still be looking 30 years from now. Send Face the ones out of your speakers.
was worth a try ya know.Ok, my $.02 on the tweeter bracket installs.
The install for my 4.1TL's (CRS+) was straight forward, nothing to it. The install for my 2.3TL's was a little more involved. I ran into the same issue Raife had with the cabinet bracing. Instead of cutting or grinding the metal on the tweeter brackets I used a razor sharp butt chisel to remove a small amount of the cabinet brace were it meets the front bezel. I started about 3/4" back on the cabinet brace, on a slight inward angle, moving towards the front bezel. The object is to remove a small triangular shaped area on the cabinet brace allowing the tweeter brackets to be easily installed. The amount of cabinet brace material that is removed is too small to cause a concern and this method is much faster than cutting each tweeter bracket.
~This is important~
You may be tempted, as I was, to torque down on the screws like you did with the driver rings, DO NOT. On the first tweeter install in my 4.1TL's I ended up cracking the plastic tweeter bezel on one corner, just a little, before I realized what had happened. The cracking didn't go all the way thru and I don't think it will have a negative impact, but I'm anal, so a new tweeter will be installed. After that I set the torque on my screw gun to the second from the lowest setting, which is about the same as hand snug with a regular screwdriver. I had no further issues.
After all was said and done, I sat down for a listen. I did not notice any sound improvements from the tweeter bracket install, but I feel better knowing that I will never have to worry about stripping out the screw holes in the front bezel again. That alone is worth the cost and effort.
Once again, a huge thank you to Larry for making this all possible.
thanks for the info. gonna come in handy here soon when i start minemole' -
Ok, my $.02 on the tweeter bracket installs.
The install for my 4.1TL's (CRS+) was straight forward, nothing to it. The install for my 2.3TL's was a little more involved. I ran into the same issue Raife had with the cabinet bracing. Instead of cutting or grinding the metal on the tweeter brackets I used a razor sharp butt chisel to remove a small amount of the cabinet brace were it meets the front bezel. I started about 3/4" back on the cabinet brace, on a slight inward angle, moving towards the front bezel. The object is to remove a small triangular shaped area on the cabinet brace allowing the tweeter brackets to be easily installed. The amount of cabinet brace material that is removed is too small to cause a concern and this method is much faster than cutting each tweeter bracket.
~This is important~
You may be tempted, as I was, to torque down on the screws like you did with the driver rings, DO NOT. On the first tweeter install in my 4.1TL's I ended up cracking the plastic tweeter bezel on one corner, just a little, before I realized what had happened. The cracking didn't go all the way thru and I don't think it will have a negative impact, but I'm anal, so a new tweeter will be installed. After that I set the torque on my screw gun to the second from the lowest setting, which is about the same as hand snug with a regular screwdriver. I had no further issues.
After all was said and done, I sat down for a listen. I did not notice any sound improvements from the tweeter bracket install, but I feel better knowing that I will never have to worry about stripping out the screw holes in the front bezel again. That alone is worth the cost and effort.
Once again, a huge thank you to Larry for making this all possible.
This sounds like it's going to be a big project with 8 tweeters in the 1.2TLs. -
I realize this is an old thread, but I had some ?'s concerning the tweeter brackets and driver rings. I'm going to order a set of rings from Larry for my 2.3TL's, but I'm not sure if the tweeter brackets will be in the budget and am a little concerned with trying to make them fit inside the cabs.
F1- do you happen to have and pics of how you shaved the brace to make room for the brackets?
Also- I'm a little confused as to the reference of using the mortite and/or aramaflex and the rings. I thought you would use one method or the other. Are you using Larry's rings and the mortite to seal the drivers and or pass radiators? Again pics would be very helpful to see in use.
Thanks for any input guys I appreciate your knowledge and help.
Travis2-ch System: Parasound P/LD 2000 pre, Parasound HCA-1000 amp, Parasound T/DQ Tuner, Phase Technology PC-100 Tower speakers, Technics SL-1600 Turntable, Denon 2910 SACD/CD player, Peachtree DAC iT and X1asynchorus USB converter, HSU VTF-3 subwoofer. -
Sorry, no pics.
As long as the original gaskets are not damaged, you don't need to change them. Whatever you do, do not use Mortite.Political Correctness'.........defined
"A doctrine fostered by a delusional, illogical minority and rabidly promoted by an unscrupulous mainstream media, which holds forth the proposition that it is entirely possible to pick up a t-u-r-d by the clean end."
President of Club Polk -
We must be cognizant of the fact that the tweeter brackets came into the picture after the following resonance abatement measures:
1. A monoccoque cabinet design specifically aimed at reducing cabinet resonance,
2. Steel retaining rings for the drivers and passive radiators,
3. Mortite speaker seals,
4. Dynamat Xtreme vibration damping foil.
As always, individual results will vary due to the particular SDA speaker, associated equipment, room acoustics, music preferences, etc.
^from DK
This is what has me confused. Did he use mortite ininially and then remove all that gasket material when he switched to Larry's rings?2-ch System: Parasound P/LD 2000 pre, Parasound HCA-1000 amp, Parasound T/DQ Tuner, Phase Technology PC-100 Tower speakers, Technics SL-1600 Turntable, Denon 2910 SACD/CD player, Peachtree DAC iT and X1asynchorus USB converter, HSU VTF-3 subwoofer. -
Did he use mortite ininially and then remove all that gasket material when he switched to Larry's rings?
Yes.Political Correctness'.........defined
"A doctrine fostered by a delusional, illogical minority and rabidly promoted by an unscrupulous mainstream media, which holds forth the proposition that it is entirely possible to pick up a t-u-r-d by the clean end."
President of Club Polk -
Thanks F1- just posted a request for the rings in Larry's thread right under where he has yours boxed up and ready to go:cheesygrin:2-ch System: Parasound P/LD 2000 pre, Parasound HCA-1000 amp, Parasound T/DQ Tuner, Phase Technology PC-100 Tower speakers, Technics SL-1600 Turntable, Denon 2910 SACD/CD player, Peachtree DAC iT and X1asynchorus USB converter, HSU VTF-3 subwoofer.
-
Nothing wrong with Mortite, it's a personal preference. I have had nothing but great results with it.
As is obvious YMMV
H9"Appreciation of audio is a completely subjective human experience. Measurements can provide a measure of insight, but are no substitute for human judgment. Why are we looking to reduce a subjective experience to objective criteria anyway? The subtleties of music and audio reproduction are for those who appreciate it. Differentiation by numbers is for those who do not".--Nelson Pass Pass Labs XA25 | EE Avant Pre | Holo Audio Cyan 2 Dac | MIT Shotgun S1 | Puritan Audio PSM136 Pwr Condtioner & Classic PC's | Legend L600 | Roon Nucleus 1 w/LPS - Tubes add soul! -
I realize this is an old thread, but I had some ?'s concerning the tweeter brackets and driver rings. I'm going to order a set of rings from Larry for my 2.3TL's, but I'm not sure if the tweeter brackets will be in the budget and am a little concerned with trying to make them fit inside the cabs.
F1- do you happen to have and pics of how you shaved the brace to make room for the brackets?
Also- I'm a little confused as to the reference of using the mortite and/or aramaflex and the rings. I thought you would use one method or the other. Are you using Larry's rings and the mortite to seal the drivers and or pass radiators? Again pics would be very helpful to see in use.
Thanks for any input guys I appreciate your knowledge and help.
Travis
Here is a link to my installation of the rings in my 5B's. You can clearly see the Mortite in the photo's. Absolutely no issues.
http://www.polkaudio.com/forums/showthread.php?121653-Installing-Driver-Support-Rings-on-5B-s"Appreciation of audio is a completely subjective human experience. Measurements can provide a measure of insight, but are no substitute for human judgment. Why are we looking to reduce a subjective experience to objective criteria anyway? The subtleties of music and audio reproduction are for those who appreciate it. Differentiation by numbers is for those who do not".--Nelson Pass Pass Labs XA25 | EE Avant Pre | Holo Audio Cyan 2 Dac | MIT Shotgun S1 | Puritan Audio PSM136 Pwr Condtioner & Classic PC's | Legend L600 | Roon Nucleus 1 w/LPS - Tubes add soul!