Oh my, something magical has happened to my SDA's

nspindel
Posts: 5,343
If anyone has had any doubts about modifying your SDA's, stop. STOP THAT SILLY ARGUMENT YOU'RE HAVING WITH YOURSELF!!!! If you know your way around a soldering iron, and you have some cash to spend (or a credit card with any room on it...) then you have no excuses. Do these upgrades. You will not believe what comes out of your old speakers when you're done....
First off, I want to apologize to F1nut for not following his advice. He told me to do this in stages, so I could understand the nuances of the changes I've made. I didn't take his advice, and I did it all at once. He is right in that I really can't specifically identify which changes had more impact than others, because I've done them all at once. So if you want to do this right then do as F1 says, not as I do.
Ok, so what did I do??? I have a pair of 1988 SDA-2B's. I did a few things to them:
1) I rebuilt my crossovers with Sonicap Gen I capacitors, a Mills resistor, and a new inductor.
2) Modified the crossover, adding a 5.8uF cap, so that I could upgrade the tweeter from the SL2000/RD0194-1 to the RD0198-1.
3) Upgraded to the RD0198-1 that I'm now able to use because of the above modification.
4) Constructed a custom SDA interconnect to replace the stock pin-blade connector.
5) Replaced the binding posts with Cardas CCGR-S, including a new post for the custom interconnect.
The results.... are nothing short of breathtaking. I've never been one who's all that great at elequant prose describing something I taste, smell, or hear. I love great wines. But while others might be able to recite an impromptu soliloquoy of the earthiness on the nose, the taste of black currants in the back of the pallatte, followed by a rich chocolaty finish, I usually say, "Yummm! That's AWESOME!!!!" So forgive me if I can't adequately describe with my keyboard what I'm hearing with my ears. But what I'm hearing with my ears is just SOOOOOO good.....
When I first powered everything up after the mods, it didn't sound all that great. I wasn't expecting it to. The threads talking about these mods all warn that initial response is surprisingly poor, and that break-in time is an absolute necessity. At first, the highs were quite tinny and the bass was extremely thin. However, I was expecting this to last a long time - it's been detailed that these mods can take 200-400 hours to burn in. This may well be the case, but the amount of improvement that happened in the first 2 hours was incredible. I've got (maybe) 5 hours on them now, and if they're just going to keep getting better from here, then I'm in for a real treat....
Ok, so that's it for the intro first post. Next come some pictures!
Good music, a good source, and good power can make SDA's sing. Tubes make them dance.
Post edited by nspindel on
Comments
-
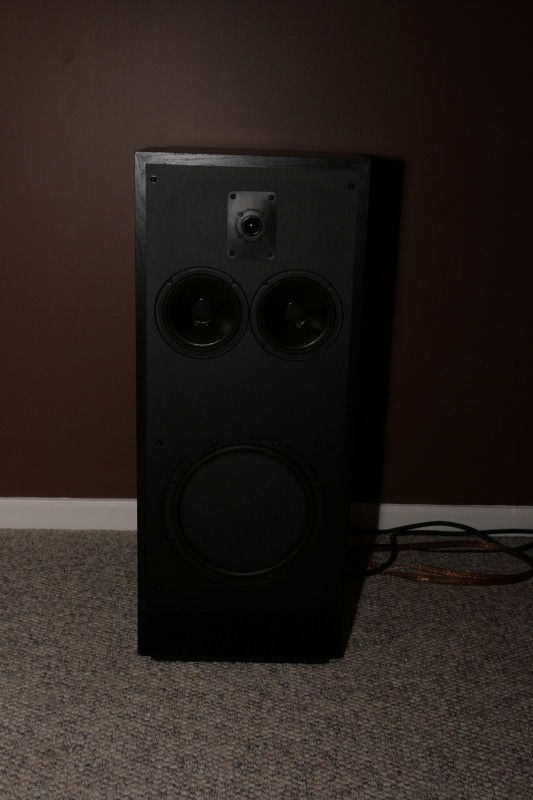
Ok, first here is what I started with. This is the SDA-2B:
If you unscrew the passive radiator (yes, it's really passive, there are no wires attached to it), the crossover is revealed: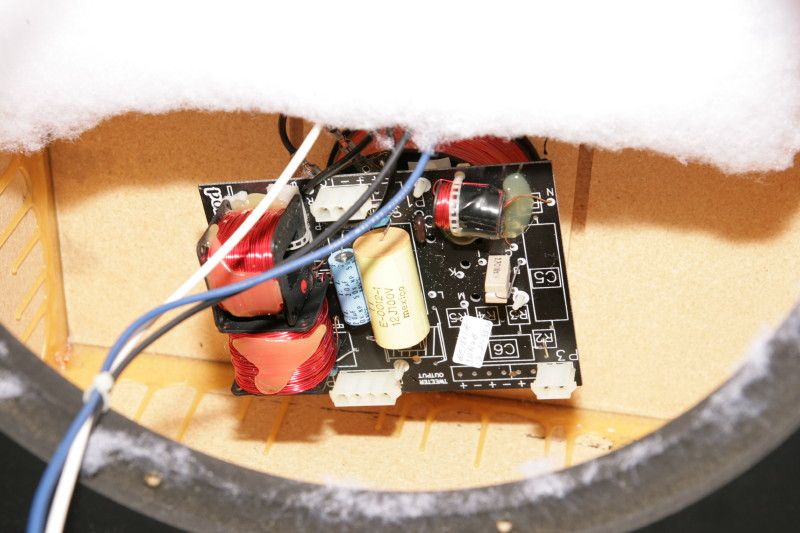 Good music, a good source, and good power can make SDA's sing. Tubes make them dance.
 -
Any pics of the upgraded crossover?Please. Please contact me a ben62670 @ yahoo.com. Make sure to include who you are, and you are from Polk so I don't delete your email. Also I am now physically unable to work on any projects. If you need help let these guys know. There are many people who will help if you let them know where you are.
Thanks
Ben -
There are three quick connects attached to the crossover - one to the mid/woofers, one to the tweeter, and one to the binding posts. Detach the three connectors - no need to mark anything. They are all sized differently and can only be connected one way.
The crossover mounts to the rear of the cabinet with a single bolt. With one hand, reach in and hold the crossover. With your other hand, loosen the bolt with a 5/32" allen wrench. Hold the crossover carefully, and when it the bolt is fully disengaged, pull it from the cabinet. Do this to both speakers. When you're done, you'll have two of these:
I chose to use Sonicaps and Mills. Others have had great with results with other manufacturers. Read the threads, do your homework, price the parts, and decide which way you're going to go....
First word of advice. DO ONE AT A TIME!!!! Don't take both crossovers apart at the same time. If something goes wrong, you want to have the other one intact to refer back to if you have to reassemble the stock parts. Speaking of parts.... Here is what you need for the crossover mod (does this picture look familiar MillerLiteScott???):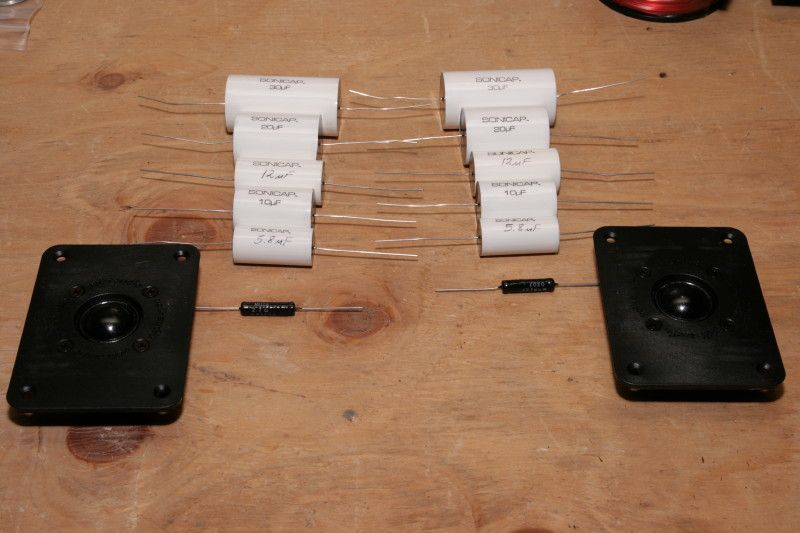 Good music, a good source, and good power can make SDA's sing. Tubes make them dance.
 -
Any pics of the upgraded crossover?
Dude, gimme a chance, I'm typing as fast as I can Good music, a good source, and good power can make SDA's sing. Tubes make them dance.
 -
Now is when you start pulling things off the circuit board. Best advice I got throughout the whole project is that de-soldering is tricky stuff. Go to Radio Shack, spend $10.99, and buy yourself a DE-soldering iron, emphasis on the DE!!! It makes removing the old parts so much easier than fooling around with a separate desoldering bulb or desoldering wick. A dedicated de-soldering iron is the only way to go.
Here's what I pulled off: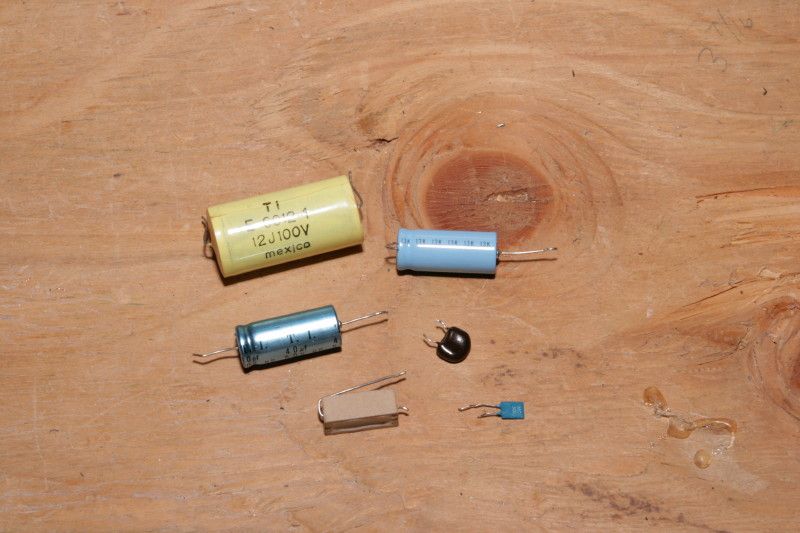
Soniccraft doesn't have a 40uF cap, so you need a 30 and a 10. Can you believe the two caps on the left combined equal the one on the right???: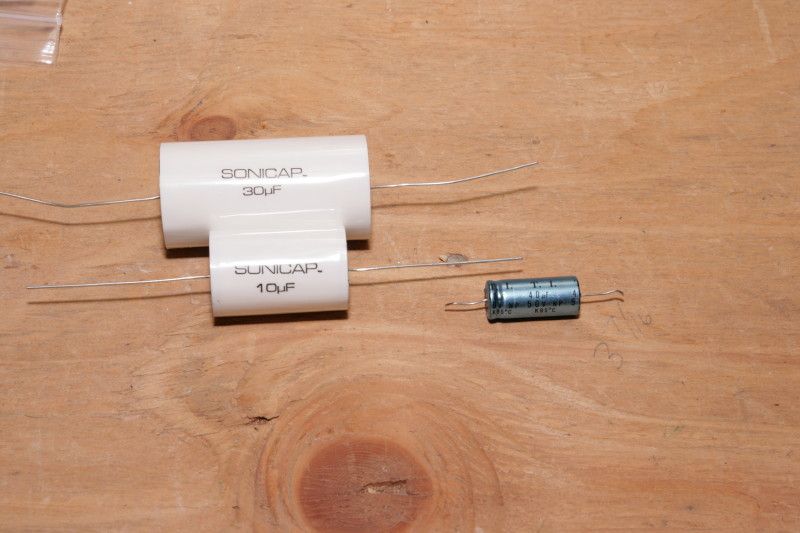 Good music, a good source, and good power can make SDA's sing. Tubes make them dance.
 -
Soniccraft doesn't have a 40uF cap, so you need a 30 and a 10. Can you believe the two caps on the left combined equal the one on the right???:
Yes. Carry on:D
2 20's would have been fine too.Please. Please contact me a ben62670 @ yahoo.com. Make sure to include who you are, and you are from Polk so I don't delete your email. Also I am now physically unable to work on any projects. If you need help let these guys know. There are many people who will help if you let them know where you are.
Thanks
Ben -
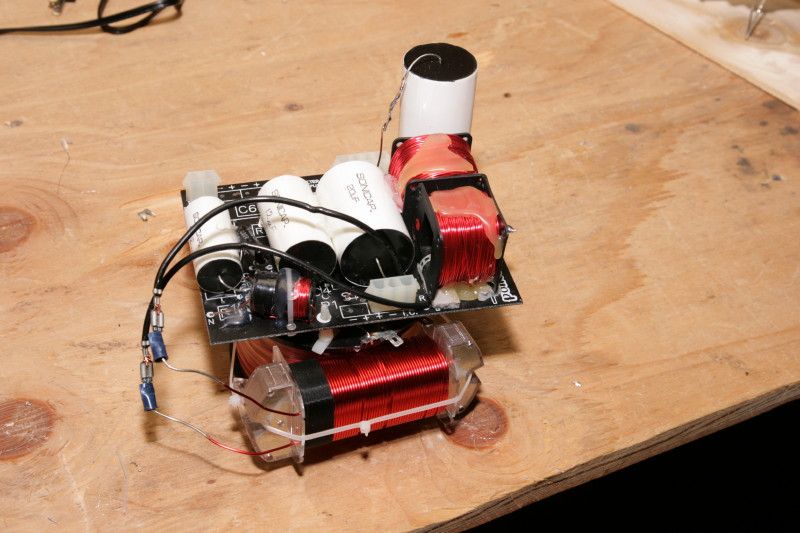
You're basically replacing the parts one-one, with two exceptions. The 40uF as described above requires a 30 and a 10 in parallel. There's not enough room on the board, so the 30 is mounted on top, and the 10 is mounted onto the leads of the 30 underneath the board. Use plenty of hot glue to hold it all in place. Also, the top lead on the 30, which needs to stand up vertically, won't be long enough, so you need to solder on a lead extender. I used 18g solid copper.
Quoting F1nut in another thread:
To do the "TL" upgrade do as above adding a 5.8uF Sonicap (custom value) in the C5 position, running the one lead into the H hole and the other lead into the C5 hole closest to R2.
EDIT: One thing to note is that on my crossovers, the H hole was covered up by the hot glue from the small corner inductor. Carefully pry the glue off to expose the H hole.
As he mentions the 5.8uF is a custom value, it's not part of their stock parts list but they will make it for you (by the way, "they" is Sonic Craft, at http://www.soniccraft.com. Fantastic customer service.)
The little brown cap in the picture of the parts I pulled is the bypass cap. The advice on other threads is that when using high quality caps like the Sonicaps, the bypass cap is no longer needed. I did not use one, and am certainly not hearing anything to make me regret that decision.
The beige rectangular piece is the 2.7ohm resistor. I replaced this with a 12w Mills.
The tiny blue piece is the polyswitch, which disables the tweeters if your amp starts clipping. This is noted to degrade sound quality. So if you're using a high quality amp and don't push the volume to the point of clipping, pull this piece and replace it with a jumper (I used 18g solid copper here as well). If you've tripped the polyswitch in the past, probably better to replace it. Get a new one from Polk, I believe they're free....
I also replaced the main inductor. On my meter the stock inductor measures 3.2 ohms. Parts Express sells a 15mH iron core inductor at .5 ohms. I didn't remove the old inductor, as this is how the assembly mounts to the cabinet. I simply disconnected it, crimped on some 3/16" male disconnects to the new inductor, and connected it. I hot-glued it to the old inductor and wrapped it up with a cable tie.Good music, a good source, and good power can make SDA's sing. Tubes make them dance. -
Yes. Carry on:D
2 20's would have been fine too.
Yes, but the 30 has the cool factor because it's HUGE!!!!Good music, a good source, and good power can make SDA's sing. Tubes make them dance. -
Ok, Ben is up past his bedtime, and he's been waiting so patiently to see what the final result looks like, so here it is:

The undermount cap is a bit of a hack, but that's what ya gotta do:
My advice - don't pack one of these in your carry-on luggage on an airplane.Good music, a good source, and good power can make SDA's sing. Tubes make them dance. -
Congrats; you'll love it. And yes, they will keep getting better and better for at least 200 hours, specially in the bass arena._________________________________________________
***\\\\\........................... My Audio Journey ............................./////***
2008 & 2010 Football Pool WINNER
SOPAThank God for different opinions. Imagine the world if we all wanted the same woman -
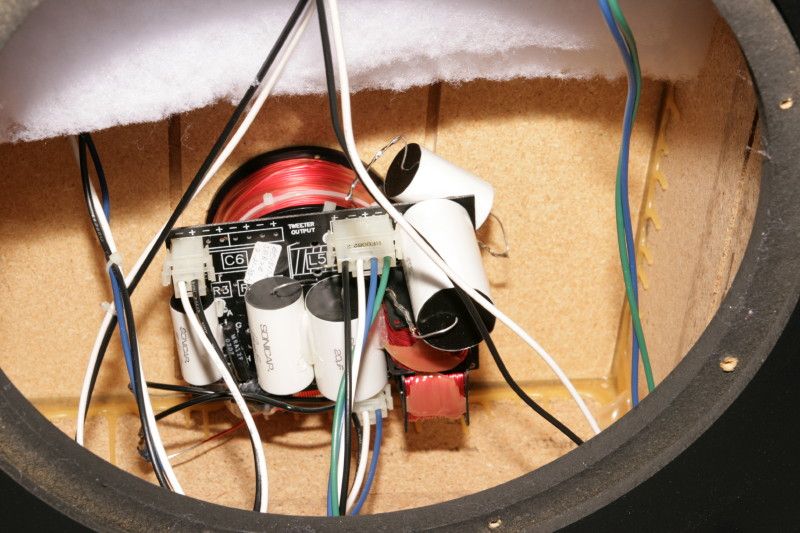
Now, CAREFULLY mount it back inside the cabinet:
 Good music, a good source, and good power can make SDA's sing. Tubes make them dance.
 -
At this point, you want to do the tweeter swap if you've done the "TL" upgrade. Test it out, make sure she's makin' music out of all three drivers. Assuming yes, repeat the process for the other speaker.
And away you go!!!!
EDIT: One thing to note is that the ground male disconnect tab on the RD0198-1 is larger than on the SL1000/SL2000/RD0194-1. The old one was 1/8". Ken at Polk told me the ground tab on the 198 was 3/16". So I bought some 3/16" female crimp-on disconnects to replace the one on the tweeter lead. Turns out it's actually slightly larger than 3/16", so the disconnect didn't fit. Screw it, I just soldered it...Good music, a good source, and good power can make SDA's sing. Tubes make them dance. -
Very nice. I was just having fun with you. I also used the Urse inductor. It helped the bass slam quit a bit. Make sure you attach that heavy inductor very securely. A loose inductor of that magnitude could cause a short circuit, and blow an amp.
Again nice job
BenPlease. Please contact me a ben62670 @ yahoo.com. Make sure to include who you are, and you are from Polk so I don't delete your email. Also I am now physically unable to work on any projects. If you need help let these guys know. There are many people who will help if you let them know where you are.
Thanks
Ben -
Nice Job. . . it took mine 340 hours before I could realize all of the performance availible.
-
Awesome detailing of this procedure! I have some SDAs almost identical to yours (2As), so as soon as I get some free cash I'll be doing this. If you don't mind me asking, how much did all the parts (less the tweets) cost you?
-
Ben, there's not enough room on the underside to mount a 20uF, at least properly.Political Correctness'.........defined
"A doctrine fostered by a delusional, illogical minority and rabidly promoted by an unscrupulous mainstream media, which holds forth the proposition that it is entirely possible to pick up a t-u-r-d by the clean end."
President of Club Polk -
what did the parts cost?
I am dumb, this doesn't look like a match?Dodd - Battery Preamp
Monarchy Audio SE100 Delux - mono power amps
Sony DVP-NS999ES - SACD player
ADS 1230 - Polk SDA 2B
DIY Stereo Subwoofer towers w/(4) 12 drivers each
Crown K1 - Subwoofer amp
Outlaw ICBM - crossover
Beringher BFD - sub eq
Where is the remote? Where is the $%#$% remote!
"I've always been mad, I know I've been mad, like the most of us have...very hard to explain why you're mad, even if you're not mad..." -
The 2A's have a different circuit, which I don't believe is TL upgradeable.Political Correctness'.........defined
"A doctrine fostered by a delusional, illogical minority and rabidly promoted by an unscrupulous mainstream media, which holds forth the proposition that it is entirely possible to pick up a t-u-r-d by the clean end."
President of Club Polk -
I also did the Cardas binding posts and the custom SDA interconnect. I don't have big enough shrink tube to polish off the interconnect yet, but here's what the finished binding posts look like including the new SDA interconnect terminal. I'm almost embarassed (EDIT: see post 104...) to put this picture up before I do the shrink tubing, but:

I used Monster Z2 for the interconnect, and will be doing my main speaker cables with the same wire. I'm just waiting for the terminators to come in off back-order from Parts Express. They're all out of the Monster Locks, they should be arriving on Jan. 25.
I'm purposely not going into detail on how to do the binding posts or the interconnect, because DarqueNight's already done a perfect job of it here:
http://www.polkaudio.com/forums/showthread.php?t=30467Good music, a good source, and good power can make SDA's sing. Tubes make them dance. -
Ben, there's not enough room on the underside to mount a 20uF.
Is this the real F1nut?
Quick question Jesse. What did value cap did the 5.8uf replace?
Thanks BenPlease. Please contact me a ben62670 @ yahoo.com. Make sure to include who you are, and you are from Polk so I don't delete your email. Also I am now physically unable to work on any projects. If you need help let these guys know. There are many people who will help if you let them know where you are.
Thanks
Ben -
Do you already have the monster cable speaker wires?Please. Please contact me a ben62670 @ yahoo.com. Make sure to include who you are, and you are from Polk so I don't delete your email. Also I am now physically unable to work on any projects. If you need help let these guys know. There are many people who will help if you let them know where you are.
Thanks
Ben -
It didn't replace anything. The C5 position on the stock board is empty.Political Correctness'.........defined
"A doctrine fostered by a delusional, illogical minority and rabidly promoted by an unscrupulous mainstream media, which holds forth the proposition that it is entirely possible to pick up a t-u-r-d by the clean end."
President of Club Polk -
nspindel, how many hours have you put on the speakers?Political Correctness'.........defined
"A doctrine fostered by a delusional, illogical minority and rabidly promoted by an unscrupulous mainstream media, which holds forth the proposition that it is entirely possible to pick up a t-u-r-d by the clean end."
President of Club Polk -
If you're just doing the Sonicaps and the Mills, it was $238.70 from Sonic Craft for both speakers. Subtract $26.80 if you're not doing the "TL" upgrade and don't need the 5.8uF's.
The binding posts are $32/pair. You'd need 2 or 3 pair depending on whether you're doing the SDA interconnect as well.
The inductors were $27.12 each at Parts Express.
The RD0198-1 tweeters are $48/each incl. shipping, plus tax from Polk, but you must mention that you're a Club Polk member.
50 feet of Monster Z2 cable from accessories4less was $64.50 (what a steal....).
The Monster Locks come out to $6.25 per terminal including the pin and the final connector, but you must buy them in sets of 4. So I'll have 2 extra when I finish the speaker cables. Total cost for the terminals (including the 2 spares) $75.
And don't forget your Cardas solder from Sonic Craft - $6!!!
A few bucks for shrink tubing, plus I needed a glue gun ($9.99) and the de-soldering iron ($10.99).
So this was not a cheap project, it was over $600. I had previously upgraded to the RD0194's, which I sold in the FS threads, along with the old SL2000's which I had kept for spares. Selling those four tweeters pretty much made the new 198's a wash. Still not an inexpensive endeavor, but compared to spending the same money on a new pair of speakers in Circuit City.... fugheddaboutit. This blows away anything made today in that price range.Good music, a good source, and good power can make SDA's sing. Tubes make them dance. -
Do you already have the monster cable speaker wires?
I have the wire, I got 50 feet of it from accessories4less. I'm just waiting for the Monster Lock pins/spades from Parts Express.
And I need to find some shrink tube that will fit this stuff, all the shrink tube I have is too small.Good music, a good source, and good power can make SDA's sing. Tubes make them dance. -
nspindel, how many hours have you put on the speakers?
Burning the new stuff in you mean? Maybe 6 or 7. I just finished. And they already sound amazing. If they're going to be better than this as they burn in, then I'm in for one helluva treat....Good music, a good source, and good power can make SDA's sing. Tubes make them dance. -
I'm sure this has been asked and answered before, but is the RD0-198 / TL upgrade significantly better than the RD0-194 tweeter, and if so, why? Thanks.
-
Burning the new stuff in you mean? Maybe 6 or 7. I just finished. And they already sound amazing. If they're going to be better than this as they burn in, then I'm in for one helluva treat....
That's interesting as they should sound like absolute crap right now.Political Correctness'.........defined
"A doctrine fostered by a delusional, illogical minority and rabidly promoted by an unscrupulous mainstream media, which holds forth the proposition that it is entirely possible to pick up a t-u-r-d by the clean end."
President of Club Polk -
Very nice. I was just having fun with you. I also used the Urse inductor. It helped the bass slam quit a bit. Make sure you attach that heavy inductor very securely. A loose inductor of that magnitude could cause a short circuit, and blow an amp.
Again nice job
Ben
It's attached with hot glue to the original inductor, then the whole assembly is wrapped with a cable tie, so should be in good shape. If something comes loose and I blow the amp, well then I have an excuse to get a new amp Good music, a good source, and good power can make SDA's sing. Tubes make them dance.
 -
That's interesting as they should sound like absolute crap right now.
They did for the first 2-3 hours, then came together very quickly. I was amazed at the transition from crap to, well, not crap.
Which leads me to the next point: the sound. Like I said, I'm no Mark Twain when it comes to describing this stuff. But the tweeter makes a huge difference, and I'm coming from the 194, not the plastic dome. The vocals sound much more real, cymbols resonate a lot more, and there's much more detail to the highs. The bass is phenominal. I'm finding that lower-volume listening is much more rewarding. Cranking it up is hugely fun, but I can still hear (and feel) some great bass at lower volume. The "punchiness" is much improved, and there's a lot more reality to the music.
Last night I listened to the Mobile Fidelity version of Muddy Waters Folk Singer. Turned the lights down and closed my eyes. Muddy was alive and in the room with me. I couldn't just hear it, I could feel it. I could "feel" his fingers sliding up and down the fretboard. Just incredible.
The imagining doesn't just feel like a left-right soundstage. It's almost like there's music coming from all over the room. I particularly noticed this with hammond organ. I'm sure this has a lot to do with the interconnect upgrade.
Overall, I have to say that I am blown away by these upgrades, and highly advise anyone considering a project like this to go for it!!!!Good music, a good source, and good power can make SDA's sing. Tubes make them dance.


